Can I fix my battery charger?
 03-27-2008, 09:08 AM
#1
Mopar Fan
Thread Starter

Join Date: Mar 2008
Posts: 42
Likes: 0
Received 0 Likes
on
0 Posts
Can I fix my battery charger?
My friend had installed a new battery about 2 weeks ago. His battery died. I put my multimeter on it, and it had zero volts. I disconnected the battery and checked the ohms across the cables, it was 0 ohms (a short).
With the battery cables disconnected, I measured the voltage again, and noticed the voltage was recovering on it's own, so I figured perhaps the battery will recover with a good charge.
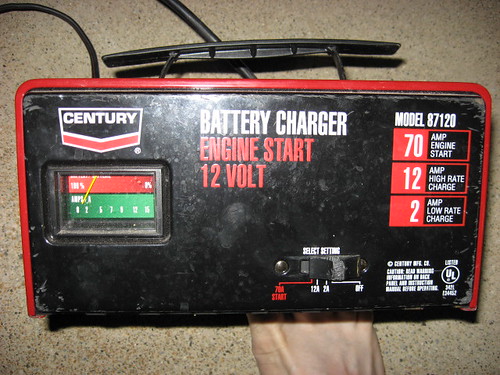
I got my battery charger which is one of those 70/12/2 or something like that, red battery chargers. (it is just like the century brand battery chargers, but it has a different name) I connected it to the battery. The battery wasn't taking much of a charge, which I thought was strange, since the battery was very new and very discharged. I have not worked with a battery that was this heavily discharged before, but usually a "good" battery that has been discharged, will charge at a high rate.
So I decided to try to help it along, I cranked my battery charger to full blast (70 amps), it made quite a loud humming sound then it got very loud and the amps went down to zero. It sounded like I ruined it. Now when I turn on the battery charger, even at the low rate setting with the cables not connected to anything, it just makes a very loud humming sound. I try quickly tapping the cables together, I don't get any spark.
The battery charger is riveted together, so I cannot easily take it apart to see what got fried. I am guessing there are no fuses in these types of chargers?
Does anyone have any experience repairing one of these battery chargers?
With the battery cables disconnected, I measured the voltage again, and noticed the voltage was recovering on it's own, so I figured perhaps the battery will recover with a good charge.
I got my battery charger which is one of those 70/12/2 or something like that, red battery chargers. (it is just like the century brand battery chargers, but it has a different name) I connected it to the battery. The battery wasn't taking much of a charge, which I thought was strange, since the battery was very new and very discharged. I have not worked with a battery that was this heavily discharged before, but usually a "good" battery that has been discharged, will charge at a high rate.
So I decided to try to help it along, I cranked my battery charger to full blast (70 amps), it made quite a loud humming sound then it got very loud and the amps went down to zero. It sounded like I ruined it. Now when I turn on the battery charger, even at the low rate setting with the cables not connected to anything, it just makes a very loud humming sound. I try quickly tapping the cables together, I don't get any spark.
The battery charger is riveted together, so I cannot easily take it apart to see what got fried. I am guessing there are no fuses in these types of chargers?
Does anyone have any experience repairing one of these battery chargers?
 03-28-2008, 05:45 PM
#2

The answer is "maybe." Some general incoherent ramblings on the subject.
First, your ohmeter test may not have meant much, because even a small load like a dome light(s) will be very low resistance. If the car has something like a solenoid operated clock that is trying to "fire", then ditto. Also, most cars have as many as 5, and as few as 3 capacitors (condensers) for radio noise suppression. If a system is completely dead, these caps will measure low resistance for a few seconds while they charge back up
If the battery was not LEFT DISCHARGED for any length of time, and if it wasn't frozen, you may be lucky. The battery may not be hurt
Now, can you post the brand name and maybe some pictures of your charger?
If it is NOT under warrantee, I'd go ahead and drill out the rivets. After all, you have nothing to lose
(However, I've always followed my lifelong philosophy, which is:
You cannot break it if it's broken, but...
You can fix it so it can't be fixed.
I HAVE fixed a few things so that they cannot be fixed)
There are several possibilities.
The fact that it still hums is a good sign.
Did it smoke or smell?
One possibility is that you've heated up the transformer, and it shorted a turn or two inside. If so, it's probably junk
Second, and more likely, is that the rectifier(s) is bad. This is pretty easy to troubleshoot.
First, pull it apart and find out if it has an internal regulator. Most of these type do NOT. Most have a switch, possibly a fuse or breaker, a transformer, and either two diodes or a rectifier "stack."
The easy way to tell if the rectifier is shorted is simply disconnect the two transformer wires feeding it.
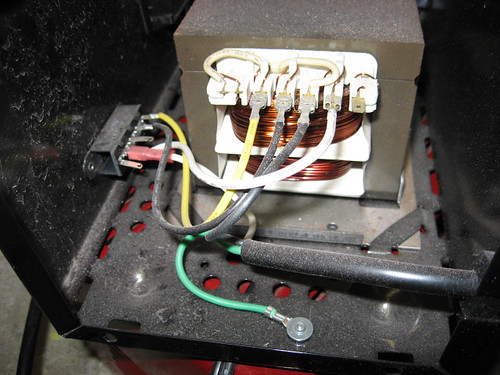
Normally, there should be only three of the largest gauge wires coming from the transformer. One goes to one charge lead.
The other two normally go to the rectifier. Disconnect AT LEAST one of these, and make sure nothing else is shorted internally, like, maybe, a wire touching, or plastic sleeving burned off, etc, and see if it quiets down.
I would---WHILE WATCHING IT--run it at no load this way for a minute or two, then unplug and feel the transformer for heat. If you can run it this way for 10 min. or so, without the thing getting hot, the transformer is probably OK
You should be able to measure AC voltage from these heavy leads. The two going to the rectifier should read MORE THAN 24V AC, and EITHER of these should measure 1/2 voltage to the "center tap"--the one going directly to the battery charge lead.
Also, visit the Century site. It appears that they make chargers under a "whole bunch" of brand labels
http://www.centurytool.net/Battery_C...arts_s/225.htm
Here's just a general, simplified circuit. The amperage switch will be on the left, activating different taps on the primary. This circuit shows a filter capacitor, which normal chargers do not have. If your charger is not regulated, and I doubt it, there isn't much in there other than this
http://zedomax.com/image/200609/batterycharger.JPG
First, your ohmeter test may not have meant much, because even a small load like a dome light(s) will be very low resistance. If the car has something like a solenoid operated clock that is trying to "fire", then ditto. Also, most cars have as many as 5, and as few as 3 capacitors (condensers) for radio noise suppression. If a system is completely dead, these caps will measure low resistance for a few seconds while they charge back up
If the battery was not LEFT DISCHARGED for any length of time, and if it wasn't frozen, you may be lucky. The battery may not be hurt
Now, can you post the brand name and maybe some pictures of your charger?
If it is NOT under warrantee, I'd go ahead and drill out the rivets. After all, you have nothing to lose
(However, I've always followed my lifelong philosophy, which is:
You cannot break it if it's broken, but...
You can fix it so it can't be fixed.
I HAVE fixed a few things so that they cannot be fixed)
There are several possibilities.
The fact that it still hums is a good sign.
Did it smoke or smell?
One possibility is that you've heated up the transformer, and it shorted a turn or two inside. If so, it's probably junk
Second, and more likely, is that the rectifier(s) is bad. This is pretty easy to troubleshoot.
First, pull it apart and find out if it has an internal regulator. Most of these type do NOT. Most have a switch, possibly a fuse or breaker, a transformer, and either two diodes or a rectifier "stack."
The easy way to tell if the rectifier is shorted is simply disconnect the two transformer wires feeding it.
Normally, there should be only three of the largest gauge wires coming from the transformer. One goes to one charge lead.
The other two normally go to the rectifier. Disconnect AT LEAST one of these, and make sure nothing else is shorted internally, like, maybe, a wire touching, or plastic sleeving burned off, etc, and see if it quiets down.
I would---WHILE WATCHING IT--run it at no load this way for a minute or two, then unplug and feel the transformer for heat. If you can run it this way for 10 min. or so, without the thing getting hot, the transformer is probably OK
You should be able to measure AC voltage from these heavy leads. The two going to the rectifier should read MORE THAN 24V AC, and EITHER of these should measure 1/2 voltage to the "center tap"--the one going directly to the battery charge lead.
Also, visit the Century site. It appears that they make chargers under a "whole bunch" of brand labels
http://www.centurytool.net/Battery_C...arts_s/225.htm
Here's just a general, simplified circuit. The amperage switch will be on the left, activating different taps on the primary. This circuit shows a filter capacitor, which normal chargers do not have. If your charger is not regulated, and I doubt it, there isn't much in there other than this
http://zedomax.com/image/200609/batterycharger.JPG
 03-28-2008, 09:26 PM
#4
Mopar Fan
Thread Starter
Join Date: Mar 2008
Posts: 42
Likes: 0
Received 0 Likes
on
0 Posts
No smoke
There wasn't any smoke, and it still hums. I will have to try out some of your ideas. Since there was no smoke and it all seemed to happen almost instantaneously, I am thinking a electronic component must have blown, like a rectifier like you were saying. I will have to tear it apart and see what I can find.
03-29-2008, 12:58 PM
#5
Post a pic when you get it opened up. I did a little searching, and cannot find a diagram. I would doubt that one is regulated, which makes things simpler.
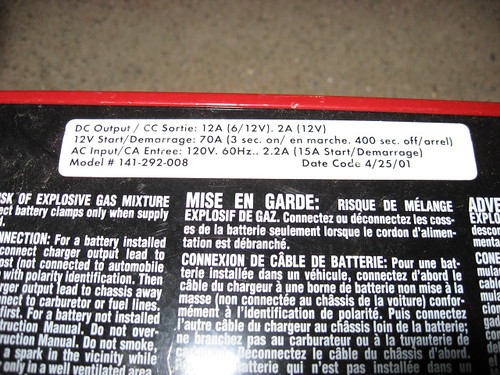
That is NOT a very heavy charger. This nonsense of "70A boost" is a big lie. Notice on the label that it says something about "3 seconds on 400 sec off"
What they are telling you there, is that the boost function is VERY lightweight
That is NOT a very heavy charger. This nonsense of "70A boost" is a big lie. Notice on the label that it says something about "3 seconds on 400 sec off"
What they are telling you there, is that the boost function is VERY lightweight
03-29-2008, 08:18 PM
#6
Mopar Fan
Thread Starter
Join Date: Mar 2008
Posts: 42
Likes: 0
Received 0 Likes
on
0 Posts
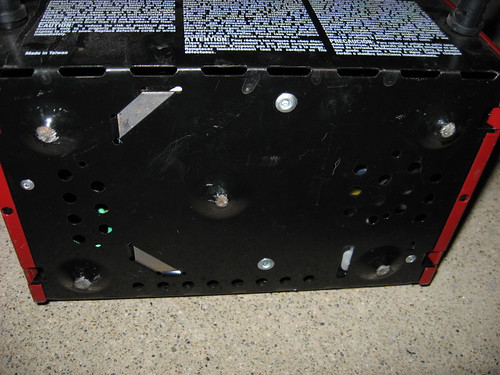
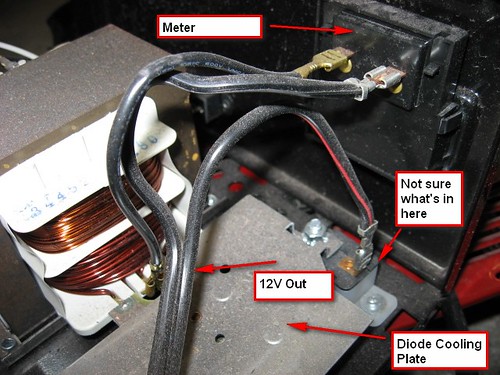
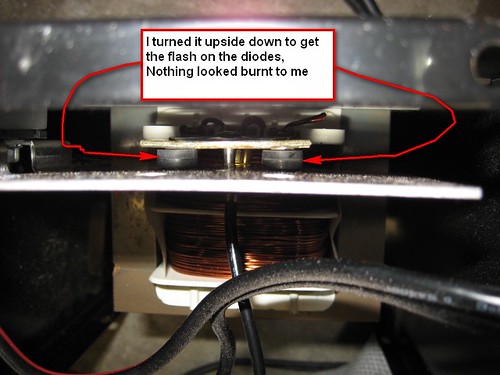
Inside Pictures
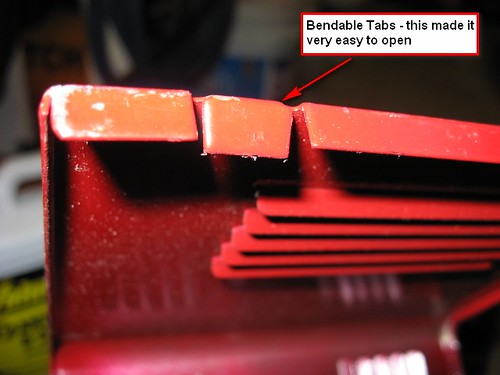
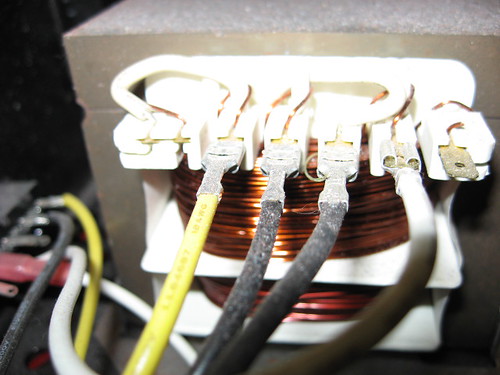
Looks like it is VERY basic indeed. I'm not a electronics expert, but this looks like a transformer and two rectifier diodes on a "cooling" plate. A switch, and a meter. I realized it was held together with simple bendable tabs, not riveted like I originally thought. The rivets hold the transformer in place.
I plugged it in again just to see what it would do. It draws a lot of current, hums very deep and loud compared to normal operation. No smoke. The current gauge does not move. I know it is drawing alot of current because my lights go a little dimmer and when I unplug it, there is alot of sparking at the plug.
I am confused at why it would be acting this way. It acts as though the transformer windings have melted, or there is a short somewhere? Everything looked "as new" inside.
 03-29-2008, 08:34 PM
#8
Mopar Fan
Thread Starter
Join Date: Mar 2008
Posts: 42
Likes: 0
Received 0 Likes
on
0 Posts
Where can you buy a Diode?
OK, 440roadrunner, I went back and read your original post - you are quite wise. I will go out and try disconnecting those leads to the diodes and some of the other things you suggested.
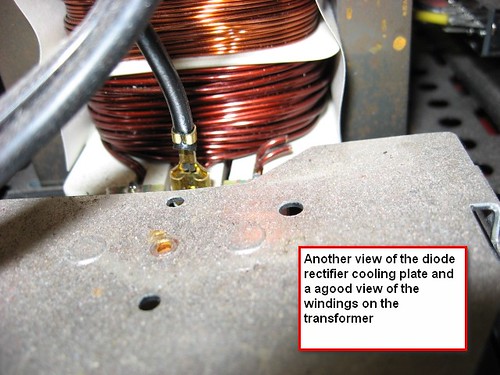
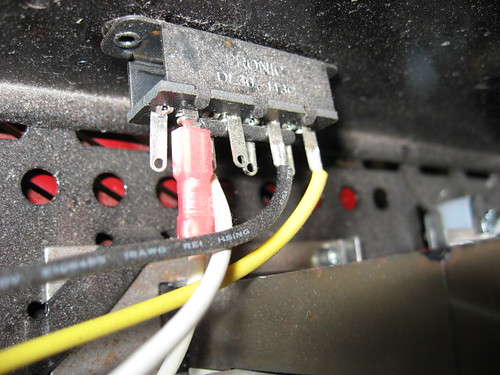
I'm sorry I can't get a better picture of the diodes, they are sort of hidden in there.
If it does turn out to be a diode, I have no idea where to buy a diode like that. Could I use any diode as long as it could handle the current and voltage?
I'm sorry I can't get a better picture of the diodes, they are sort of hidden in there.
If it does turn out to be a diode, I have no idea where to buy a diode like that. Could I use any diode as long as it could handle the current and voltage?
03-30-2008, 11:23 AM
#9
OK, I don't know where you're located or your skill level
You must be fairly mechanically inclined, can you perform electrical soldering?
Here's the approach I'd take.
First, review the diagram I found:
http://zedomax.com/image/200609/batterycharger.JPG
On the low voltage side of the transformer (the secondary) your's is very similar. The only real difference is that the "I don't know what's in here" is a circuit breaker. It would not cause the loud hum. Also, your charger will not have the capacitor that's shown as a filter (says 2200uf, 25v) That will simply not be there.
You have two possibilities for your trouble:
1: One or both of the diodes is shorted
2: The transformer is shorted.
You need to figure out how to get that diode plate/mess apart, and get AT LEAST one diode out of the circuit.
If your remove or disconnect one diode (does not matter which) and the hum goes away--the transformer runs quietly,--then obviously one of the diodes is shorted.
1: If the transformer is shorted, junk it
2: If a diode is shorted, here's the approach I'd take
Call Century from the webpage I posted, and see what the cost situation is on replacement diode/ rectifiers. It may be ridiculous
If that doesn't pan out, here's what I'd do:
Buy a Radio shack bridge--because that's the closest useable thing they have:
http://www.radioshack.com/family/ind...d=2032269&pg=1
Part no. 276-1185
Now, you WILL NOT BE USING the bridge as designed. Here's a pic of the circuit.

The lead from the transformer to the meter is unchanged. What you want to do is
Disconnect and remove the old diodes from the plate
Unhook the transformer leads from the plate/mess/ diode assy
Crimp or solder extension leads to the transformer so you can hook up the new rectifier and hook to your breaker "(I don't know what's in here)" you said
You can use the old aluminum rectifier plate to mount the new bridge with a small screw. If you have some thermal compound like used for your computer processor, put a small amount between the bridge and the plate
Get the thing mounted, and just hook it up according to the diagram. Notice the layout of the "cut corner" of the bridge, and the markings around the outside edge. Two connections are AC (transformer) and two connections are plus/ minus. Leave the minus terminal on the bridge UNconnected
Leave the wiring hooked from the meter to the transformer unmolested, that is shown as the "center tap" in the diagram
These bridges are so cheap, you might by another for a spare!! Just use "quick connect" flat spade connectors--like used elsewhere in the charger to hook it up.
You CAN of course use individual diodes. If you happen to have an old alternator laying about, it's possible that you could salvage a couple out of it. Many alternators would be difficult to use this way.
You must be fairly mechanically inclined, can you perform electrical soldering?
Here's the approach I'd take.
First, review the diagram I found:
http://zedomax.com/image/200609/batterycharger.JPG
On the low voltage side of the transformer (the secondary) your's is very similar. The only real difference is that the "I don't know what's in here" is a circuit breaker. It would not cause the loud hum. Also, your charger will not have the capacitor that's shown as a filter (says 2200uf, 25v) That will simply not be there.
You have two possibilities for your trouble:
1: One or both of the diodes is shorted
2: The transformer is shorted.
You need to figure out how to get that diode plate/mess apart, and get AT LEAST one diode out of the circuit.
If your remove or disconnect one diode (does not matter which) and the hum goes away--the transformer runs quietly,--then obviously one of the diodes is shorted.
1: If the transformer is shorted, junk it
2: If a diode is shorted, here's the approach I'd take
Call Century from the webpage I posted, and see what the cost situation is on replacement diode/ rectifiers. It may be ridiculous
If that doesn't pan out, here's what I'd do:
Buy a Radio shack bridge--because that's the closest useable thing they have:
http://www.radioshack.com/family/ind...d=2032269&pg=1
Part no. 276-1185
Now, you WILL NOT BE USING the bridge as designed. Here's a pic of the circuit.
The lead from the transformer to the meter is unchanged. What you want to do is
Disconnect and remove the old diodes from the plate
Unhook the transformer leads from the plate/mess/ diode assy
Crimp or solder extension leads to the transformer so you can hook up the new rectifier and hook to your breaker "(I don't know what's in here)" you said
You can use the old aluminum rectifier plate to mount the new bridge with a small screw. If you have some thermal compound like used for your computer processor, put a small amount between the bridge and the plate
Get the thing mounted, and just hook it up according to the diagram. Notice the layout of the "cut corner" of the bridge, and the markings around the outside edge. Two connections are AC (transformer) and two connections are plus/ minus. Leave the minus terminal on the bridge UNconnected
Leave the wiring hooked from the meter to the transformer unmolested, that is shown as the "center tap" in the diagram
These bridges are so cheap, you might by another for a spare!! Just use "quick connect" flat spade connectors--like used elsewhere in the charger to hook it up.
You CAN of course use individual diodes. If you happen to have an old alternator laying about, it's possible that you could salvage a couple out of it. Many alternators would be difficult to use this way.
10-29-2008, 07:49 PM
#11
Mopar Fan
Thread Starter
Join Date: Mar 2008
Posts: 42
Likes: 0
Received 0 Likes
on
0 Posts
what about the ammeter built into the charger?
I appreciate your suggestion to buy an ammeter and learn how to use it. I would think the ammeter in the charger would be sufficient.
The load hum this charger makes is clearly telling me it is shorting out and 440roadrunner has given me very good and clear instructions on how to troubleshoot and fix it.
10-29-2008, 07:59 PM
#12
Mopar Fan
Thread Starter
Join Date: Mar 2008
Posts: 42
Likes: 0
Received 0 Likes
on
0 Posts
Good Instructions
Thank you 440roadrunner, I will tear it apart and see if I can isolate it to the diodes or the transformer. I bought a new "computer" battery charger. I thought I would like it, but it turns out to be pretty disposable junk. It has a computer fan to cool off the electronics inside and the fan bearings are already wearing out. I also miss the analog gauge my old century has. I'd really like to fix this.
OK, I don't know where you're located or your skill level
You must be fairly mechanically inclined, can you perform electrical soldering?
Here's the approach I'd take.
First, review the diagram I found:
http://zedomax.com/image/200609/batterycharger.JPG
On the low voltage side of the transformer (the secondary) your's is very similar. The only real difference is that the "I don't know what's in here" is a circuit breaker. It would not cause the loud hum. Also, your charger will not have the capacitor that's shown as a filter (says 2200uf, 25v) That will simply not be there.
You have two possibilities for your trouble:
1: One or both of the diodes is shorted
2: The transformer is shorted.
You need to figure out how to get that diode plate/mess apart, and get AT LEAST one diode out of the circuit.
If your remove or disconnect one diode (does not matter which) and the hum goes away--the transformer runs quietly,--then obviously one of the diodes is shorted.
1: If the transformer is shorted, junk it
2: If a diode is shorted, here's the approach I'd take
Call Century from the webpage I posted, and see what the cost situation is on replacement diode/ rectifiers. It may be ridiculous
If that doesn't pan out, here's what I'd do:
Buy a Radio shack bridge--because that's the closest useable thing they have:
http://www.radioshack.com/family/ind...d=2032269&pg=1
Part no. 276-1185
Now, you WILL NOT BE USING the bridge as designed. Here's a pic of the circuit.
The lead from the transformer to the meter is unchanged. What you want to do is
Disconnect and remove the old diodes from the plate
Unhook the transformer leads from the plate/mess/ diode assy
Crimp or solder extension leads to the transformer so you can hook up the new rectifier and hook to your breaker "(I don't know what's in here)" you said
You can use the old aluminum rectifier plate to mount the new bridge with a small screw. If you have some thermal compound like used for your computer processor, put a small amount between the bridge and the plate
Get the thing mounted, and just hook it up according to the diagram. Notice the layout of the "cut corner" of the bridge, and the markings around the outside edge. Two connections are AC (transformer) and two connections are plus/ minus. Leave the minus terminal on the bridge UNconnected
Leave the wiring hooked from the meter to the transformer unmolested, that is shown as the "center tap" in the diagram
These bridges are so cheap, you might by another for a spare!! Just use "quick connect" flat spade connectors--like used elsewhere in the charger to hook it up.
You CAN of course use individual diodes. If you happen to have an old alternator laying about, it's possible that you could salvage a couple out of it. Many alternators would be difficult to use this way.
10-29-2008, 08:17 PM
#13
Mopar Fan
Thread Starter
Join Date: Mar 2008
Posts: 42
Likes: 0
Received 0 Likes
on
0 Posts
Good News! It's the Diode
I just now tore apart the charger, and in less than 1 minute, my Fluke 87 confirmed that one of the diodes is fried. As a 2nd confirmation, I plugged in the charger to check the transformer with the diodes disconnected. It sounds normal! So now I just need to find a diode or two that will work for this.
I don't have an old alternator, so I guess I can check out the resources listed above in 440roadrunner's post.
My next question would be how many amp diodes should I get?
P.S. I do know how to solder, no biggie. Thanks for your help 440roadrunner.
I don't have an old alternator, so I guess I can check out the resources listed above in 440roadrunner's post.
My next question would be how many amp diodes should I get?
P.S. I do know how to solder, no biggie. Thanks for your help 440roadrunner.
Last edited by heminate; 10-29-2008 at 08:21 PM.


 08-03-2009, 11:54 AM
#15
Mopar Fan
Thread Starter
Join Date: Mar 2008
Posts: 42
Likes: 0
Received 0 Likes
on
0 Posts
Battery charger died again - need bigger rectifier
OK, this battery charger worked good for a while, then it died again. I'm pretty sad about it. I guess I used the 70 Amp setting, I'm not sure how I did it. The Rectifier is rated at 25 amps. Does anyone out there know of a bigger rectifier or diode I can use that is somewhat inexpensive? I thought about finding an old alternator and using the diodes out of that, but I'm not sure if that would work.
I will probably disable the 70 amp start setting somehow to prevent future problems...
I will probably disable the 70 amp start setting somehow to prevent future problems...
01-10-2010, 04:55 PM
#16
Junior Member

Join Date: Jan 2010
Posts: 1
Likes: 0
Received 0 Likes
on
0 Posts
Heminate, did you ever find a solution? I have the same battery charger with a shorted diode. You may try using 2 of the Radio Shack rectifiers and hooking them in parallel. I have had success in the past with other battery chargers using rectifiers from the Delco alternators with internal voltage regulators such as GM used in the 70's & 80"s. These were 6 amp chargers and they never burned out again, they have been going for 20 years or so.
01-10-2010, 05:17 PM
#17
Mopar Fan
Thread Starter
Join Date: Mar 2008
Posts: 42
Likes: 0
Received 0 Likes
on
0 Posts
Heminate, did you ever find a solution? I have the same battery charger with a shorted diode. You may try using 2 of the Radio Shack rectifiers and hooking them in parallel. I have had success in the past with other battery chargers using rectifiers from the Delco alternators with internal voltage regulators such as GM used in the 70's & 80"s. These were 6 amp chargers and they never burned out again, they have been going for 20 years or so.
08-14-2010, 06:37 PM
#18
New Member

Join Date: Aug 2010
Posts: 1
Likes: 0
Received 0 Likes
on
0 Posts
same symptoms - much simpler fix
(I found this post and it was very helpful so I thought I would add some notes about my fix.)
Symptoms -
12.x volts output - good
Ammeter never moved off of 0 and no sparks between POS and NEG clamps - BAD
Sometimes a buzz, sometimes no buzz.
(For names of the parts, I'm going to use the names above but I have no idea if they are correct.)
Problem turned out to be the electrical contact of the diodes to the aluminum plate of the solder coated circuit board.
I removed the aluminum plate by removing the nut that connected it to the circuit breaker.
I wiggled and pulled the 2 spade connectors away from the transformer.
I rotated the circuit board that has to the 2 spade connectors on it.
I pried out one of the diodes and could see that there had been some arcing and was some dirt.
I noted that the orange side of the diode was touching the aluminum plate.
I removed both diodes.
With a small file like a fingernail file, I filed the ends flat.
I filed the aluminum plate and the soldered surface of the circuit board material.
Put the diodes back in making sure the orange side was touching/facing the aluminum plate. (little bit of pressure on glass board when putting the final diode back in so it could be possible to break the board if not careful.)
Put the reassembled alum plate assembly back in and bolted it down to the circuit breaker.
Plugged it in to outlet and touched POS and NEG clamps together and lots of sparks!
Put the box cover back on and bent the tabs back over.
Put it on the awaiting discharged battery (12.33 volts) and it pegged the ammeter at about 16 or 17 amps at the start of the charge. Most I've seen in years!
Hope this helps. I'm not sure how those diodes could go bad. They looked so simple. I'm glad mine was just dirty/bad contact surfaces.
So, the little charger lives on. 25 years old and counting and it gets used at least once a month around here.
Last edited by tdifleet; 08-14-2010 at 06:38 PM. Reason: more info
05-18-2012, 06:34 AM
#19
New Member

Join Date: May 2012
Posts: 2
Likes: 0
Received 0 Likes
on
0 Posts
Had the same problem with a Schumacher se 82 - 6
Tested the rectifier with a diode tester and
Also per the removal instructions of 440roadrunner
And confirmed which one had gone bad
I did dig up an old alternator and attempted
Removal of the diodes, but the one I tried
To extract them from had them held in place
Extremely well and I was unable to remove
One with out breakage of the diode
So I visited the local radio shack per 440roadrunners
Instructions and picked up the exact bridge
He describes above. It was simple because
Both the bridge and charger were able to be connected
With simple crimp on spade connectors. I could
Have soldered the connections, but there
Was no need to
Anyway, I put the cover back on the unit
And it is purring and charging like new
Just wanted to say thanks for the expert
Advice, it was a fun little project, and who
Can argue with a fix that only costs $3.69 plus
Tax. That's what the bridge cost, and I had
Spare wire and spade connectors at the house
Excluding the time I spent messing around
With trying to extract diodes from the alternator,
The entire project, including the drive to pick
Up the part was about an hour
Thanks again!
05-18-2012, 06:40 AM
#20
New Member
Join Date: May 2012
Posts: 2
Likes: 0
Received 0 Likes
on
0 Posts
Symptoms
I suppose I should have listed the symptoms
Of my battery charger, so anyone performing a search
May find this post
The battery charger was making a very loud
Humming sound and the transformer was
Getting really hot, almost to the point of
Smoking.
So if you have a battery charger that has
A loud hum and the transformer gets
Extremely hot. Maybe this quick fix will
Work for you as well


Thread
Thread Starter
Forum
Replies
Last Post


