1994 Jeep Cherokee XJ


 09-06-2015, 08:00 PM
#34
Mopar Fanatic
Thread Starter

Work continues on the truck. He took a moment to get shock mounts moved while waiting for some more metal. If all goes well we should be hitting the trails soon. Expect I have 1-2 weekends of maintenance when we get it back and he expects to be complete soon.


09-06-2015, 08:01 PM
#35
Mopar Fanatic
Thread Starter
Truck is officially home! Aaron estimates tubing to be about 400-500 lbs.
Put together my list last night of issues needing addressed before we take it out.
1 - Paint tubing, body panels and axles.
2 - Wire in and install light bar
3 - Replace worn u-joints and bushings
4 - Replenish spare parts tote
5 - Slip yoke eliminator and rear drive shaft
6 - Top off axles after applying teflon tape to plugs
7 - Move axle to 2" back, 3" cuts it close to rubbing on the back with no load, while loaded I expect potential issues
8 - Bed liner cargo area and reinstall interior that is being used
9 - Grease all zircs
10 - replace relay and reinstall switch for aux fan
11 - Diagnose and repair CB issue
12 - Repair hood latch again
13 - Check and tighten bolts ; can't forget to tighten meh junk
Going to get started today on painting, with any luck we can complete that. Going to be very difficult to get some areas of the cage, so I am contemplating a roll on bed liner for it also. Thanks again to Aaron for the fantastic work. I have shown you guys some of the pictures I was sent during this process but not all of them, for the complete 700+ pictures follow this link
https://photos.google.com/share/AF1Q...JJcDhEM2U2MkZ3
Last edited by xaza; 03-30-2016 at 11:50 AM.
09-06-2015, 08:01 PM
#36
Mopar Fanatic
Thread Starter
Decided to coat cage and fender armor in bed liner. It added texture and tied into the bumpers very nicely. Truck bed liner went on smooth. Scuffed, prepped and laid down. First time using so it isn't show quality perfect but we mixed with mixer regularly and kept texture fairly even. Had way too much bed liner mixed so did rear cargo hatch also.Will have to get some better pictures tomorrow.
Been busy getting truck ready to go. Got SYE installed with another drive shaft from Bill's Englewood Drive Shaft. Took truck to car wash and it drove good. Had some noise from rear brake but got it resolved.
While setting past several months truck had grown some surface rust. It wasn't washed after last trip out in February. Wire brushed it clean and touched up rubberized undercoating and paint. Truck looks much better now.
My list is getting shorter!
1 -
2 - Wire in and install light bar
3 -
4 -
5 -
6
7 -
8 -
9 -
10 - replace relay and reinstall switch for aux fan
11 - Diagnose and repair CB issue
12 -
Got second coat of bed liner done today with a new hood release cable. Looks like I will have some dirt underneath truck next weekend!
Last edited by xaza; 03-30-2016 at 11:24 AM.

 09-07-2015, 07:29 AM
#38
Mopar Lover

Very professional work.
My Mechanic son who works on lots of bigger and 4x4 trucks and has coworkers that mud and climb looked through with me and at the end said "that guy don't farg around".
That's his way of giving a compliment.
My Mechanic son who works on lots of bigger and 4x4 trucks and has coworkers that mud and climb looked through with me and at the end said "that guy don't farg around".
That's his way of giving a compliment.
09-07-2015, 12:04 PM
#39
Mopar Fanatic
Thread Starter
Thank you guys. Not exactly professional but I try my best imitation and have learned the hard way every step of the way. I know this is not a show quality truck, it is built for taking abuse and has fared very good thus far. I know painting and undercoating the truck is likely going to be scratched and need touched up the first time I take it out but I am trying to make this thing survive for many more years.
I like to be unique and believe I have hit that mark. I am working on a new mod now that should be the exclamation point for my rig. I can use a little help from some fabricators. I will run things by my guy that did my cage but I want to wait until I am past the concept page first. The rear doors do not open fully anymore and even when they did my Rottweiler had trouble getting in because it just didn't open wide enough. My concept I am currently working on is to make back door "slide" similar to a van. This will open up the low point for dogs to jump in and make it not so narrow. I am envisioning using a slide at the back of the door, near handle and two double hinges on the other side to support weight. Is there a place that sells specialty type hinges like such? Any special tips regarding door modification? Door also has power locks and windows, any tricks to routing wiring to keep it out of the way and allow door to slide. I will attempt to draw up my concept later today but I am not a very good artist.
I like to be unique and believe I have hit that mark. I am working on a new mod now that should be the exclamation point for my rig. I can use a little help from some fabricators. I will run things by my guy that did my cage but I want to wait until I am past the concept page first. The rear doors do not open fully anymore and even when they did my Rottweiler had trouble getting in because it just didn't open wide enough. My concept I am currently working on is to make back door "slide" similar to a van. This will open up the low point for dogs to jump in and make it not so narrow. I am envisioning using a slide at the back of the door, near handle and two double hinges on the other side to support weight. Is there a place that sells specialty type hinges like such? Any special tips regarding door modification? Door also has power locks and windows, any tricks to routing wiring to keep it out of the way and allow door to slide. I will attempt to draw up my concept later today but I am not a very good artist.
09-07-2015, 12:40 PM
#40
Super Moderator

Your rig looks great, how much weight did you add with the cage?
09-07-2015, 01:27 PM
#41
Mopar Lover
I've looked at the pictures again and I have an idea to bounce around. The door seal is on the body frame, yes? So as the door closes it squeezes at the back BUT scrubs across the front slightly as it squeezes closed. Here we go...
Eliminate the front hinge point that is inside the body and move it outside of the body at the exo upright, sort of like Van rear barn doors. In that way the door could open past 90 degrees and almost 180 against the front door.
Oh I must say beautiful daughter, beautiful dog. Being a big dog owner I understand and I think it is well worth the effort.
09-07-2015, 02:23 PM
#43
Mopar Fanatic
Thread Starter
I've looked at the pictures again and I have an idea to bounce around. The door seal is on the body frame, yes? So as the door closes it squeezes at the back BUT scrubs across the front slightly as it squeezes closed. Here we go...
Eliminate the front hinge point that is inside the body and move it outside of the body at the exo upright, sort of like Van rear barn doors. In that way the door could open past 90 degrees and almost 180 against the front door.
Oh I must say beautiful daughter, beautiful dog. Being a big dog owner I understand and I think it is well worth the effort.
Eliminate the front hinge point that is inside the body and move it outside of the body at the exo upright, sort of like Van rear barn doors. In that way the door could open past 90 degrees and almost 180 against the front door.
Oh I must say beautiful daughter, beautiful dog. Being a big dog owner I understand and I think it is well worth the effort.
09-14-2015, 06:26 PM
#44
Mopar Fanatic
Thread Starter
Got truck out yesterday for a quick run.Had a great trip out and truck did very well. As usual there is a new list now to take things to the next level. Primary issue needing resolved is a cracked exhaust manifold, will likely replace with a JY one until I can get a header. Radius arm still hitting factory lower control arm mount, will need to clean it up more. Coil springs are crushed at the top, will be looking to replace them with a more solid spring. Need to replace e brake cables and lower radiator hose. With steering working so much better since Currie upgrade, going to change pitman arm back and see how it drives with things properly aligned again. Still getting noises from y-link, going to pull apart all bushings clean/inspect/grease and replace as needed. Had a last minute oops on Saturday that almost prevented us making it out, had to grind off some bolts for the axle end bolts. New t-bolts should be here this week to get those right. Some movement in leaf spring mount, going to box it in and reinforce it. Thinking about using the Rusty's but welding in instead of bolting and completing it out to fully box it in.
http://www.rustysoffroad.com/rusty-s...-brackets.html
Rear doors do not open enough to access back seat anymore, working on something unique to resolve this issue. If we can pull it off it will be extremely sweet. This will take months and some JY doors to pull off so don't expect this to unveil soon.
Here is my favorite shot from yesterday, shows driver side bump stop not doing it's job. Wheel was all up in the wheel well, drive shaft hit radius arm and coil spring over compressed
Last edited by xaza; 03-30-2016 at 11:47 AM.
09-19-2015, 09:11 PM
#45
Mopar Fanatic
Thread Starter
Got a good start done today. Got radius arms dropped and inspected, greased and reinstalled. Found a bent bolt causing radius arms to hit each other on one side and repaired. Got factory control arm mounts cut away better, should prevent another noise. Popped out and pressed in new upper axle bushing. Most important repair of the day was cracked exhaust manifold got replaced with a Banks revolver header. Tried the JY but they were all cracked and didn't want to waste more time driving around trying. Got a couple welds to take care of, emergency brake cables and a few odds and ends to finish up tomorrow.
Last edited by xaza; 03-30-2016 at 11:46 AM.
09-20-2015, 07:49 AM
#46
Super Moderator
How about an overall picture of your rig now that the exoskeleton is done.
09-20-2015, 10:51 AM
#47
Mopar Fanatic
Thread Starter
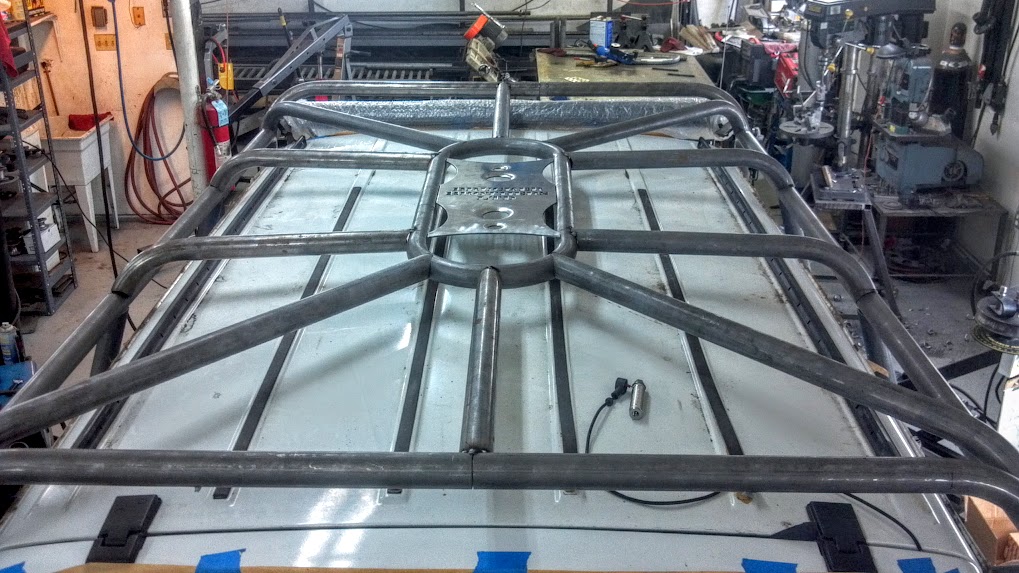
LOL, my bad. Been so busy scurrying to get truck right before my biological mom comes out for a wheeling trip guess I wasn't paying much attention and missed those.
I have not taken a good picture of the top yet which is why I still have to reinstall the roof rack. If you scroll up there are some better pictures of the cage complete as we were putting bed liner on it.
I have not taken a good picture of the top yet which is why I still have to reinstall the roof rack. If you scroll up there are some better pictures of the cage complete as we were putting bed liner on it.
Last edited by xaza; 03-30-2016 at 11:43 AM.
09-20-2015, 11:26 AM
#48
Super Moderator
It looks a little mad max to guy from Iowa, but it's cool!
The following users liked this post:
xaza (10-03-2015)
10-03-2015, 06:42 AM
#49
Mopar Fanatic
Thread Starter
Managed to get last weeks list done and get truck out to the trails for a wonderful family day. Truck did good, but brake calipers were not releasing making a bit of brake noise. Got the brakes pulled apart and found drivers side caliper wobbling around. Bolts were snugged all the way down. Determined steering knuckle needed to be replaced along with calipers and pads. Ordered steering knuckles to do both sides. Picked up brake rotors and calipers and ordered in my pads, should arrive today and be back together. While looking at passenger side wheel bearing assembly was leaking so went ahead and replaced it with a Moog (3 year warranty). Brother managed to get it all done after work yesterday, I am truly blessed to have such a great brother. When pads arrive just have to load/mount calipers and bleed the brakes.
Last edited by xaza; 03-30-2016 at 11:33 AM.
10-03-2015, 07:45 AM
#50
Mopar Lover
I have never figured out brothers, I have a sister and 3 sons in their 20's. The meanest things any of my sons has done has been to their brother but don't get between them, you fight one you're fightin' 3. When the three of them get together to get a job done get out of the way, it is amazing what they can accomplish together. I know my Father, looking down, is very proud of them.
The neighbor across the street has two boys under 10 and it funnier than hell to watch them and one go crying to Mom or Dad then 5 minutes later best pals. When my boys see this I bring Mom outside (my wife) and she just laughs and tells them it's like when they were that age and then the stories come out, some I never knew about and I wonder how all three are still alive.
Brothers, I'll never figure them out.
10-07-2015, 05:47 PM
#51
Mopar Fanatic
Thread Starter
If I had the traditional relationship with my brothers and sisters I would be in for a rough time. I have 6 sisters and 4 brothers plus 6 more step brothers/sisters. I graduated high school living with one sister. All that doesn't include the brother who lives with me, I was unofficially adopted by his family. He has made it possible for my truck to get where it is. He is always go go go and has spent many hours working on my truck while I am on service calls or watching Broncos games. It is true, the most messed up things we do, we do to each other.
Had to straighten driver side upper bump stop mount after detonating bump stop from axle not hitting flat. Adjusted axle to sit properly and replaced bump stop bushing last weekend. Pads installed and brakes bled. Might be changing pitman arm length for more ideal steering geometry but truck is an alignment away from another test trip...I think
no more stacking blocks to make jack tall enough to lift truck
Last edited by xaza; 03-30-2016 at 11:36 AM.
11-07-2015, 05:40 AM
#52
Mopar Fanatic
Thread Starter
We got out to one of our favorite trails last weekend. Had to winch up the first obstacle because front locker was not working and almost tested the cage already. Repaired the broken wire and completed the rest of the trail. Got a little video of the day, if you go to my youtube page there is also a short clip of 1st obstacle that is not edited for sound.
https://www.youtube.com/user/xaza23
https://www.youtube.com/user/xaza23
Last edited by xaza; 11-07-2015 at 05:55 AM.
11-07-2015, 07:15 AM
#54
Mopar Fanatic
Thread Starter
Oh yes indeed. We got past a group with a truck that was having some issues and had another group that had never been on the trail follow us the rest of the day. We passed a buggy on about 40" tires going the other way saying it was not passable, we never even used our winch when we got up in the snow. We did have a member of our group take out his distributor with a tree branch and had to be towed/coast last 1-2 miles...mostly downhill and gentle easy trail on that side. Was a fantastic 14 hour day in the hills. Time to start packing the snowboard when we go out instead of the climbing gear.
Last edited by xaza; 11-07-2015 at 07:17 AM.
03-30-2016, 11:56 AM
#56
Mopar Fanatic
Thread Starter
My apologies but the way I linked my pictures in caused them to not properly show anymore. Issue started with post #35, I have gone back through and fixed all posts although the pictures may not be exactly what was originally posted. Still around reading but been busy with boring things.
05-18-2016, 06:36 PM
#58
Mopar Fanatic
Thread Starter
Not much being done on build but going to have a few things to take care of after last weekends urban crawling. Lowest point of tire lifts 28.5 inches with limiter straps set as they are. Pretty good but should be able to safely allow a couple more inches with a little coil noise. Blew out rear shock driving off the cars. About a month ago wife traded in her Jeep for a new Ram 1500, something we can tow with. XJ might become a trailer queen instead of getting a diesel now. 
02-22-2017, 10:39 AM
#60
Mopar Fanatic
Thread Starter
After installing the cage the factory mirrors went from too small to worthless. You either see a bunch of cage or they are turned out too far to be much help. Found the solution to this with 94 Ford F250 mirrors. Not sure if the sheet metal would hold up to a nut/washer and didn't want to have to fumble around inside these tiny doors. Decided to make some backing plates with some nuts and strip metal. To cover the corner of door where factory mirror was removed I picked up extra covers for the inside of the doors at JY. I trimmed them and attached using weatherstripping glue. I will go back and make a solid bead on the outside with clear silicone to make sure there are no spots for water to sneak inside the door. I have not driven it yet but the mirrors look great. They moved out far enough to see around the cage with a good angle yet in tight for trails. They have maintained their ability to fold in and tuck nicely into the line of protection the cage offers. The glass is much larger and does not taper down at the outer edge like the factory mirrors. Line of sight looks good for pulling trailer now also.


