1962 Dodge Dart 440...Resto/Mod...Lots of PICS


 03-04-2009, 01:40 AM
#34
Mopar Fan
Thread Starter

Join Date: Feb 2009
Posts: 46
Likes: 0
Received 0 Likes
on
0 Posts
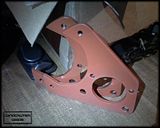
Got the calipers done and the master cylinder is done. Both look really good IMHO. Also repainted the brake mounting brackets just to add a few more coats of protection to them. I am gonna try to keep the "MOPAR orange" to a minimum. Not that I dont like its history, but I like things as understated as I can get them. But I sstill want to keep a bit of the "old school" orange on there.
Here are the pics. Sorry they were taken on my phone.
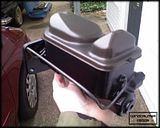
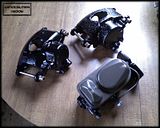
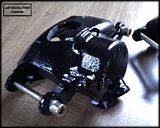
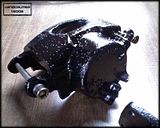

Here are the pics. Sorry they were taken on my phone.


 03-04-2009, 02:56 PM
#38
Mopar Fan
Thread Starter
Join Date: Feb 2009
Posts: 46
Likes: 0
Received 0 Likes
on
0 Posts
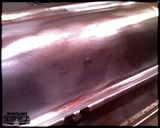
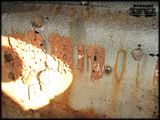
Thanks guys! I am working on getting the valve covers all cleaned up now. They were bad. The insides had about 1/4 inch of crap just caked on them. But 1 bottle of mean green later and two hours in the freezing cold at 1 A.M. got them all clean. Now I am getting all the old paint, rust, and other assorted junk off of them so I can cut off the wire holder, grind and re-weld a few spots. Then paint them up!
Might be a few days before I get them in paint because they have a few spots of heavy rust that I need to fix.
Might be a few days before I get them in paint because they have a few spots of heavy rust that I need to fix.
03-04-2009, 10:01 PM
#39
Mopar Fan
Thread Starter
Join Date: Feb 2009
Posts: 46
Likes: 0
Received 0 Likes
on
0 Posts
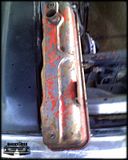
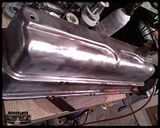
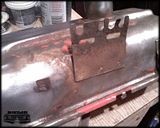
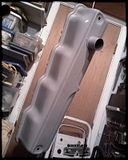
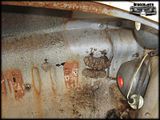
Got all the rust off the outside of the valve covers and all the paint as well. I threw a LIGHT coat of primer on them to keep the surface rust from starting back while I get the insides all cleaned out. They look really good too. Also I got all the crap cut off the outside of them. I am going to change the wire looms out for some new ones so I cut off the old ones. They were in BAD BAD shape, so I think this is the smarter move.
Anyway, here are some of the pics:
This is them before I touched them:
Here is one after the Mean Green treatment:
Here they are all shiny and prettyfied:
Here is the wire loom before and after:
Here they are in primer:
Anyway, here are some of the pics:
This is them before I touched them:

Here is one after the Mean Green treatment:

Here they are all shiny and prettyfied:

Here is the wire loom before and after:


Here they are in primer:

 03-08-2009, 07:19 PM
#40
Mopar Fan
Thread Starter
Join Date: Feb 2009
Posts: 46
Likes: 0
Received 0 Likes
on
0 Posts
Due to AMAZING weather I got a lot done! LOTS LOTS LOTS!!!
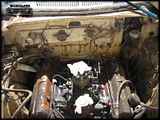
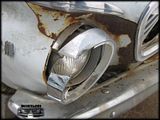
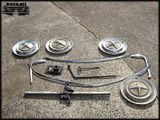
Torn down the front of my great grandmothers Dart. Also got all the chrome, lights, and the trunk all empty. I now have a pattern for all the trunk bits.
Got a few things all cleaned up and in paint too!
Oh, and I have Guests! Tons of them. None had anything in them, but they were funny to see.
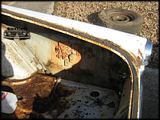
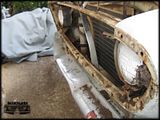
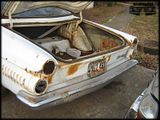
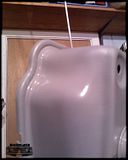
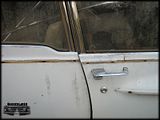
Also, there is a small problem. Due to the fact that this car was left to rot for 14 years, the underside of the car is rusted out so bad that the car is starting to sag in the middle. Notice the door.
Torn down the front of my great grandmothers Dart. Also got all the chrome, lights, and the trunk all empty. I now have a pattern for all the trunk bits.
Got a few things all cleaned up and in paint too!


Oh, and I have Guests! Tons of them. None had anything in them, but they were funny to see.


Also, there is a small problem. Due to the fact that this car was left to rot for 14 years, the underside of the car is rusted out so bad that the car is starting to sag in the middle. Notice the door.
 03-08-2009, 07:43 PM
#41
Mopar Lover

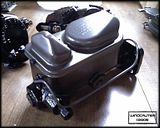
yeah looks like a sag somewhere; how's the hinges though? Sometimes they'll let the doors sag too. looks like an MCI brake kit. Did the seller say what type of brake kit it was?
03-08-2009, 11:16 PM
#43
Mopar Fan
Thread Starter
Join Date: Feb 2009
Posts: 46
Likes: 0
Received 0 Likes
on
0 Posts
No I measured and its sagging by about 20mm. The door was closing fine until today. I also noticed that more of he underside had fallen off.
Question: Should I take the glass out before it gets worse, or leave it in till I get everything out of the interior then take the glass out? Just worried about breaking one of them from the body flexing if it folds in half. LOL
Question: Should I take the glass out before it gets worse, or leave it in till I get everything out of the interior then take the glass out? Just worried about breaking one of them from the body flexing if it folds in half. LOL
03-09-2009, 09:10 AM
#45
Mopar Fan
Thread Starter
Join Date: Feb 2009
Posts: 46
Likes: 0
Received 0 Likes
on
0 Posts
Yeah, the whole underside of the car is falling off. it was right on the ground when it sat for years. I think the only thing holding it together is the roof and the front seat at this point. LOL
03-11-2009, 04:56 PM
#47
Mopar Fan
Thread Starter
Join Date: Feb 2009
Posts: 46
Likes: 0
Received 0 Likes
on
0 Posts
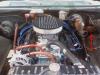
Oh, wait, I am not restoring the one that is rotted. I got a donor car to transfer everything from my great-grandmothers car onto. I had to cause of all the damage to hers. I know its not gonna be 100% "HER CAR", but it will be close enough for me. The black one is the donor car. And its in great shape. Just surface rust and a few dents.


 03-12-2009, 11:59 AM
#50
Mopar Fan
Thread Starter
Join Date: Feb 2009
Posts: 46
Likes: 0
Received 0 Likes
on
0 Posts
Thanks for the replies! And yeah I had a few nights of laying in bed picturing the car just folding and all the glass shattering. ((Damn those old cartoons with the FOLDING BEDS!)) But yeah, gonna be getting the glass out in a day or so. Then cutting it up for all the good sheet metal. No more pics at this point.
I did get the jack foot, tire iron, and tire hold down screw thingy all rust free and painted. On thing that I need some help with is how do I get the rust and all off of the jack? Its riveted together and there is rust down in the cracks?
More to come in a day or so. And thanks again for the replies guys and girls!
03-13-2009, 01:17 PM
#52
Mopar Fan
Thread Starter
Join Date: Feb 2009
Posts: 46
Likes: 0
Received 0 Likes
on
0 Posts
Don't know anyone up here with one. But I have all the stuff to do blasting sans the cabinet. Might need to looking into getting one, or just building a rig that I can take down after this project. Then I can tailor it to the larger parts I am gonna be doing and it would not cost a fortune. All I would need to buy at that point would be the gloves for the box.
Same idea, just a larger version HERE
Same idea, just a larger version HERE
03-18-2009, 11:49 PM
#54
Mopar Fan
Thread Starter
Join Date: Feb 2009
Posts: 46
Likes: 0
Received 0 Likes
on
0 Posts
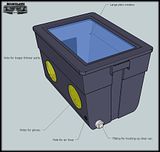
Well after having a hell of a few days. (Dont ask) I will be running out tomorrow to get the parts for the DIY blasting bin. I did a quick mock up of it to work out some of the placement for the holes and all in Sketchup. I find that modeling in Sketchup can hellp me to avoid most space problems before I cut in the real world. Here is a just a quick screen shot of what I will be putting together. I will post pics of it when I am done. Sorry I dont have more to report.
Oh, and I have a quick question for you all: What is the best way to repair a car horn? I would love to have the very same one that my GGMother used. But It no longer makes a sound. Just hoping there is a cure for them.

Oh, and I have a quick question for you all: What is the best way to repair a car horn? I would love to have the very same one that my GGMother used. But It no longer makes a sound. Just hoping there is a cure for them.
03-19-2009, 02:20 AM
#55
Mopar Lover

Join Date: Dec 2008
Location: East Coast Canada
Posts: 2,509
Likes: 0
Received 0 Likes
on
0 Posts
Good question about the car horn, I think its the only thing EVER, I have never taken apart. I would love to know the answer to this one.
Can you rebuild or repair a car horn?
Can you rebuild or repair a car horn?
03-19-2009, 01:40 PM
#56
Mopar Fan
Thread Starter
Join Date: Feb 2009
Posts: 46
Likes: 0
Received 0 Likes
on
0 Posts
Well we are gonna find out. LOL I will be pulling it apart this weekend, and if I have to I will mod a new horn into the old casing. Sorta like the MP3 player I did a year or so ago.
LINK
LINK
03-19-2009, 08:30 PM
#57
03-20-2009, 01:28 AM
#59
Admin
 03-20-2009, 01:31 AM
#60
Admin
Like Polar said, a bead blaster or even a sand blaster will work. If you don't have access to them, then a twisted wire wheel brush and some time will get it done for you too.


