When you click on links to various merchants on this site and make a purchase, this can result in this site earning a commission. Affiliate programs and affiliations include, but are not limited to, the eBay Partner Network.
Once dry i'll assemble the entire frame work and paint it as one piece. That way i'll get the bolt heads and nuts too. without worrying about scratching anything during assembly.
The top plate was already shot with Epoxy etching primer.
epoxy etching primer, I've been in the business for 45 years and never heard of it. Epoxy yes, self etching primer yes but not the combanation. I'd be interested in what product it is for my own use, if you can find out I would appreciate it.
Getting the grille and bucket halves restored and assembled with the restored lights and bases...
First bucket and light assembly restored Getting the alignment right I have the left side headlight bucket half mounted on the right side bucket..lol. It doesn't line up... Perfectly aligned Not bad for a 54 year old part... rejuvenated.. sweet fine art. Headlights, finally! One more bucket half to restore....
Finishing up bodywork on the rear half today. Glazing. Fine tuning. Looking to get the rest of the car body in grey primer so I can get color on it. Then on to the roof and hood. Coming along. Need another gallon of paint and some reducer.
UPDATE::
Well it's June 2022 and I'm waiting for the weather to cooperate. It's prepped for paint already and all I will have to do is wipe it down with prep and an air hose to get hidden debris out of the way so it doesn't end up in the wet paint. In the interim I have fiddled around with the motor a little. I got the Weiand single plane intake back from the "Mistress of Metal" in TN who is a powder coating genius. She put a two color finish on it that will withstand the fuel and oil and hold up well against nicks and scratches too. It's in Alien Silver and Black on the Weiand letters. Looks very nice! I decided to forgo the OEM bolts to bolt it down to the heads and went instead with plated Allen Head bolts. The trouble I ran into, with either fastener, is that the old intake has fat runners. This means that the bolts wont go into the holes without hitting against the runners outside surfaces on two of the holes. I had Leanna mill out around the worst one and I STILL had to cut the bolt down for length to get it in the hole without scratching the runner surface. Then I ran into an issue with being able to get an Allen wrench in there to tighten and torque them down. I ended up cutting an Allen wrench shaft to about an inch long, just long enough to get into the bolt head hole and still have enough sticking up to get a wrench on AND to miss hitting the runner sides as well. That worked well. They look trick on there too, and it was worth the effort and fuss. I used black adonized Allen head bolts to secure the new Melling High Volume oil pump to the block and new bolt sets to put the water pump on as well. I got Brushed aluminum Allen Head bolts to bolt on the Holley 750 dual feed carb to the top of the Weiand intake too. Those had to be cut down a little as well. I also used Allen Head bolts on the water neck and the valley pan clamp bars. This will all tie in to the Allen head bolts fastening the inner fender close out panels to the inner fenders. Method to my madness. The engine is assembled except the oil filter and I need a new electronic ignition module for the distributor. I also do not yet have an alternator for this motor, I need a 100 amp unit. Money. I need a small fuel line between the pump and the carb feed line, a temp sending unit, a thermostat, hoses and belts, a carb spring kit & some small odds and ends. All of the wiring will be encased in a black mesh tube and run to the rear of the motor and down the backside and in through the firewall. All of the junk usually on the firewall in these cars will now reside under the dash. The wiper motor and linkages are under the dash. If I had a lift in the garage I would insert the motor/trans/K frame/ front suspension into the car through the bottom of the engine bay, like the factory did it. But I don't so it's the old fashioned way of hoisting that heavy big block over the rad support bar and down into the bay. lol. Fun stuff. Wiring is the biggest hurdle to come. I have to combine 1966 Dodge Charger front lights with 1972 Dodge engine bay with 2004 Audi A6 dash and interior with 1967 Coronet interior lighting with 1966 Ford Thunderbird sequential tail lights. Cant wait.
Here's an overview of the Yankee Express project outlines and what I did from day one and how I did it.
To begin with my wife knew that I wanted a Dodge muscle car from the 1960's for a project to occupy my time in retirement after 30 years in the military. I saw this 1967 Coronet advertised on Craigs List, yes, I know..lol, and told me about it. I checked it out and this woman in far upstate NY had this car for sale for $3750. The car was 100% complete, running and driving and didn't seem to have any major damage to the body or interior other than normal wear. I called her and talked to her about it and found that she had divorced her husband for cheating and this was his car that she got in the divorce. It had been listed for about 20 minutes when I called her up. I told her to hold it and I was coming with and a trailer to haul it back. I was on my way within the hour. I drove it up onto the trailer and hauled it home from up by the St Lawrence Sea Way down to Vermont. I drove the car from my friends house to my garage, about a mile or so, and it drove fine and ran well. That was in October of 2014.
The cars stats. from the factory, were 1967 Dodge Coronet 500, 318 V8, auto 727 trans, A/C, factory tinted glass all around, black vinyl interior, bench seats with buddy seat/armrest, AM radio, 120 mph speedo, bench back seat, drum brakes all around, 8 3/4 rear end with 3:55 gears, no posi traction, 15' tires and wheels and factory hup cap covers. Cream yellow exterior. Nothing missing parts wise and the Certi-Card and holder still fastened to the radiator support. Good buy.
I sat around on overturned 5 gallon plastic buckets in different places around the garage and thought about what I would do to this car and how I would proceed. This went on for many days, most of that winter actually. Meanwhile I began to tear it apart. All of the parts were bagged and tagged and I set aside all of the parts that didn't fit the plan for the cars future. These parts would be sold and traded for ones that I would need later. The tear down revealed some damage to the body after all, this was to be expected with a 47 year old car. The front fenders had been smacked and crumpled on both front corners, the right rear lower quarter panel behind the wheel well had been crumpled and badly repaired, the cowl had been crushed by a falling tree, or something, on the right corner just above the junction of the door/ fender area. There was no other serious rust except a couple of small spots and then surface rust on the rear deck top. Not bad at all.
The damaged front corners led me into the decision to sweep both corners back to a 90* degree angle, more like the 1970 Plymouth Road Runner look, as this would cut out the majority of the damage. I did buy a section of the left front fender from a friend to use some of it to repair the damage behind that area. The cowl got new metal welded in as did the quarter panel.
My ideas , from my bucket sitting sessions, about this car were driven mostly by the premise that anything I changed would have to 100% blend in with the factory design and lines of the car and that I would stop and not over do it and end up with a pig in a bowtie.
I had been following custom car building for decades and had a list of cars and trucks that I really liked, for various reasons, and I referenced that list seeking changes that would blend on this body. What I came up with initially was to sweep the front fender noses back to 90*, swap the 67 Coronet front grill & lights for a 66/67 Charger unit with the revolving headlight buckets, ditch the fender mounted turn signal indicators, the radio antenna mast, and to add a Hemi RO/23 style hood scoop. Lose the entire interior and dash other than the headliner. I wanted to swap in a big block V8 440 motor, smooth the firewall, put everything under the dash, upgrade the brake master cylinder to a larger unit, add disc brakes to the front, build a strong 727 automatic transmission, open up the fake side scoops, lose the gas door on the left quarter panel, maybe lose the door handles, add a fuel cell to the trunk, add different lights to the rear.
I took measurements of the distance between the A pillars where the dash resides as well as the vertical distances across the front under the dash. Armed with these I went to several areas wrecking yards and poked around in about 700 cars and trucks looking for something modern that I liked, and that would FIT in the space I had. One of the last cars I looked at was the 2004 Audi A6 Quattro All-Road. I had ignored this car twice before because It looked too narrow. It was not. It was right on the money. I even liked the look and colors. I had at last found my donor car. I tore out everything forward of the back seats, door to door. The entire dash and door panels with the wiring looms came too. I even took the rear door panels.
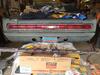
I took measurements of the rear lights area as well to carry along as I searched for the interior. I found a couple of 66 Thunderbirds in one yard and liked the lights for the Coronet, but, I also took a set of 68 Cougar lights to try out. I bought a set of 67 Charger tail light base panels to try out too.
The charger panels were too short left to right and the lenses were outrageously expensive. so they were out. The Cougar lights looked too big and clunky so they were out. The T Bird lights were the right length, almost, and were taller vertically, wider I guess, and I would have to modify the tail extensions on both sides to accept them. In addition I would have to rebuild the entire rear end to make the trunk deck separate from the lights. No sweat.
As I got to looking at how the T Bird lights would look on the car I noticed that the 1970 Road Runner had the rear bumper with the ends curved in such a way that they would match cleanly with the67 Coronet tail extension profiles. In other words, when standing aft of the car and looking at both sides profiles the line would sweep up and in smoothly between the bumper profile and the extension profile. A design gem. The way the T Bird Lights split the spacing of everything above the bumper worked perfectly with the width of the Road Runner bumper top to bottom too. Symmetry. Perfect. I also really liked the Road Kill 1970 Road Runner that had the exhaust exiting out through the rear bumper back up light holes. The T Bird light panel has an oval section of clear plastic in the center through which the back up lights shine so I wouldn't need the bumper holes for that and could then use them for the exhaust to poke through! Bonus, I'm so smart!
Anyway, all of these changes begat MORE issues as I went along, that had to be addressed as well. This in turn made more issues too. Fun! This gave me a good idea what car designers had to go through when designing these cars to begin with. A lot of details that have to work in concert with a lot of other details.
As I went along in this project, I added a set of roadster style panels to the area behind the front seats. Here's why.
I saw an ad one day for a rear seat topper from a 1967 Plymouth Satellite. I liked the way it looked as It reminded me of a 1959 Corvette dash and rear seat panel. I investigated the part and found that the two cars were the exact same width in the body. This seat topper would slide right in between the space from each side right behind my front seats. Hmmm.......idea!?
I bought the thing and stuck it in as a mock up. It fit and looked spectacular! I had decided to put bucket seats in the car because the Audi console split the center. This seat topper hugged the seat tops perfectly. All I had to do was figure out how to fill the space behind it. I did.
As I designed the panels I had the idea of placing a trough up the center of the thing, much like the 59 Corvette. As it happened the seat topper has a flat portion in the center that lends itself to this form perfectly. It also, coincidentally,. matches the width of the contour lines flowing up the center of the hood and the trunk deck! This allowed the flow through from front to rear of the lines on the car, almost as if the factory had done it! Going to plan nicely!
One issue that cropped up was in using the Audi dash. It was WIDE front to back and extended way out into the cab of the 1967 Coronet, like 19 inches. So, this placed the front seats back a ways from stock, the shift lever back a ways from stock and the gas pedal a long ways from the seat. Good thing I'm tall. I had to create a shift linkage bar that reached from the new position and also had to move the mounting flange for the shifter rearward. The Audi dash front edge curvature was different than the Coronet dash and had to be cut down and curved to match. Fortunately I was able to slice off the right amounts and in the right curve without impacting the Audi defrost vents. This also worked by decreasing the amount of space the dash took up in the car by about 6 inches less. Due to the shape of the Audi dash It had lots of extra room underneath now to place stuff from the engine bay under the dash. The Audi console has a center pull E Brake handle. The Coronet does not. That had to be imagined and fabricated. The dash has an aluminum skeleton that it bolts up to and this skeleton was NOT the correct length to meet the A Pillars. So, I made mounting plates for that to bridge the spaces, about 5 inches each side, and could then bolt the dash up in the right location. The Audi dash has lines that flow over into the door panels. So, this had to be worked out as the Coronet doors are very large and different. I discovered that the Audi rear door panels have a longer trim piece than the front doors do and this piece would fit much better than the front ones on the longer Coronet doors. This meant it was cut & paste time.
As you can see in the pictures it came out pretty good. It was a LOT of fooling around and fabrication but worth it in the end.
The motor is a 1972 440 Magnum RB big block. It was taken up to RPM Racing Engines in Georgia, VT in December 2020 to be prepped for rebuild. I had them install new cam bearings, bore the cylinders out to +0.40 over stock, square up the cylinder bores with the crank centerline, hone the bores, hone the head surfaces flat, mill the crank deck flat, hone the cam and crank bearing passages, tank the block and provide me with new Speed Pro pistons assembled to my throw rods with new wrist pins, a new Melling High volume oil pump, new bearings for the cam and crank, polish the forged steel crank, test fit the new Comp 306-9-21 270/470@50 cam, new ring sets, new Viton Positive vinyl valve seals, and also repair a boogered up freeze plug hole in the rear of the right bank cylinder head. I assembled the motor. This motor was a 375 HP torque monster from the factory. With it now being 0.40 over, the Comp Cam which is the largest profile flat tappet hydraulic cam you can use in a 440 before you must change to a higher stall torque converter, the Weiand single plane intake, the heads fully ported and polished and the valve skirts relieved, and a 750 Holley carb it should make about 484-500 hp now.
Thanks. We shall see. Whatever it is will be fine with me. I did follow the build journal of an engine builder who started out with the same engine and I did what he did so it should equal the print outs he posted for the engine from the dyno results. Although they made many pulls with different heads and intakes, gaskets and pistons and cams. This combo did generate 484 hp and 496 ft lbs. @ 4500 rpm. I may need a larger carburetor, we shall see. I have a buddy with an 850 cfm Holley that I may try as well to see the difference. I don't have any plans to race the car, just drive it around. It will make me happy regardless. I may take it up to Laconia raceway for one or two passes, just to see.
Last edited by Ghostrider 67; 06-07-2022 at 03:51 PM.
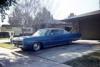
Some of the other things that I've done to her are the rear wheel wells have been tubbed into the frame rails. The leaf springs have been relocated to under the frame rails using a Mancini Racing kit. This allows the use of 29" tall rear tires with a 15.25 inch section width and 13 inches of tread width. The spare tire well has been removed from the trunk floor and replaced by a flat steel floor pan. The trunk lid has been changed from a torsion bar lifting mechanism to two gas filled lift rods attached to fabricated mounting flanges through which the two fuel filler steel pipes pass on angles to the fuel cell. The gas filler tube and return line have been removed from the trunk cavity as the stock filler door has been shaved. A 3/8" aluminum fuel line runs from the rear of the car to the engine bay. A/N fittings at both ends. The trunk now has close out panels much like a modern car. The 1970 Road Runner rear bumper has been lengthened 3 15/16" in the center and the ends have been reshaped to match the quarter panel contour lines angles and location and also to hug closely to the sheet metal. The pocket shape of the quarter panel sheet metal has been cut out and reshaped to exactly follow the bumper end contours leaving a 1/4" gap. Custom bumper mounting plates have been fabricated to ensure that it hangs in the correct location. The front bumper has been sectioned and shortened, the turn signal lens holes shaved, the center slot where the license plate attaches has been widened and reshaped to act as an air dam to direct air to the radiator. The bumper ends have been sectioned and recurved to meet the new fender nose angles and to hug the sheet metal closely. Custom fabrication added to the front bumper mount brackets to align the mounting holes with the new bumper shape. The lower radiator support bar has been changed to a 66 Charger unit so that the hidden headlights will mount up. It's the only difference between Chargers and Coronets in 66/67 other than wiring and headlight buckets. The parts are interchangeable. Mexico units were sold with the Charger front on them from the factory. The battery is relocated to under the roadster panels in the passenger side rear seat area/ footwell. I fabricated a Hurst Pistol Grip shifter and handle. The shift handle is out of Black Locust hardwood and hand formed. The shift lever is cut from 3/16" steel plate and hand bent. It operates with parts taken from the inside of an Inland Shift lever. The center pull E Brake works via two right side e brake cables which puts the forward ends in the center of the car and of equal length. Custom fabricated mounts for the e brake, the shift lever and the console mounts were fashioned and applied. The Audi steering wheel is tilt and telescoping and connected to the 67 steering gear via a "D" shaft and swivel collar from Borgeson Steering. I hand formed from mild 20ga sheet metal an RO/23 type Hemi hood scoop. I replaced the headlight bucket motors with custom 12V electric motors and hand built the mounting flanges and connecting linkages. The seats are late model Volvo units, leather, 10 way power and heated. The doors have custom fabrication all over the inside surfaces and inner door linkages. Audi rubber boots between doors and A pillars to pass through wiring. Power window lifts added. The spare tire mounts where the rear seat back would rest. Rear drum brakes got new parts all around and lines. The entire body was sanded down to bare metal. Other than the bottom side and the cab inside.
Last edited by Ghostrider 67; 06-07-2022 at 07:48 PM.
Back at it after spending $2500.00 on parts. Ordered headliner, front and back glass gaskets, door seals upper and lower, LCA snubbers and UCA bumpers, new brake shoes, fuel line from pump to carb, Mallory Unilite module, T Bird taillight lenses and gaskets, RH thread wheel studs for the Left rear axle, 2 Cooper Cobra Radial GT tires 295-50-15 and 2 Cooper CS5 Grand Touring tires 205-70-15, the other three wheels, big block 440 chrome dipstick and tube, chrome alternator 100 amp, intermediate brake line, transmission mount rubber block, bunch of different width striping tape and mask paper. My local Tire Barn is going to mount and balance the skins for $30 bucks a corner.
Man you have really been hammering away at this project.... Tire fit looks awesome...
Love to see the fabed up bumpers after you get them installed....
Keep chipping at it.. Looking good !!!!
When do you think the car will be ready to shoot somemore color on it? or is it already done?
Cheers
It's BEEN ready since last November. lol. I may shoot it tomorrow actually. OR, i'll wait till after the end of the month when my wife heads off to visit Scotland for two weeks. Then she can't complain about the smells...lol. All I have to do is wipe it down, hit it with sandpaper to raise some tooth for the paint to stick to and wipe it down again and shoot it. I've been finishing up the motor recently. The little stuff. Got new motor mounts so It can go in once I have the tires and rims married up and on the car. Need to assemble the valve body for the tranny still.
 08-23-2021, 09:27 AM


 and a trailer to haul it back. I was on my way within the hour. I drove it up onto the trailer and hauled it home from up by the St Lawrence Sea Way down to Vermont. I drove the car from my friends house to my garage, about a mile or so, and it drove fine and ran well. That was in October of 2014.