1967 Turquiose 383 Belvedere II 2dr hardtop
 09-11-2011, 07:54 PM
#1
Mopar Fan
Thread Starter

Join Date: Aug 2011
Location: Oklahoma
Posts: 26
Likes: 0
Received 0 Likes
on
0 Posts
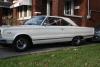
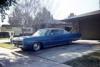
1967 Turquiose 383 Belvedere II 2dr hardtop
Welcome to my thread!
I will be chronicling my journey as I restore my 1967 Belvedere II 2dr hardtop. This is my first project, and will be asking alot of questions here. If you have an opinion, please feel free to share them with me as I have NEVER done this before, but am looking to learn, and would highly value expertise from you fellow Mopar lovers.
Phase one: Get the car to my house.... COMPLETE.
I have the car in my driveway now, up on blocks, and have been vacuuming it out and dealing with all the rat's nests and poo. It's amazing how much rat poo can accumulate over 3decades of the car sitting.
I have pulled out the front and back seats, and most of the carpet as well. There is still alot of vacuuming before I am finished. My next goal, is to get the hood, trunk lid, bumpers, and dashboard out of the car. The goals after that will be to get the door and interior panels out, as well as all the glass. Thirdly, will be a complete dismantling of the front end, and drivetrain removal.
I'll post some pictures from where I started today. Pictures of the empty interior to follow later.. as I havent taken them yet.
Please feel free to share your thoughts and opinions, either here or in an email to me. I welcome them.
Tommyboy!


 09-12-2011, 02:46 AM
#4
Admin
Looks like a good project. Couple of things/pointers/safety items though.
Like mr340 said, make sure to wear a mask and some safety glasses. You'll be glad you did in the long run.
Make sure to lable everything that you remove as you may forget where it goes when you start to put it back together. Not saying you'll forget where the hood goes, but little items and fasteners.
If the ground you are working on is not level (as it looks like in the pictures), please move the vehicle to a level ground. You don't want/need the vehicle sliding or tipping over/off those blocks while you are under it. I've been there, it's not fun.
09-12-2011, 04:47 AM
#5

Welcome, Your project looks familiar as I started with the same about 15 tears ago. As said by others, label all your hardware as the car comes apart, get lots of ziplock bags! You will find it comes apart a whole lot easier/ quicker then it goes back together.Your first purchase should be a Factory Service Manual, check E-Bay, best $60-$70 bucks you will spend. Good luck with it and keep the pics coming.
09-12-2011, 02:39 PM
#6
Mopar Lover

Before you start disassembly get a benchmark of frame height measurements. Guys are always asking this before they cut a car be it frame connectors, back halfing, cutting quarters or mini tubbing. My experience has shown the best way is engine and trans in place sitting on tires. Try and level the car as best you can and measure to a level floor if possible. Spots like leaf spring mounting bolts, front bumper bolt mount, bottom of trans member at frame and rockers front and back. With this you can duplicate it when on stands or if you have to move the car after all that weight has been removed and the suspension is relaxed.
Forgot about this: http://www.autobooksbishko.com/searc...ry=Shop+Manual
Forgot about this: http://www.autobooksbishko.com/searc...ry=Shop+Manual
Last edited by Coronet 500; 09-12-2011 at 03:00 PM.
09-12-2011, 06:40 PM
#7
Mopar Fanatic

Please get those hollow blocks out from under the car, they will not support the car. The blocks will break and crack and if you are under it, you may be crushed. As someone else mentioned, get it on level ground. If possible put it in the garage out of the weather and then put it on very nice jackstans. Outside it will get wet and start to rust worse than it is and give you a better place to work on it.
I have more later but dinner is ready.
I have more later but dinner is ready.
09-12-2011, 08:29 PM
#8
Mopar Fan
Thread Starter
Join Date: Aug 2011
Location: Oklahoma
Posts: 26
Likes: 0
Received 0 Likes
on
0 Posts
Thank you all for the advice. Expect lots of questions on this thread as I continue this process.
My next, short-term goal, is to get the car in my garage. I have 4 "new" tires to put on the rims, which I am currently working on right now. I have a buddy who has tire-shop work experience coming over tomorrow to show me how to get them on the rims with some easy "tricks"... i'm not a believer yet. I man-handled one tire onto the rim today and it was WORK. I do agree that the blocks are not a good long-term solution. And we are expecting 2" of rain starting on Wednesday, so I will have it indoors as of tomorrow evening!
I am also working on plans to weld myself a car body rotisserie, so I can do this project properly. I am also considering making 2 of them, so I can try to sell one, locally, to help fund my car-parts addiction I fear will be coming upon me shortly. haha.
My brother-in-law is getting married this weekend, so I expect that getting the car indoors will be the extent of my progress this week as we have a ton of family coming into town.
I will be posting pictures of the rust damaged areas I have discovered probably next week.
09-12-2011, 08:39 PM
#9
Mopar Fan
Thread Starter
Join Date: Aug 2011
Location: Oklahoma
Posts: 26
Likes: 0
Received 0 Likes
on
0 Posts
To respond to Coronet 500, I am pretty sure I understand what you are saying. My garage floor is pretty level, and when I get the tires on, I'll make some detailed notes before I disassemble anymore. Thank you!
09-13-2011, 09:14 PM
#10
Mopar Fan
Thread Starter
Join Date: Aug 2011
Location: Oklahoma
Posts: 26
Likes: 0
Received 0 Likes
on
0 Posts
Praise God for small victories. I got it inside, before the rain. I was working on the tires tonight at 8pm-ish and getting NOWHERE, so, on a whim, I took the tires, loaded them up and drove around looking for a place to help me change them knowing the chances were slim. after several "no's"... I pulled into Walmart thinking it might be open the latest. And lo and behold, there was a friend of mine who worked in the tire shop there. They had technically closed, but he switched them around for me. It turns out that one of the rims I have was a 15" rim, while I thought it was a 14... hence the trouble getting the tire on. haha. anyways, tires on in less than 15minutes, and i got the car into my garage before we get a week of rain. Thank you Lord! 
09-14-2011, 03:58 AM
#11
Mopar Lover

One thing... Take a lot of pictures... During the tear down and all.. Its great to go back to a digital picture to see exactly how a bracket or fitting goes... The old saying is a picture is worth a thousand words is very true... And you never know you may want to keep the photos for a build album for your memories.... Plus it shows that you did all the work.....
10-07-2011, 07:51 PM
#12
New Member
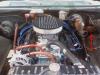
Cool Project. I saw a car like this at the drag races this year. It got second place & it was all stock including the original motor (no aftermarket performance parts such as cams etc.) except for the racing mags & tires.
Last edited by mongrot; 10-07-2011 at 07:53 PM.
10-19-2011, 04:14 PM
#13
Mopar Fan
Thread Starter
Join Date: Aug 2011
Location: Oklahoma
Posts: 26
Likes: 0
Received 0 Likes
on
0 Posts
I deleted my last post. Just taking it one day at a time. We'll see what happens...
Ryan in Oklahoma aka Tommyboy
Ryan in Oklahoma aka Tommyboy
Last edited by Tommyboy; 10-24-2011 at 03:47 PM.
 12-18-2011, 05:44 PM
#15
Mopar Fan
Thread Starter
Join Date: Aug 2011
Location: Oklahoma
Posts: 26
Likes: 0
Received 0 Likes
on
0 Posts
For those of you who remember me, about 3 months ago, I acquired this car with great excitement. After getting it home, I quickly become overwhelmed with the amount of rust on the car. I went through a time where I considered selling it, but I just couldnt bring myself to do it. Even as I look upon the rust and minor dents, I can't help but see the potential beauty and worthwhile hiding behind it.
SO, that having been said, I have decided to tackle the mountain of work ahead of me, one proverbial shovel-full at a time. After some more disassembly of the car, I'll be tackling the driver-side quarter panel.
To anyone who has replaced rusty quarters on a 66-67, please feel free to message me with tips and suggestions as this will be my first time to do something like this. I have an autobody guy who will help me, but I'll be doing alot by trial and error.
Thank you all for your time, and I welcome your thoughts. I will update with pics as I proceed with the quarter replacement sometime around new years.
12-19-2011, 07:56 PM
#17
Mopar Lover

Keep up the great work and when will we see pic's of your progress as far as the quarters there pretty much the same as the rest and if your body man is good he will be able to show ya' a few tricks to doing it the right way , if your welding them in place just make sure you weld towards your previous weld about 3 inches in all at a time and that will stop the warpage in most cases
as far as the quarters there pretty much the same as the rest and if your body man is good he will be able to show ya' a few tricks to doing it the right way , if your welding them in place just make sure you weld towards your previous weld about 3 inches in all at a time and that will stop the warpage in most cases
12-19-2011, 07:59 PM
#18
Super Moderator

Good luck on your ride. I you want the more costly repair and new sheet metal try AMD and see if they make parts for your car.
https://www.autometaldirect.com/
https://www.autometaldirect.com/
12-20-2011, 05:19 AM
#19
Mopar Lover

Tommy if you need insperation just follow [new toy old boy] in the forum, this is my project and it is moving slow because of the time I have to work on it. Family and work come before play time

 Good luck.
02-14-2014, 05:51 AM
Good luck.
02-14-2014, 05:51 AM
#21

Don't give up.
Welcome to my thread!
I will be chronicling my journey as I restore my 1967 Belvedere II 2dr hardtop. This is my first project, and will be asking alot of questions here. If you have an opinion, please feel free to share them with me as I have NEVER done this before, but am looking to learn, and would highly value expertise from you fellow Mopar lovers.
Phase one: Get the car to my house.... COMPLETE.
I have the car in my driveway now, up on blocks, and have been vacuuming it out and dealing with all the rat's nests and poo. It's amazing how much rat poo can accumulate over 3decades of the car sitting.
I have pulled out the front and back seats, and most of the carpet as well. There is still alot of vacuuming before I am finished. My next goal, is to get the hood, trunk lid, bumpers, and dashboard out of the car. The goals after that will be to get the door and interior panels out, as well as all the glass. Thirdly, will be a complete dismantling of the front end, and drivetrain removal.
I'll post some pictures from where I started today. Pictures of the empty interior to follow later.. as I havent taken them yet.
Please feel free to share your thoughts and opinions, either here or in an email to me. I welcome them.
Tommyboy!
I will be chronicling my journey as I restore my 1967 Belvedere II 2dr hardtop. This is my first project, and will be asking alot of questions here. If you have an opinion, please feel free to share them with me as I have NEVER done this before, but am looking to learn, and would highly value expertise from you fellow Mopar lovers.
Phase one: Get the car to my house.... COMPLETE.
I have the car in my driveway now, up on blocks, and have been vacuuming it out and dealing with all the rat's nests and poo. It's amazing how much rat poo can accumulate over 3decades of the car sitting.
I have pulled out the front and back seats, and most of the carpet as well. There is still alot of vacuuming before I am finished. My next goal, is to get the hood, trunk lid, bumpers, and dashboard out of the car. The goals after that will be to get the door and interior panels out, as well as all the glass. Thirdly, will be a complete dismantling of the front end, and drivetrain removal.
I'll post some pictures from where I started today. Pictures of the empty interior to follow later.. as I havent taken them yet.
Please feel free to share your thoughts and opinions, either here or in an email to me. I welcome them.
Tommyboy!
02-14-2014, 06:05 AM
#22
Do not give up.
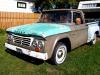
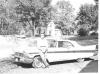
I started with a car real close to what yours is. 2yrs later it is still a work in progress but it has come a long way. It takes time and a lot of blood, sweat and a few choice words every now and then but well worth every minute you put into it. I sent a couple pics of where mine is today just to give you a little "it can be done" heads up.
 02-16-2014, 12:40 PM
#24
Oh, man, that’s such a sweet looking ride. Being a horror/macabre fan, I like the way it sits right now! it looks like an old warrior. Drop in a 440 and make a helluva a sleeper lol!
Seriously, nice car. I’m glad you are going to take the project on because I can’t wait to see the progress.
Seriously, nice car. I’m glad you are going to take the project on because I can’t wait to see the progress.

Thread
Thread Starter
Forum
Replies
Last Post
Phatchanz
Member's Rides
2
06-26-2013 10:27 AM


