Installing My Intake...
 02-12-2011, 10:49 AM
#1
Mopar Fanatic
Thread Starter

Join Date: Apr 2010
Location: Northern Lower Michigan
Posts: 451
Likes: 0
Received 0 Likes
on
0 Posts
My Intake...New ?
I removed and installed a intake on a Rocket 350 when I was like 17 years old. That's been awhile ago  but I remember enough to know it's not that big of job. However I wondering what little things should I do while I'm at it.
I will be removing the tappit covers and installing new gaskets there, is there anything I should consider doing while those are off?
Any tips on the intake installation itself?
Thank you
Joe.
but I remember enough to know it's not that big of job. However I wondering what little things should I do while I'm at it.I will be removing the tappit covers and installing new gaskets there, is there anything I should consider doing while those are off?
Any tips on the intake installation itself?
Thank you
Joe.
Last edited by Barfly; 02-18-2011 at 03:47 PM.
 02-12-2011, 02:42 PM
#2
Admin
TAKE PICTURES!
Really just take your time, make sure you have all the proper torque specs, good documents to follow incase you get lost and to take pics to remember how things go back together.
Really just take your time, make sure you have all the proper torque specs, good documents to follow incase you get lost and to take pics to remember how things go back together.
02-12-2011, 04:01 PM
#3
Mopar Lover

make sure you clean off the old gasket, and make sure that you dont let any fall into the engine. I would suggest covering the valley to assure that this doesnt happen.
02-14-2011, 03:53 AM
#4
Mopar Fanatic
Thread Starter
Join Date: Apr 2010
Location: Northern Lower Michigan
Posts: 451
Likes: 0
Received 0 Likes
on
0 Posts
Thanks guys, I will take pictures and be careful of the mess.
I'm thinking about painting or powder coating the intake.
Any idea's there?
Thank you
Joe.
I'm thinking about painting or powder coating the intake.
Any idea's there?
Thank you
Joe.
02-14-2011, 04:41 AM
#5
Admin
Any type of coating will act as an insulator and will cause the intake to remain wamer than it normally would. I would leave it as it is.
Do some research on alum paint that expells heat though, there may be a paint out there that actually helps disipate some of the heat to keep the intake cool or allows teh intake to keep it's thermal properties without interfance.
Do some research on alum paint that expells heat though, there may be a paint out there that actually helps disipate some of the heat to keep the intake cool or allows teh intake to keep it's thermal properties without interfance.
02-14-2011, 04:30 PM
#6
Mopar Fanatic
Thread Starter
Join Date: Apr 2010
Location: Northern Lower Michigan
Posts: 451
Likes: 0
Received 0 Likes
on
0 Posts
See this is why it's good to ask questions!
I would have never thought of the heat aspect. And I can
see where it would be worse with the thick plastic powder coating.
If anything I'll paint then. But I can see that being trouble some
pealing chipping etc.... I'll take your advice and just leave her alone.
Thanks Tim.
Joe.
I would have never thought of the heat aspect. And I can
see where it would be worse with the thick plastic powder coating.
If anything I'll paint then. But I can see that being trouble some
pealing chipping etc.... I'll take your advice and just leave her alone.
Thanks Tim.
Joe.
02-15-2011, 03:23 AM
#7
Admin
If done right, you won't have any issues. I would talk to an engine shop and paint shop and see what they tell you. I'm sure hat you'll have to clean, de-grease, prime and then paint.
02-18-2011, 03:51 PM
#8
Mopar Fanatic
Thread Starter
Join Date: Apr 2010
Location: Northern Lower Michigan
Posts: 451
Likes: 0
Received 0 Likes
on
0 Posts
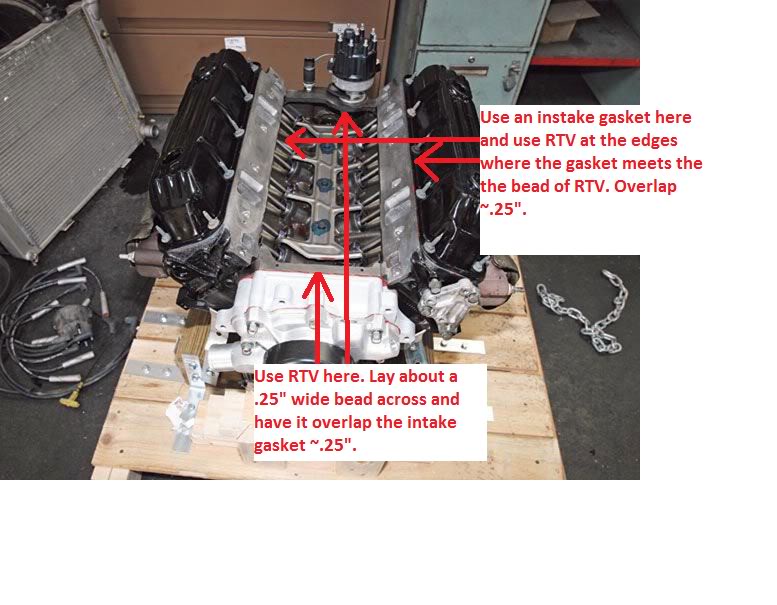
The Edelbrock instruction say to use their silicone between the gasket and the heads. Not knowing what to use other than the Edelbrock brand, I asked at the parts store. They sent me away with a small tube of silicone to use on the ends of the intake and said not to use anything on the gaskets.
As I said, this fly's in the face of Edelbrocks instructions.
Should I use silicone on the gaskets? And if so what in the store brand would be good?
Thank you
Joe.
As I said, this fly's in the face of Edelbrocks instructions.
Should I use silicone on the gaskets? And if so what in the store brand would be good?
Thank you
Joe.
02-18-2011, 05:37 PM
#10
Mopar Fanatic
Thread Starter
Join Date: Apr 2010
Location: Northern Lower Michigan
Posts: 451
Likes: 0
Received 0 Likes
on
0 Posts
I just got the instructions out again. Edelbrock is not recommending silicone on the gaskets, it's a product they sell called Gasgainch and further investigation reveals it's a tacky kind of stuff meant to hold the gasket in place not seal it. Or so I think anyway.......

 02-20-2011, 02:02 PM
#14
Mopar Fanatic
Thread Starter
Join Date: Apr 2010
Location: Northern Lower Michigan
Posts: 451
Likes: 0
Received 0 Likes
on
0 Posts
Okay, which one of you guys was thinking to yourself "I wonder if he remembers there is water in that thing?" and then forgot to mention it?
Yea, I forgot there was water in that thing, and low and behold when I pulled off the intake...... there was antifreeze and water floating around on top of the oil above the valves.
Well I cleaned up the water / oil and and drained the radiator some and continued on.
Everything went pretty well (so far) and before we ran the engine I drained the oil to be sure nun of the coolant got into the pan. We waited overnight for the silicone on the end seals to cure. After running her for about five minutes the thermostat gasket was leeking and I had to silicone it and now are waiting another night for that to cure.
All in all it went pretty well, I tried not of complicate or over think the project but I was careful, took my time cleaning and reading directions.
Here is a link to my pictures. You can also see my son is well on his way to refinishing the hood scoop and seems to be getting into it.
Joe.
Last edited by Barfly; 02-20-2011 at 02:44 PM. Reason: Edit Link
02-26-2011, 05:15 PM
#16
Mopar Fanatic
Thread Starter
Join Date: Apr 2010
Location: Northern Lower Michigan
Posts: 451
Likes: 0
Received 0 Likes
on
0 Posts
When I went to set the carb down on the intake it would not sit down all the way do to the dual feed fuel line was resting on a cast bracket in the manifold. I think the bracket is for an automatic choke.
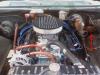
As you can see in this picture I was in a hurry to get the truck out of Dad's garage and just put a 1" spacer under the carb so the fuel line would clear and continued on. Warming her up and what not the engine did run better than before but still seemed not right.
Today I went out in the driveway (still cold by the way) and removed the spacer, bent the fuel line upward to clear the bracket and placed the carb right down on the manifold as it should be.
Now the plenum divider of the dual plane intake is actually in the mix. And from what I can tell the throttle response is greatly improved. Which makes me feel better as I was starting to wonder if the intake change was all for not. I'll add a pic of what the carb looks like now, tomorrow.
I actually think we are headed in the right direction now
 02-26-2011, 05:56 PM
#17
Mopar Fanatic
Join Date: Jan 2011
Location: Southern california
Posts: 416
Likes: 0
Received 0 Likes
on
0 Posts
Looks good but it also looks like your running a double pumper...Boy your MPGs are really gonna suck. I tried one on my Charger R/T and found the car ran stronger and with much better mpg with a 3310 vac sec non-double pumper. A double pumper is not a good choice with an auto trans in my opinion unless you have a high stall converter.
02-26-2011, 06:50 PM
#18
Mopar Lover

Join Date: Apr 2009
Location: Michigan: The First Line of Defense From The Canadians!
Posts: 1,892
Likes: 0
Received 4 Likes
on
4 Posts
Not sure what your goal was with the intake change, but it does sound good. the divided plenum will increase lo-end, and throttle response. Open spacers of different heights can be used as a tuning tool.
02-27-2011, 08:54 AM
#19
Mopar Fanatic
Thread Starter
Join Date: Apr 2010
Location: Northern Lower Michigan
Posts: 451
Likes: 0
Received 0 Likes
on
0 Posts
At the risk of sounding like a broken record talking about this intake
My goal was to eliminate or reduce this terrible bog when going from idle to WOT. Ultimately improving my launch off the starting line at the near by 1/8 mile drag strip.
Last weekend we changed out the intake. Water leaks, changing the oil, cold weather and removing a carb spacer I installed has prevented me from taking her out on the road.... until this morning.
I went out in the driveway, pulled all the plugs and cleaned them up. Started her up and let her idle to a nice normal running temp. Backed out on the road and went for about a 1 mile trip around the neighborhood. Now the roads are still slick and my tires stink so I was unable to really get on it but.....
NO BOG, NO BACKFIRE through the carb. Just positive, strong response.
Throttle response is like I'm driving a whole different truck!!
Damn, I'm so impressed with myself I can hardly sit still
I am so happy it made a positive difference.
I'm not so naive that I think I'm done with that carb. I'm sure there is more tuning as the weather gets warmer etc... but as of right now I could not be happier.
What a big difference going from that Eddy Torker 340 Single Plane to the Eddy Performer 318/360 Dual Plane intake. Much better!!!
Thank you all for your help
Joe.
03-04-2011, 06:42 PM
#21
Yeah, Glad to hear how it went. So often you never hear about results. Pictures are a big help too and we like to look. Sorry about the water, you can blame me if it helps. It's just one of those things a guy can take for granted. You sure did handel it all well. I like the thought of your boy getting into it as well. My step son loves this stuff but lives too far away for us to get to work together often.
It's just one of those things a guy can take for granted. You sure did handel it all well. I like the thought of your boy getting into it as well. My step son loves this stuff but lives too far away for us to get to work together often.
 03-08-2011, 09:12 AM
#23
Mopar Fanatic
Thread Starter
Join Date: Apr 2010
Location: Northern Lower Michigan
Posts: 451
Likes: 0
Received 0 Likes
on
0 Posts
I had to Google Ubly
I never get over in the thumb much. We live over by the little finger
near Traverse City. Still it would be nice to meet someone from the forum and discuss our projects. Let me know when you get up this way.
Maybe we could meet up at Mid Michigan Motorplex near Stanton, that would be kinda in the middle.
Joe.

Thread
Thread Starter
Forum
Replies
Last Post
67rockabillydart
Do-It-yourself Section
14
04-14-2009 01:11 PM
jane1043
Off Topic
0
05-08-2008 07:11 PM


