S6 refuses to start!!@#$
 01-07-2014, 10:39 AM
#1
Mopar Fan
Thread Starter

S6 refuses to start!!@#$
I bought this car a month ago. I've rewired everything thats obvious, Ive found a few wires that I tell where they go but they don't seem to be going to anything significant. I properly installed an electric fuel pump and seems to try and start more so than before I bypassed the mechanical. One thing that concerns me is ones it start firing, the whole car jumps like somebody tossed a chunk of metal in the block, then it recovers, and a few seconds later, it'll do it again. I'm pretty sure the Carb has been tampered with but I don't want to spend money chasing my tail blowing $$ on an engine that may be shot!!:bang head: Im in Abilene TX if anybody local has some time, but I hope someone here can give me some direction....?
 01-07-2014, 10:46 AM
#2

I'm sorry sir, we don't service Audi here. This is a Mopar forum
Now are you talking about a SLANT 6?
A little information about the model of whatever car or truck would be helpful
If the wiring has been all chopped up, specific descriptions or even photos would be helpful..........such as "a one-wire connector, dark blue," etc
AND what sort of ignition is on the car? Points? Late enough for factory breakerless? Breakerless conversion? Pertronix? Mallory? MSD? What?
What have you done?
Run a compression test? Leakdown?
Changed the plugs? What do the plugs look like?
Checked or replaced the plug wires?
How about the cap/ rotor? Dirty? greasy? wet? new?
None of us have crystal *****. We didn't drop by last night to have a peek....................................
01-07-2014, 10:55 AM
#3
Mopar Fan
Thread Starter
I appreciate the sarcasm......Its a 1975 Plymouth Duster, it as a 225 Slant 6 in it, 50% of the wires are spliced or taped in some way, form or fashion, I replaced ballast, ignition relay, Trans Safety switch, fuel line, installed electric fuel pump at the tank, has a stock single barrel carb that appears to have been rigged up to get the car running. Im a body man, paint, custom fab interior, and bolt ons. I don't dig into engines but would like to head down that road. Im looking a place to start. So your list of things prefaced with " Did you do this and that" would have been along th lines of what i was looking for prefaced with, "maybe you can try this and that, take some pictures of your areas of concern" etc......
I guess Ill order a distributor and cap, electronic ignition, plugs and wires, and Ive yet to find anyone that can help me with the carb thus far......thanks for the input, I have thick skin and took away the positive from your post....
I guess Ill order a distributor and cap, electronic ignition, plugs and wires, and Ive yet to find anyone that can help me with the carb thus far......thanks for the input, I have thick skin and took away the positive from your post....
 01-07-2014, 11:54 AM
#5
Mopar Fan
Thread Starter

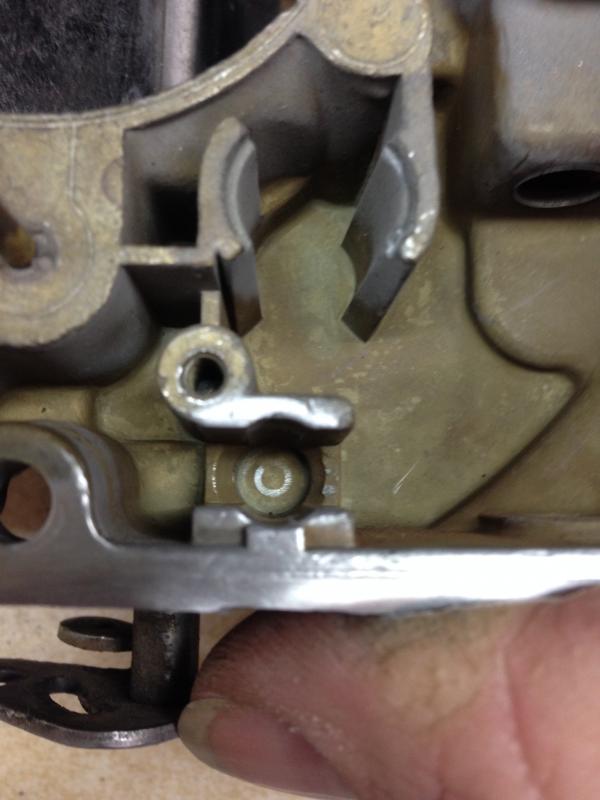
Should it be capped or is does a hose go to it?


Orange and yellow wire just hanging out.....

Blue wire not connected, no mate in site

Metal hose lines disconnected

 01-07-2014, 12:17 PM
#6

I agree with checking the timing i had a neon shake real bad after i failed to time it right the first time.
01-07-2014, 01:58 PM
#8
Mopar Fan
Thread Starter
I'll snap a shot of the ignition box......I'll try and check the distributor gear, and position though Im afraid i may make things worse, that stuff scares me to death but I guess I need to learn somehow. Basically, if I spray carb cleaner in the carb it ttys to start, and since I put the electric fuel pump on, at continues to try to start, but once it clunks like the motors jumping outta the car, its back to just draining the battery.
01-07-2014, 03:16 PM
#10
The 7th picture down looks like the ac acumulator i think thats what it is called def for the ac system though.
Last edited by Abnormal; 01-07-2014 at 03:21 PM.
01-07-2014, 05:03 PM
#11
Mopar Fan
Thread Starter
I found that plug 2 and 4 were swapped backwards on the plugs, Swapped them out, made a little more progress, its tryn harder to start, and stopped jumping on me. I found the timing guide on the from of the block, and all I could find on the crank pulley was a notch so I lined it up with the first hatch mark on the plate guide. Pulled the dist cap off and the rotor arm was pointing at the 10oclock posit which happens to be plug 6 on the distributor. My number one plug on Dist is at the 4oclock position instead of 6oclock like the manual displays. Should I swap the wires on the distributor so that #1 plug is at the firing arm(6oclock) and then go around 5,3,6,2,4 from there?
THX Abnormal...!
THX Abnormal...!
Last edited by jabo51581; 01-07-2014 at 05:14 PM.
 01-08-2014, 08:11 AM
#15
Mopar Fan
Thread Starter
i guess the proper way to do it is line up the timing with #1 cylinder ,marks aligned, pull distributor and turn rotor to #1 plug so everything is lined up for a starting point, secure distributor, then install plug wires in proper order. then IF I can get it to run, advance or retard from the cap.......But I still think the carb is jacked up...anything stand out in the pics I posted of the carb?
Last edited by jabo51581; 01-08-2014 at 08:29 AM.
01-08-2014, 09:16 AM
#16
Mopar Fan
Thread Starter
I swapped the distributor plug wires to the right order and lost all fire, returned them to the previous setup, 180 degrees backwards, and I'm back to firing but still no start. What electronic ignition should I put on it?
01-08-2014, 11:24 AM
#18
Mopar Fan
Thread Starter
01-08-2014, 11:28 AM
#19
Mopar Fan
Thread Starter
01-08-2014, 05:44 PM
#21
Mopar Lover

I would pull the # 1 spark plug....
Turn the engine, till you feel compression....
Line up the dampner with the timing tab.....
Remove the dist. cap and make sure the dist rotor is pointing to the cap tower that is going to the # 1 spark plug.....
Check to see if your getting spark to the spark plug?
Use a test light and make sure the hot is HOT.... Then check for spark again..
http://www.allpar.com/fix/electronic-ignition.html
Last edited by RacerHog; 01-08-2014 at 05:47 PM.
The following users liked this post:
jabo51581 (01-17-2014)
01-08-2014, 05:59 PM
#22
EDIT LOL I see racerhog was postin' while I was thinkin'
The uncapped fitting won't prevent starting / running, it will just make it idle poorly and lean. Doesn't that go to your air filter (snorkel heat control)?
ECU / ignition.
Not clear to me IF and HOW you have checked spark. REALIZE that even the coil wire can be bad, so check right at the coil.
"Rig" a known good plug, or a commercial spark tester, into the coil tower so you can see it, then crank the engine USING THE KEY
Using the KEY is important, why? Because coil / ignition voltage during start comes from the ignition switch directly, and bypasses the ignition resistor / bypass.
I you can NOT get a good blue spark.........
run a temporary clip lead from "battery" (such as the starter relay "big stud) directly to the coil POSitive terminal. Don't leave connected long.........just long enough to check spark.
If you still do not get a nice fat blue spark at the coil tower
Remove the ECU, scrape around the mounting and firewall and remount, tight, using star lock washers. The ECU MUST MUST be grounded to operate
Remove the distributor, the ballast, and the ECU connectors. Inspect with a light for corrosion inside, and work them in / out several times to scrub clean and to "feel" for tightness
Inspect the interior of the distributor. Check the shaft for play, and check for debri, rust, or strike damage to the pickup / reluctor.
Check the reluctor gap, using a NON magnetic feeler, at .008. O'Reallys used to carry these
SETTING TIMING
REALIZE that there NORMALLY is NO reason for an engine to "change" time. It might very well be that the timing chain / sprockets are worn and have slipped.
THE timing marks are only correct every "other" time they come up........the opposite rotation the engine is not firing no1. So you cannot simply set the timing marks and set the rotor to no1
So HOW?
There are two ways. One, if you happen to have the timing cover off, Rotate the marks to TDC and look at the no1 valves. On the correct rotation, both no1 valves will be closed. Be careful here, with the crank one turn off, they will both be nearly equally OPEN
The second way is to remove the no1 plug, stick your finger or "something" in the hole, and bump the engine until you "just start" to feel compression. A compression gauge works, too. Now watch the marks which should be "just coming" up
DO NOT set the engine at TDC, but rather, "about where" you want timing, say, 8 BTC.
Now set in / adjust the distributor so that the rotor is "just coming" to the no1 tower, and so that the reluctor is in the middle of the pickup coil. This should be close enough to start "with no fuss."
You can ALSO set/ adjust timing with a timing light......using the starter!!!!
Also, It does NOT matter if the rotor points to the so called "correct" plug tower. If it saves time, and is easier, just rotate all the wires one hole.
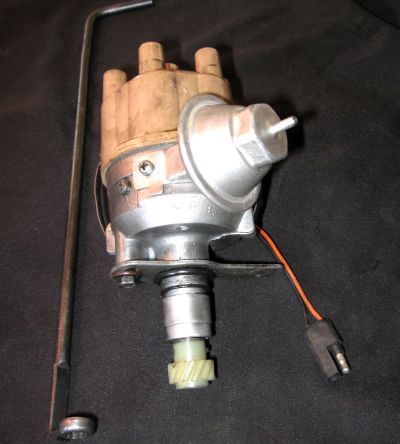
Also realize that there are TWO slots on a slant distributor. One you see, on the engine, the other is at the opposite end of the bracket under the distributor.
CHECK that the distributor is actually rotating!!! These use a plastic drive gear which can fail
You can see the additional slot in the photo below. Unless cam timing, etc, has changed, there should be no need to "mess with this."
ALSO the factory service manuals have a procedure to check cam chain slop and approximate cam timing to determine if it has slipped. You can download some service manuals over at "MyMopar
http://www.dutra.org/pictures/engine...ist-wrench.jpg
The sarcasm, by the way, is always free
The uncapped fitting won't prevent starting / running, it will just make it idle poorly and lean. Doesn't that go to your air filter (snorkel heat control)?
ECU / ignition.
Not clear to me IF and HOW you have checked spark. REALIZE that even the coil wire can be bad, so check right at the coil.
"Rig" a known good plug, or a commercial spark tester, into the coil tower so you can see it, then crank the engine USING THE KEY
Using the KEY is important, why? Because coil / ignition voltage during start comes from the ignition switch directly, and bypasses the ignition resistor / bypass.
I you can NOT get a good blue spark.........
run a temporary clip lead from "battery" (such as the starter relay "big stud) directly to the coil POSitive terminal. Don't leave connected long.........just long enough to check spark.
If you still do not get a nice fat blue spark at the coil tower
Remove the ECU, scrape around the mounting and firewall and remount, tight, using star lock washers. The ECU MUST MUST be grounded to operate
Remove the distributor, the ballast, and the ECU connectors. Inspect with a light for corrosion inside, and work them in / out several times to scrub clean and to "feel" for tightness
Inspect the interior of the distributor. Check the shaft for play, and check for debri, rust, or strike damage to the pickup / reluctor.
Check the reluctor gap, using a NON magnetic feeler, at .008. O'Reallys used to carry these
SETTING TIMING
REALIZE that there NORMALLY is NO reason for an engine to "change" time. It might very well be that the timing chain / sprockets are worn and have slipped.
THE timing marks are only correct every "other" time they come up........the opposite rotation the engine is not firing no1. So you cannot simply set the timing marks and set the rotor to no1
So HOW?
There are two ways. One, if you happen to have the timing cover off, Rotate the marks to TDC and look at the no1 valves. On the correct rotation, both no1 valves will be closed. Be careful here, with the crank one turn off, they will both be nearly equally OPEN
The second way is to remove the no1 plug, stick your finger or "something" in the hole, and bump the engine until you "just start" to feel compression. A compression gauge works, too. Now watch the marks which should be "just coming" up
DO NOT set the engine at TDC, but rather, "about where" you want timing, say, 8 BTC.
Now set in / adjust the distributor so that the rotor is "just coming" to the no1 tower, and so that the reluctor is in the middle of the pickup coil. This should be close enough to start "with no fuss."
You can ALSO set/ adjust timing with a timing light......using the starter!!!!
Also, It does NOT matter if the rotor points to the so called "correct" plug tower. If it saves time, and is easier, just rotate all the wires one hole.
Also realize that there are TWO slots on a slant distributor. One you see, on the engine, the other is at the opposite end of the bracket under the distributor.
CHECK that the distributor is actually rotating!!! These use a plastic drive gear which can fail
You can see the additional slot in the photo below. Unless cam timing, etc, has changed, there should be no need to "mess with this."
ALSO the factory service manuals have a procedure to check cam chain slop and approximate cam timing to determine if it has slipped. You can download some service manuals over at "MyMopar
http://www.dutra.org/pictures/engine...ist-wrench.jpg
The sarcasm, by the way, is always free
The following users liked this post:
jabo51581 (01-17-2014)
01-08-2014, 06:02 PM
#23
You can also eliminate the ballast and just use an HEI module. That's what I use, and I even threw together a "little box" with a coil and clip leads
You hook up coil output
distributor connector
ground and 12V
and you have ignition. I built it to "test fire" a couple (ended up 3) engines I bought, and use it as a "spare" in the trunk.
You hook up coil output
distributor connector
ground and 12V
and you have ignition. I built it to "test fire" a couple (ended up 3) engines I bought, and use it as a "spare" in the trunk.
The following users liked this post:
RacerHog (01-08-2014)
 01-17-2014, 06:55 PM
#25
Mopar Fan
Thread Starter
I would pull the # 1 spark plug....
Turn the engine, till you feel compression....
Line up the dampner with the timing tab.....
Remove the dist. cap and make sure the dist rotor is pointing to the cap tower that is going to the # 1 spark plug.....
Check to see if your getting spark to the spark plug?
Use a test light and make sure the hot is HOT.... Then check for spark again..
http://www.allpar.com/fix/electronic-ignition.html
Turn the engine, till you feel compression....
Line up the dampner with the timing tab.....
Remove the dist. cap and make sure the dist rotor is pointing to the cap tower that is going to the # 1 spark plug.....
Check to see if your getting spark to the spark plug?
Use a test light and make sure the hot is HOT.... Then check for spark again..
http://www.allpar.com/fix/electronic-ignition.html
Last edited by jabo51581; 01-17-2014 at 07:20 PM.
01-17-2014, 07:09 PM
#26
Mopar Fan
Thread Starter
EDIT LOL I see racerhog was postin' while I was thinkin'
The uncapped fitting won't prevent starting / running, it will just make it idle poorly and lean. Doesn't that go to your air filter (snorkel heat control)?
ECU / ignition.
Not clear to me IF and HOW you have checked spark. REALIZE that even the coil wire can be bad, so check right at the coil.
"Rig" a known good plug, or a commercial spark tester, into the coil tower so you can see it, then crank the engine USING THE KEY
Using the KEY is important, why? Because coil / ignition voltage during start comes from the ignition switch directly, and bypasses the ignition resistor / bypass.
I you can NOT get a good blue spark.........
run a temporary clip lead from "battery" (such as the starter relay "big stud) directly to the coil POSitive terminal. Don't leave connected long.........just long enough to check spark.
If you still do not get a nice fat blue spark at the coil tower
Remove the ECU, scrape around the mounting and firewall and remount, tight, using star lock washers. The ECU MUST MUST be grounded to operate
Remove the distributor, the ballast, and the ECU connectors. Inspect with a light for corrosion inside, and work them in / out several times to scrub clean and to "feel" for tightness
Inspect the interior of the distributor. Check the shaft for play, and check for debri, rust, or strike damage to the pickup / reluctor.
Check the reluctor gap, using a NON magnetic feeler, at .008. O'Reallys used to carry these
SETTING TIMING
REALIZE that there NORMALLY is NO reason for an engine to "change" time. It might very well be that the timing chain / sprockets are worn and have slipped.
THE timing marks are only correct every "other" time they come up........the opposite rotation the engine is not firing no1. So you cannot simply set the timing marks and set the rotor to no1
So HOW?
There are two ways. One, if you happen to have the timing cover off, Rotate the marks to TDC and look at the no1 valves. On the correct rotation, both no1 valves will be closed. Be careful here, with the crank one turn off, they will both be nearly equally OPEN
The second way is to remove the no1 plug, stick your finger or "something" in the hole, and bump the engine until you "just start" to feel compression. A compression gauge works, too. Now watch the marks which should be "just coming" up
DO NOT set the engine at TDC, but rather, "about where" you want timing, say, 8 BTC.
Now set in / adjust the distributor so that the rotor is "just coming" to the no1 tower, and so that the reluctor is in the middle of the pickup coil. This should be close enough to start "with no fuss."
You can ALSO set/ adjust timing with a timing light......using the starter!!!!
Also, It does NOT matter if the rotor points to the so called "correct" plug tower. If it saves time, and is easier, just rotate all the wires one hole.
Also realize that there are TWO slots on a slant distributor. One you see, on the engine, the other is at the opposite end of the bracket under the distributor.
CHECK that the distributor is actually rotating!!! These use a plastic drive gear which can fail
You can see the additional slot in the photo below. Unless cam timing, etc, has changed, there should be no need to "mess with this."
ALSO the factory service manuals have a procedure to check cam chain slop and approximate cam timing to determine if it has slipped. You can download some service manuals over at "MyMopar
http://www.dutra.org/pictures/engine...ist-wrench.jpg
The sarcasm, by the way, is always free
Last edited by jabo51581; 01-17-2014 at 07:14 PM.
01-18-2014, 10:52 AM
#29
Only thing that throws me off, If I set #1 top dead center, lined rotor just shy of #1 dist post, I get nothing, but if I set it to #6 dist post"where it was when I bought the car" everything seems like Im just a spark from starting at this point. Im trying to figure out how the firing order could do a complete 180, I even swapped the plug wires on the dist, on the block, etc...., it only works the way it was #1 TDC at compression, rotor on dist post 6...??
which is why I posted this:
So HOW?
There are two ways. One, if you happen to have the timing cover off, Rotate the marks to TDC and look at the no1 valves. On the correct rotation, both no1 valves will be closed. Be careful here, with the crank one turn off, they will both be nearly equally OPEN
The second way is to remove the no1 plug, stick your finger or "something" in the hole, and bump the engine until you "just start" to feel compression. A compression gauge works, too. Now watch the marks which should be "just coming" up
DO NOT set the engine at TDC, but rather, "about where" you want timing, say, 8 BTC.
Last edited by 440roadrunner; 01-18-2014 at 10:55 AM.
01-19-2014, 11:40 AM
#30
Mopar Fan
Thread Starter
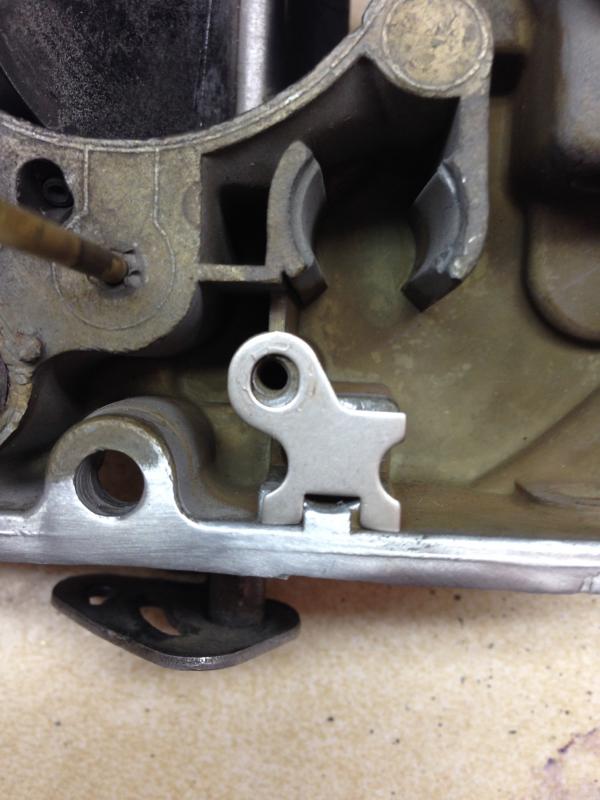
well, I'm rebuilding the carb(my first rebuild) that happened to be stripped out and the bolt secured with liquid nails!? Re threaded, problem solved. Now Im at a point in rebuilding where I'm installing a RETAINER PLATE and the top half of the carb, I don't remember removing anything from beneath the plate, but it appears something was there at one time, maybe this carb is a MUTT. Any input on what might go under this plate? Single barrel Holley-S6-225....