
Tearin into my 440, possible blown head gasket
 05-29-2012, 09:14 AM
#1

Tearin into my 440, possible blown head gasket
Hello again all,
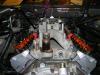
Ive posted my concerns about a possible blown head gasket before and now the issue can no longer be ignored so I started tearing down the top end, hoping to find something small and easily fixable. So far I got the intake, valley pan, valve covers and headers off. Since this is my first time, I was wondering if I could post some pics of certian questionable areas since I may not really notice anything out of place. I did see bubbles in my overflow res like suggested, so I am counting on it being the gaskets. Let me know if anything in these pics looks like something I should be made aware of. Will be taking the heads off tonight. Really appreciate the help as always...
Ive posted my concerns about a possible blown head gasket before and now the issue can no longer be ignored so I started tearing down the top end, hoping to find something small and easily fixable. So far I got the intake, valley pan, valve covers and headers off. Since this is my first time, I was wondering if I could post some pics of certian questionable areas since I may not really notice anything out of place. I did see bubbles in my overflow res like suggested, so I am counting on it being the gaskets. Let me know if anything in these pics looks like something I should be made aware of. Will be taking the heads off tonight. Really appreciate the help as always...
 05-31-2012, 02:08 PM
#2
I got to taking off my drivers side head bolts on my lunch break and my first look at the head gasket didn't really give me any more indication as to what my problem is. I don't know if Im missing it but then again I dont really know what I am supposed to be looking for. There is a lot of oil/carbon build up in the ports of my heads, as per the pics, there was also a lot of oil on the rear head bolts and the aft section of my header gasket. The tops of my pistons are no longer polished, there is a fair amount of carbon build up on it, is that normal for a motor that was built ground up like 6 months ago? Didnt see any ripples in the cylinde walls but there is some wear on the left and right sides of the walls in almost all of them. I did notice that the gaskets were not really lining up with the coolant bores. The coolant bores were only about 1/3 lined up, they were offset to the right of the gasket bore and only barely allowing coolant to flow to the head. I will post pics of all this in a few hours but Im really worried now, all help is welcome.
Thanks
Thanks
05-31-2012, 03:39 PM
#4
All looks good to me from what I can see.
I re read your old posts about the milky substance in the radiator and now the air bubbles. So you have contamination of fluids.
Intake gaskets and head gaskets are a good bet for sure. But look for cracks in the heads. I like to magna flux the heads if I have a suspected exhaust crossover to coolant.
Get yourself a straight edge and some feeler guages and check the deck of the motor and then flip the heads and check them too. This isnt exact science but if someone torque it wrong and something warped you can see it. Dont spend good money and labor on gaskets if something isnt true.
Do NOT reuse the headbolts. And follow all the torque sequences in order.
One more tip: When the intake is off and you have re torqued the heads I like to lay the intake on dryand see how much gap I have in the front and rear wall and then check the bolt holes for alignment.
05-31-2012, 04:02 PM
#5
Super Moderator

I would re-use ARP fasteners but not factory ones. Don't forget to use ARP lube with their fasteners it makes a big difference when torqued properly.
05-31-2012, 06:38 PM
#6
All fasteners are new ARP (were new) Just wanted to post these pics of the gaskets and the valves were different colors, not sure what that means. What do you guys think?
Thanks for all the help and info so far, really appreciate it.
Thanks for all the help and info so far, really appreciate it.
05-31-2012, 06:49 PM
#8
05-31-2012, 07:50 PM
#9
Super Moderator
Nothing really abnormal in the pics. Carbon build up is all. I would take the heads to a machine shop and have them pressure checked and if they check good have them shave .010" off to clean them up again. What head gasket? I would try a Fel Pro 8519PT.
06-01-2012, 05:34 AM
#10
My time is valuable to me so I don't like doing things twice... That being said..
Here is how I would proceed.
I would label the valves, springs, retainer and locks so they can go back in the exact spots. If you have that much carbon in the chambers the back of the stems may be coated with carbon. Clean the backs. label which ones were loaded up. Post back.
As Brememeric stated eventually have them cleaned and checked for cracks. If you can get a thicker head gasket that has a .010 increase on compressed thickness then mill the heads .010. If you can NOT get a head gasket to meet the mil depth just clean for straightness. You don't need to mess with or the cost of messing with geometry in the valve train.
If you are gonna keep doing home diagnostics I would want to see the back of the white exhaust valve where the stem protrudes from the guide in the cylinder head. And the seat it comes out of. It looks ok.. I just like a better look.
If this is your first top end removal you are doing nice job and approaching it smartly. Nicely done!
06-02-2012, 08:27 AM
#11
Thanks for the pep talk PK, I literally have 0 people in my group of friends that have any knowledge of cars/motors. My buddy who works on imports is moving back to town but thats another month away. (Don't worry, Im almost done converting him, all it took was 1 ride in the Plymouth, lol) I'm getting a sitter for today so I can spend some time on the car. I also need to pick up whatever the tool is called that compresses your valve springs, is that what I need to show you more of the valve stem? Im not sure exactly what your wanting to see but I need one anyways. I'll get back later post some pics of my findings.
BREM, appreciate your help as well. Your recomendation of head gasket was in fact what I was using. The fact that the coolant passages where so far off center is not abnormal? You can see in my gasket pick the indentation of how it lined up to my head, the circle is just barley cathing the right side of the coolant slit in the gasket. My heads were milled but we dont know how much, so dont know if that matters either....
Thanks
06-02-2012, 01:33 PM
#12
I hope I didn't worry you needlessly. They look fine. The overheating condition you had and that off colored valve just peaked my curiosity some..
Thats funny about the imports... You are so right, once the import owners get into something with torque they are instantly converted .
.
The reason for my inquiry was that the exhaust valve does get hotter than the intake valve. Often slightly different in color if AF ration is good. The intake valve gets cooled from air and fuel charge, the exhaust valve does not gets the same cooling, that heat is transmitted thru the margins via the seat and into the casting where water flow carries it away. (its more detailed than that simple version but about the best I can muster).
If its not seated correctly the heat stays in the valve and transmits thru the stem to the guide and you have scorching. This can happen in reverse too from side loaded valves causing heat friction with the guides and doing the same to the valve.
Here is a pick of two valves plucked from RHS casting that were overheated. They functioned and had good compression. The seat work was poor and the margins horrible. So they heated up. These are totally cleaned up to see if they could be reused. Look at the burns on the back of the face and the scorching were the stem protrudes from the guide in the runner.. They are junk.
Sorry for the long winded explanation but you said you were solo on this endeavor so I figured it would help. That valve is prob fine but with that little "tell tale" it warrants a quick peak. A good shop would take a peak at that too.
Thats funny about the imports... You are so right, once the import owners get into something with torque they are instantly converted
. The reason for my inquiry was that the exhaust valve does get hotter than the intake valve. Often slightly different in color if AF ration is good. The intake valve gets cooled from air and fuel charge, the exhaust valve does not gets the same cooling, that heat is transmitted thru the margins via the seat and into the casting where water flow carries it away. (its more detailed than that simple version but about the best I can muster).
If its not seated correctly the heat stays in the valve and transmits thru the stem to the guide and you have scorching. This can happen in reverse too from side loaded valves causing heat friction with the guides and doing the same to the valve.
Here is a pick of two valves plucked from RHS casting that were overheated. They functioned and had good compression. The seat work was poor and the margins horrible. So they heated up. These are totally cleaned up to see if they could be reused. Look at the burns on the back of the face and the scorching were the stem protrudes from the guide in the runner.. They are junk.
Sorry for the long winded explanation but you said you were solo on this endeavor so I figured it would help. That valve is prob fine but with that little "tell tale" it warrants a quick peak. A good shop would take a peak at that too.
06-06-2012, 06:00 PM
#13
UPDATE
So I ended up having a bunch of family things to take care of and havnt had the time to look into diagnosing the heads so I went ahead and called up the machine shop that put em together. Theyre replacing the valves, I guess they were never replaced and had some pitting on both ends, charged me for new vlaves though...Anyways he already checked em over, they were warped a bit and hes got em magnafluxed & cut straight already, tomorrow they will have the new valves installed. I started investigating the block, there is a lot of rust build up in the coolant passageways in the block. I can only assume that its the reason I started overheating in the first place, maybe something was clogged in the radiator or therm...really not sure but from talking with the shop they suggested that I attempt to clean it out as best I can then use a rust inhibitor, which I believe Royal Purple just came out with, so hope that will fix my issues.
Also wondering if the heads were warped, what are my odds on the block deck being warped too? I think its a little more resistant to warpage but not really sure. All thoughts and ideas welcome.
Thanks
Also wondering if the heads were warped, what are my odds on the block deck being warped too? I think its a little more resistant to warpage but not really sure. All thoughts and ideas welcome.
Thanks
06-06-2012, 06:39 PM
#14
Use a machinist straight edge with some feeler gauges to check the deck. There are acceptable tolerances in deck straightness though. Check it and then bolt those heads up. You arent building a cup car
U can use boiler brushes an industrial cleaners like CLR or comparable to clean those passages. Rinse well.
Most machine shops clean, magnaflux and mil for straightness before they dig in, unless you advise otherwise.
U can use boiler brushes an industrial cleaners like CLR or comparable to clean those passages. Rinse well.
Most machine shops clean, magnaflux and mil for straightness before they dig in, unless you advise otherwise.
The following users liked this post:
69POLARA383 (06-07-2012)
06-08-2012, 01:04 PM
#15
New heads,possible new issue? Looks like lots of pitting, how serious a problem is this now? About to forget the whole iron headed stock look and get some stealth heads...Just really like the sleeper look and I eventually want to run nitrous so would aluminum be the way to go anyways? Btw, heads were not new, they were my old heads just cut, again, and now I have some serious material cut from the chamber, who knows what my compression will be. The heads were the only thing "not new" and were previously milled for higher compression by the precious owner, the guy just couldnt remember how much was takin off. Is there an easier way to figure this out than going back to the machine shop?
Last edited by 69POLARA383; 06-08-2012 at 01:07 PM.
06-08-2012, 01:12 PM
#16
Those heads look good. I don't see any issues. When you say "Pitting" I think you are referring to the casting themselves? Their iron. The newer castings do look more pre polished these days but I cant see problems with what you have.
The following users liked this post:
69POLARA383 (06-08-2012)
06-08-2012, 01:18 PM
#17
Mopar Fanatic

New heads,possible new issue? Looks like lots of pitting, how serious a problem is this now? About to forget the whole iron headed stock look and get some stealth heads...Just really like the sleeper look and I eventually want to run nitrous so would aluminum be the way to go anyways? Btw, heads were not new, they were my old heads just cut, again, and now I have some serious material cut from the chamber, who knows what my compression will be. The heads were the only thing "not new" and were previously milled for higher compression by the precious owner, the guy just couldnt remember how much was takin off. Is there an easier way to figure this out than going back to the machine shop?
Last edited by MrOldart2U; 06-08-2012 at 01:22 PM.
The following users liked this post:
69POLARA383 (06-08-2012)
 06-08-2012, 05:58 PM
#19
Super Moderator
Just make sure you dry fit the intake manifold. Not knowing how much they are cut can throw off the bolt holes and the intake may need to be milled.
The following users liked this post:
69POLARA383 (06-08-2012)
06-09-2012, 07:25 AM
#20
Need help, installing roller rockers
Putting the heads on now, wanted to get some info on bolting up the rockers. They were on the heads before and already set up, Just want to know how to bolt em in with the pushrods and valve springs (dont want to bend anything) Any tips, warnings suggestions...thanks
07-05-2012, 09:11 AM
#22
Had the car all put back together on yesterday, started it upa nd ran great for about 4-5 minutes. Then it started spittin oil out form between the block and the heads...any reason why this would happen? Shoudl be torqued properly everywhere...any help is appreciated.
BTW, was looking at a complete 400 to replace the 440 while I get her back together. Would that be a straight swap or would I need new anything?
Thanks...
BTW, was looking at a complete 400 to replace the 440 while I get her back together. Would that be a straight swap or would I need new anything?
Thanks...
07-05-2012, 01:03 PM
#24
07-06-2012, 10:47 AM
#27
Oil seems to be coming from both sides, passenger much less than driver side though. Looks like its coming out from right behind the 2 center header tubes on driver side, cant really get to see it much till I get back under the car and take the headers off...
07-08-2012, 12:33 PM
#28
I re-cycled through the torque sequence on both heads, not really seeing and oil leaking anymore but still have some really bad smoking and a sizzling sound from the exhaust manifolds. Have no idea what it could be...could I have my rockers adjusted wrong or timing?? Very frustrated...all help appreciated.
07-09-2012, 07:42 AM
#30
I thought that was an issue so I double checked my torque #'s and ran a new bead of sealer across the gasket. The thing is scalding hot in about 10-20 seconds of running though, is that a normal amount of time for everything to get that hot? Plus Im not really seeing any leaking, could just be missing it I guess...


