
Voltage regulator 67 bel


Thread Starter
Mopar Fan
Joined: Mar 2012
Posts: 50
Likes: 0
From: Lake Charles, la
Voltage regulator 67 bel
hey guys. i have a 100 amp alt on my 67 belvedere (sound system) and my radio cuts out when i give it gas and turn on lights and other instances. i figured out i have a 100a alt and a 45a regulator. no wonder my gauge was fluctuating so much! when i give it gas the needle goes where its supposed to. at idle it fluctuates and when i give it gas again thats usually when the radio will cut out, not go off, just stop music, then it picks right back up again. i read a lot of people going to newer post 70 voltage regulators. i found the pigtail for them at napa. getting it tomorrow. my question is, would a voltage regulator for a 70 charger with a 440 or 72 charger work? thats what i used to look it up, same part numbers for both regulators. just wanna make sure its the same amperage!!

Thread Starter
Mopar Fan
Joined: Mar 2012
Posts: 50
Likes: 0
From: Lake Charles, la
Idk prolly same part, they have the regulator for the chargers at local parts houses, but none say how many amps they are rated at. Only the mechanical pre 70 regulators say, and it's either 45 or 60 amps :-/
Thread Starter
Mopar Fan
Joined: Mar 2012
Posts: 50
Likes: 0
From: Lake Charles, la
Man now I'm even hearing more stuff. People say I should bypass meter and stuff cause of potential danger. Damnit, brand new engine compartment harness and everything and I'm already gonna have to cut it up??!! Bulk head is brand new too!! Dash wiring is original but rewrapped it was in such good shape. Can I just disconnect gauge, and upgrade regulator?? Since bulk head is new, I don't think I'd have a problem and my odds are better. I sure hate electrical crap and I hate to start cutting on a brand new restored car. Ugh. What do you guys think? The gauge acts so weird though. At idle It bounces of center, when I accelerate it goes to far right then radio quits then goes back to center perfectly still, and radio kicks back on. When I gas it, or "romp" it, the gauge goes to far right, it seems it's only sometimes it does it, I guess when brake lights go off and I accelerate? Not sure. Man this is confusing stuff.

Mopar Lover
Joined: Nov 2007
Posts: 2,424
Likes: 248
1 We need to know what this alternator is that you are using.
2 In order to use the 70/ later style regulator, your alternator MUST have 2 insulated field terminals. The proper description for this is "isolated field" incorrectly often called "dual field."
If you are using a 69/ earlier style alternator, and some other designs, you have one field terminal grounded. You cannot use a 70/ later regulator with this grounded field
3 There are other regulators you can use. One is Standard Motor Products no. VR-128. It does not look like the 69/ earlier type, but it wires up the same way.
4 With that huge alternator, you are indeed GOING to cause trouble. The main thing is
too small wiring in the main charging circuit, IE from the alternator, through the bulkhead, the ammeter, back out the bulkhead, and to the battery. The bulkhead is a HUGE problem
READ THIS excellent article on the subject:
http://www.madelectrical.com/electri...p-gauges.shtml
which came from here:
http://www.madelectrical.com/electrical-tech.shtml
Scroll down the page and examine the simplified diagram, which shows the main charge wire. This wire, too small, and the undersized bulkhead connector terminals, AS WELL AS problems with the ammeter itself, are what starts the fire
You PROBABLY do NOT need to hack up your car wiring. Simply ADD a nice big no8 / no6 jumper wire directly from the alternator output stud to either the battery positive, or the stud on the start relay. Your ammeter will now not work. You can either modify the dash cluster to replace the ammeter with a voltmeter, or just use a "hang on" voltmeter run through a switched 12V source.
I'm assuming, though, that your wiring is in "good shape." Inspect your bulkhead connector as pictured in the article. You MAY need to do something else with the bulkhead. There is SOME chance that either the ammeter has a problem, or that the "in harness splice" is broken.
This splice, only partially pictured in the article, is a factory welded splice taped up in the under dash harness. This splice "Ys" off to supply
the headlight circuit
the fusebox "hot" buss
the ignition switch main feed
a couple of other things, I forget.
These splices HAVE failed in a few cases.
HERE for example, is how I did my 67 Dart ammeter -- to -- voltmeter. This project was not my idea, someone else thought this up. Basically, you buy a "Sunpro" voltmeter, take it apart, and mount it behind the ammeter face. It has a calibration pot inside that you can adjust. You adjust the needle so that 14V exactly places the needle on the center mark of the old ammeter scale. Thus, when the alternator is operating at the proper charging voltage (13.8-14.2) the ammeter needle is centered, just like it was when the old ammeter was "satisfied."
http://www.forabodiesonly.com/mopar/...=119480&page=3
Last edited by 440roadrunner; Mar 27, 2012 at 10:42 PM.
Thread Starter
Mopar Fan
Joined: Mar 2012
Posts: 50
Likes: 0
From: Lake Charles, la
Great info. It does have dual field I believe. It's a dual wire setup, there's two blue wires going to one side of the vr and one green to other. (the blues are spliced together in a nice heat shrunk connector for the vr). He used a new wiring harness and new bulk head, but didn't redone under dash wiring, instead it was so nice, he rewrapped it and everything in the car is true to diagram. Instead of alt of course. Now you say it'd be so much easier to run wire from alt to battery, and gauge will no longer work (I guess cause ohms laws, travels least resistance), so question is, do I still have to use voltage regulator if I do that? Should I just go ahead and upgrade to new reg? Also, if I just run wire from alt to battery nothing will change electronic wise inside, everything will still work? The car is only driven to shows or around town, or trailered, I definitely don't want a fire! Im new to forums is there a way to post pics? On the alt, looking down from front of car, there's a wire on left, one on right, and I'm guessing a ground in back connected by nut. If that helps on type of alt. the guy I got it from, seems he did everything right to upgrade the system, just didn't change vr or add additional line. Now one thing I thought about doing, was let it run, and turn everything on and see how much amp output I have. If its 60 amps or less ill just change alt back. Hopefully I can find a two wire 60 amp alt that'll work cause I just hate electrical stuff. (family is all electricians except me lol). For now I'll disconnect amp gauge, until I can do what you did I like that idea about the volt gauge!! For now I'm guessing I wanna get the big fix done. So to sum up, I need new additional wire from alt to Batt (I'm guessing leave others where they are, just add another on top of existing to batt), new regulator. From there I'll be safer, and everything will work and look great! :-) let me know if that's incorrect! I really appreciate all te input! I don't have anyone to fall back on with this stuff. Family hates working on cars and car electronics so they're no help haha
Thread Starter
Mopar Fan
Joined: Mar 2012
Posts: 50
Likes: 0
From: Lake Charles, la
The standard vr128 looks good, mount up same way! I'm guess that's a female connector? Or a male? I have a female connector that's similar to that that plugs into one I got now, an other side kinda bolts on, it's oem equipment so you know lol I'm guessing that's a solid state. It'd look better than putting a post 70s one under the hood. And I don't have to splice that new pigtail in. Yay!
Thread Starter
Mopar Fan
Joined: Mar 2012
Posts: 50
Likes: 0
From: Lake Charles, la
Hmm, I could prolly just add that wire and leave everything else as it is huh? That'd be super easy lol. Since current would would be traveling least resistance, I could use vr I have right now, and leave bulk head and amp gauge alone. Am I correct thinking that? Or very misguided and retarded? Lol Of course I'm not sure if that would fix my radio issue. But being that most current would be bypassing regulator, it might not cut out on me anymore.
Mopar Lover
Joined: Nov 2007
Posts: 2,424
Likes: 248
The VR-128 should wire up just like your old one, as I said it just looks different
I get the feeling from your reply that you didn't read much very carefully. PLEASE READ the MAD article I posted. The big BIG problem with these old cars and high charging current is the CHARGING WIRING the BULKHEAD CONNECTOR and the AMMETER
If you run a wire direct from the alternator output to the starter relay, BOTH the old charging wire, AND the old main battery feed going through the bulkhead now become ONE PARALLEL conductor, and are now ONLY supplying power to the interior of the car, but NOT carrying heavy charging current. As in the MAD article, it is also a good idea to connect the ammeter wires together to eliminate any problem with the ammeter
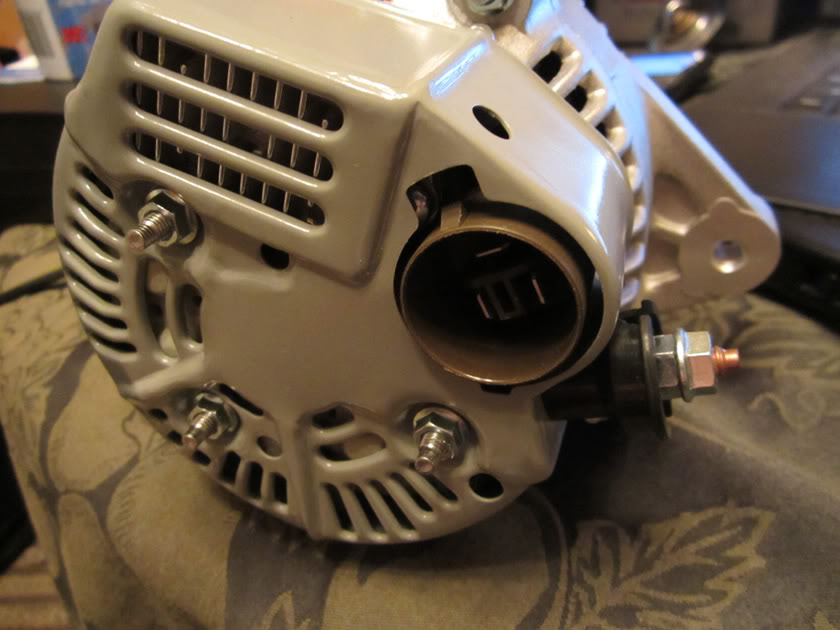
Compare your alternator to the photos below:
The photo below is an early 69/ earlier alternator. This is a "trick" because if you look at the 12 o'clock position above the bearing, you can see a rebuilder has drilled a hole in the case. This was done by many rebuilders to convert the old style GROUNDED field to the newer ISOLATED field. So this alternator once had an insulated brush installed in that hole
Ignoring the hole, look at the 6 o'clock position below the bearing. THIS is the early GROUNDED brush. The second brush is the insulated on, to the left of the bearing at 9 o'clock

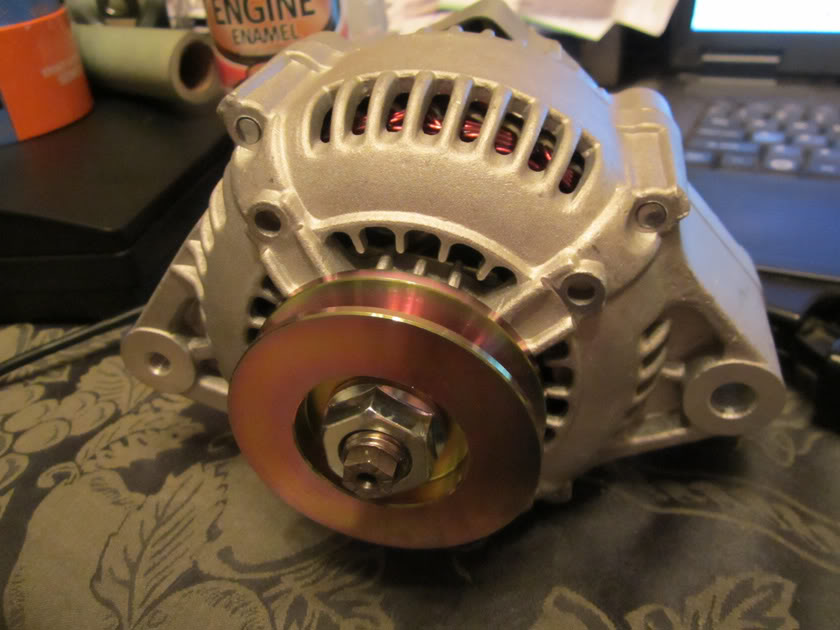
The alternator below is the first few years of the 70 / later ISOLATED FIELD alternator. It has become known as a "round back" because of it's rounded appearance. You can see a brush (field terminal) again to the left, just like the early one above, and a second insulated brush holder at the bottom, cut off in the photo

The alternator below is simply a newer design, and known as a SQUARE BACK because of it's "sharp corned" appearance, and works just like the one above, and in fact any of the three fit the same brackets
YOU CAN USE the later alternators with an EARLY regulator by simply making up a jumper wire on ONE of the field terminals and grounding it.

I get the feeling from your reply that you didn't read much very carefully. PLEASE READ the MAD article I posted. The big BIG problem with these old cars and high charging current is the CHARGING WIRING the BULKHEAD CONNECTOR and the AMMETER
If you run a wire direct from the alternator output to the starter relay, BOTH the old charging wire, AND the old main battery feed going through the bulkhead now become ONE PARALLEL conductor, and are now ONLY supplying power to the interior of the car, but NOT carrying heavy charging current. As in the MAD article, it is also a good idea to connect the ammeter wires together to eliminate any problem with the ammeter
Compare your alternator to the photos below:
The photo below is an early 69/ earlier alternator. This is a "trick" because if you look at the 12 o'clock position above the bearing, you can see a rebuilder has drilled a hole in the case. This was done by many rebuilders to convert the old style GROUNDED field to the newer ISOLATED field. So this alternator once had an insulated brush installed in that hole
Ignoring the hole, look at the 6 o'clock position below the bearing. THIS is the early GROUNDED brush. The second brush is the insulated on, to the left of the bearing at 9 o'clock
The alternator below is the first few years of the 70 / later ISOLATED FIELD alternator. It has become known as a "round back" because of it's rounded appearance. You can see a brush (field terminal) again to the left, just like the early one above, and a second insulated brush holder at the bottom, cut off in the photo
The alternator below is simply a newer design, and known as a SQUARE BACK because of it's "sharp corned" appearance, and works just like the one above, and in fact any of the three fit the same brackets
YOU CAN USE the later alternators with an EARLY regulator by simply making up a jumper wire on ONE of the field terminals and grounding it.
Last edited by 440roadrunner; Mar 28, 2012 at 08:31 AM.
Thread Starter
Mopar Fan
Joined: Mar 2012
Posts: 50
Likes: 0
From: Lake Charles, la
okay alt i have is second one you showed in the pictures. im gonna figure out how to post pics and ill let yall see what i have! bout to check amp draw for whole car now. if its less than 65 ill just put smaller alt on and run wire to starter relay or positive on battery. ill post my findings! along with pics of course.
Thread Starter
Mopar Fan
Joined: Mar 2012
Posts: 50
Likes: 0
From: Lake Charles, la
I found out its a powermaster alt, looks like middle pic with both fields. I thought place where it has that nut was a ground but the third pic shows batt. I wonder if it's internally regulated.
Mopar Lover
Joined: Nov 2007
Posts: 2,424
Likes: 248
A quick look at the powermaster site seems to indicate that their Mopar alternator ---which appears to look like the vintage Mopars-- is isolated field, and does not have a regulator.
There is really no such thing as an internal regulator for a Mopar that I'm aware of. Someone was selling a regulator that was a tiny little box which bolted to the rear of the alternator, and you would be able to see that easily
There is really no such thing as an internal regulator for a Mopar that I'm aware of. Someone was selling a regulator that was a tiny little box which bolted to the rear of the alternator, and you would be able to see that easily

Super Moderator
Joined: Sep 2010
Posts: 3,609
Likes: 181
From: Houston, Texas
Here's what I will be running in the Dart. If your not worried about stock this is a internally regulated 80 amp lightweight Denso alternator. I run a big 6 awg wire from the battery lug on the alternator all the way straight to the battery. Then you need the ignition source voltage to the back connector to turn it on and a battery voltage reference to the other connector on back. One connector is not used.
Thread Starter
Mopar Fan
Joined: Mar 2012
Posts: 50
Likes: 0
From: Lake Charles, la
Nice! Seems that power master only makes 75 amp and 120-200 amp alts for what I have. So being that I'm positive it's only a 75 amp alt, I think I don't really have to worry about stuff, being that my alt will never need to put out 75 amps. I will install fusible links tho to protect the system just in case. Tomorrow I am installing a newer ss vr. I found a article in Mopar mag, says that with old style mechanical reg, modern electronics cant handle te voltage swing, which after troubleshooting is exactly what's happening. So they recommend newer one which I'm getting. When I get home to my computer, I will upload pics for y'all so stay tuned. Now, question: how is meter in dash considered an amp meter, if it shows dc voltage from alternator? And it shows the voltage swing while running, cause I can tell exactly when it'll cut out, by watching gauge. Hmm. I figure amp draw would be more constant. Thoughts?
Mopar Lover
Joined: Nov 2007
Posts: 2,424
Likes: 248
I get the DISTINCT feeling you are not bothering to read what is posted here. ("Don't have to worry.")
A reality check: "Back in the day" when I owned a 70 440 Road Runner, I burned up the bulkhead connector WITH A 60 AMP FACTORY ALTERNATOR. Because I realized that the connector was inadequate, I ran a couple of parallel conductors through a hole reamed out in the connector, LONG before this was common knowledge. Part of this decision was because the bulkhead connector housing was so badly melted that I could not have replaced the connector terminals in the original plastic.
This was long LONG before Al Gore had invented the internet, and long before MAD electrical posted their website. I SUGGEST that you go back and read that article, then go out and INSPECT your bulkhead connector.
??? The factory meter in vinage Mopars IS an ammeter. It is NOT a voltmeter.
Mopar Mag may be technically correct, but "in modern terms" they are NOT correct, WHY?? This is because the vast majority of 69/ earlier replacement regulators are REALLY electronic regulators IN AN OLD BOX. In fact, some of them have a SHORTER box like this one:
http://www.classicindustries.com/ima...mg/v/vr706.jpg
Thread Starter
Mopar Fan
Joined: Mar 2012
Posts: 50
Likes: 0
From: Lake Charles, la
Okay, I was just hoping to not have to drill stuff or cut harness. But I'd rather do that than have a 25k cars dash go up in flames. That's what I'll do then. Ima still replace regulator, cause of voltage swing, I took it apart it is indeed mechanical. But I'm also gonna bypass meter and fix bulk head. Man, being 6'3" under dash work sucks! :P I traced lines out last night on diagrams. Some people tell me just to add 6 gauge wire to alt to battery, some say drill bulk head. Id like it to look factory, so I believe like I said, drill bulk head, and replace gauge in dash with a voltmeter, do like guy in previous reply. Sounds easy enough. My only thought is, the people that run wire to batt from alt, with the fusible link, how is that being regulated from alt to battery? I've seen someone do this on a s10 blazer, and battery swole up and almost exploded cause the alt was putting out so much it was boiling the water in battery. I just printed out mad article, ima do what they've done. But I'm curious as to how that works.
Super Moderator
Joined: Sep 2010
Posts: 3,609
Likes: 181
From: Houston, Texas
I did the mad electrical thing a different way. My bulkhead connector, engine forward and underdash wiring is new from Year One. When I put that Denso unit on I bypassed the ampmeter and the old heavy wire from the old alternator went straight to the battery and was fused. Thus I have two parallel feeds through the bulkhead. The easy way to say it is both old ampmeter wires are feeding straight off the battery.
Thread Starter
Mopar Fan
Joined: Mar 2012
Posts: 50
Likes: 0
From: Lake Charles, la
Installed new Chrysler post 70s version regulator today with new pigtail to see how it did. System wouldn't charge. But charged fine with mechanical. It's wired correctly, spent 2 hours ohming wires and verifying that. Reg was grounded properly. Now on my 880, previous owner upgraded to ss vr replacement and it looks exactly like my mechanical on the belvedere but shorter case. I guess I should buy one of those and try. I never even noticed before what it had on it, no wonder it always worked so good!
Mopar Lover
Joined: Nov 2007
Posts: 2,424
Likes: 248
You sure it's wired correctly?
One quick test is to remove the regulator connector and probe the connector with key in run. You should have power to both terminals. Now go down and remove either field wire from the alternator. This should kill power to the green wire at the regulator. Make sure you have it wired like so:
from here:
http://www.mymopar.com/index.php?pid=18
Notice that the green field wire goes to the terminal on the regulator in the corner of the connector
Super Moderator
Joined: Sep 2010
Posts: 3,609
Likes: 181
From: Houston, Texas
You sure it's wired correctly?
One quick test is to remove the regulator connector and probe the connector with key in run. You should have power to both terminals. Now go down and remove either field wire from the alternator. This should kill power to the green wire at the regulator. Make sure you have it wired like so:
from here:
http://www.mymopar.com/index.php?pid=18
Notice that the green field wire goes to the terminal on the regulator in the corner of the connector
http://www.mymopar.com/index.php?pid=78

Thread Starter
Mopar Fan
Joined: Mar 2012
Posts: 50
Likes: 0
From: Lake Charles, la
Well I already pulled it off and ordered the vr 706 which is just a replacement for what I had just ss. I believe after it was said and done and going back over the diagrams, I had it wired incorrectly for that type that I had. I needed an extra field wire, and swap two on reg. but the vr 706 will work just like last one, so no need to add extra field wire. I got all the stuff for the bypass today, might tackle that next weekend. I get new reg Saturday, I'll drop it in Saturday afternoon and report what it does. Hopefully I didn't fry anything today. Ugh.
Thread Starter
Mopar Fan
Joined: Mar 2012
Posts: 50
Likes: 0
From: Lake Charles, la
Replaced regulator yesterday, fired it up, charging fine. Connected a 6 gauge from back of alt to starter relay, everything's fine. I figured I'd leave it like that for a little while until I get some time to do more. Ammeter no longer works as y'all said. Drive it all last night, right as I finally got home, the headlights just went out, kindve flickered. I pushed the switch in and out a few times and they would come on then go out. Finally I turned them off then back on they came on like nothing happened. I then turned off my brights and went on home. What would cause that? I believe I got halogens in it, but it never did it before all the changes, I've had same lights in the car. Should I get a new switch? Can old switch not handle the newer lights?
Mopar Lover
Joined: Nov 2007
Posts: 2,424
Likes: 248
Like I said before, BULKHEAD CONNECTOR
But there are several problems with these old cars
PLEASE read the Mad article I posted.
Here's how your headlight power works
Because you now jumpered the charging line, you now have TWO wires essentially in parallel supplying power INTO the car through the bulkhead
These conductors are the original wire from the battery -- starter relay - fuse link - through the bulkhead - to the ammeter
The second one is now battery --your new jumper wire-- from the alternator -- through the bulkhead -- to the other side of the ammeter
(It would be BEST to disconnect the ammeter and jumper these two wires together IN CASE the ammeter has developed a problem)
NEXT coming off one side of the ammeter is the IN HARNESS SPLICE
From this splice is an UNfused wire going directly to the headlight switch, and the swtich has a breaker built into it
THIS WIRE ONLY SUPPLIES the headlights, NOT the tail / park and instrument lights which comes off a separate fuse
With the switch on, headlight power next goes to the DIMMER SWITCH and either hi or low beams is selected, the power then goes out through the BULKHEAD CONNECTOR to the headlights
So the problem could be a damaged BULKHEAD CONNECTOR, IN HARNESS SPLICE, LIght switch CONNECTOR, the LIGHT SWITCH itself, a bad DIMMER SWITCH, back OUT through the BULKHEAD CONNECTOR, and of course, last, problems right AT THE HEADLIGHT CONNECTORS including the GROUND at the headlights, as the lights are grounded from a pigtail coming off the headlight connectors.
This is one of the easiest circuits to check out. I usually start with the dimmer switch because it's easy to get to.
First, take a good look at your HIGH BEAM INDICATOR. Power for this indicator comes directly off the hi beam side of the dimmer switch. If you are NOT getting power there in hi, then the trouble is on the INTERIOR side of the car, most likely. This is assuming other accessories operate normally, such as radio, heater, wipers.
Take a meter/ test lamp and probe the dimmer. You should always have two terminals hot, as this is a simple double throw switch -- one terminal gets power from the light switch, ONE of the other terminals feeds power to the lights.
If you have no power to the switch, you have no choice but to access the light switch.
You know how to remove the switch? THAT is a little trick. Unhook the battery ground, reach up under the dash, and feel for the release button on the switch. Pull the **** out as far as it will go with one hand, push the release, and "fiddle" a little with the **** and release until the **** and shaft comes out
Likea so:
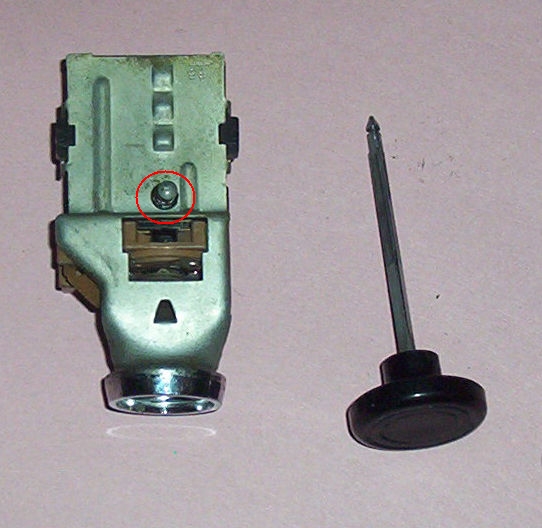
From there it's a matter of inspecting the connector for melt/ heat damage or corrosion, and determine if the switch has power or whether the switch has given up.
What can I say? This is troubleshooting 101
But there are several problems with these old cars
PLEASE read the Mad article I posted.
Here's how your headlight power works
Because you now jumpered the charging line, you now have TWO wires essentially in parallel supplying power INTO the car through the bulkhead
These conductors are the original wire from the battery -- starter relay - fuse link - through the bulkhead - to the ammeter
The second one is now battery --your new jumper wire-- from the alternator -- through the bulkhead -- to the other side of the ammeter
(It would be BEST to disconnect the ammeter and jumper these two wires together IN CASE the ammeter has developed a problem)
NEXT coming off one side of the ammeter is the IN HARNESS SPLICE
From this splice is an UNfused wire going directly to the headlight switch, and the swtich has a breaker built into it
THIS WIRE ONLY SUPPLIES the headlights, NOT the tail / park and instrument lights which comes off a separate fuse
With the switch on, headlight power next goes to the DIMMER SWITCH and either hi or low beams is selected, the power then goes out through the BULKHEAD CONNECTOR to the headlights
So the problem could be a damaged BULKHEAD CONNECTOR, IN HARNESS SPLICE, LIght switch CONNECTOR, the LIGHT SWITCH itself, a bad DIMMER SWITCH, back OUT through the BULKHEAD CONNECTOR, and of course, last, problems right AT THE HEADLIGHT CONNECTORS including the GROUND at the headlights, as the lights are grounded from a pigtail coming off the headlight connectors.
This is one of the easiest circuits to check out. I usually start with the dimmer switch because it's easy to get to.
First, take a good look at your HIGH BEAM INDICATOR. Power for this indicator comes directly off the hi beam side of the dimmer switch. If you are NOT getting power there in hi, then the trouble is on the INTERIOR side of the car, most likely. This is assuming other accessories operate normally, such as radio, heater, wipers.
Take a meter/ test lamp and probe the dimmer. You should always have two terminals hot, as this is a simple double throw switch -- one terminal gets power from the light switch, ONE of the other terminals feeds power to the lights.
If you have no power to the switch, you have no choice but to access the light switch.
You know how to remove the switch? THAT is a little trick. Unhook the battery ground, reach up under the dash, and feel for the release button on the switch. Pull the **** out as far as it will go with one hand, push the release, and "fiddle" a little with the **** and release until the **** and shaft comes out
Likea so:
From there it's a matter of inspecting the connector for melt/ heat damage or corrosion, and determine if the switch has power or whether the switch has given up.
What can I say? This is troubleshooting 101
Thread Starter
Mopar Fan
Joined: Mar 2012
Posts: 50
Likes: 0
From: Lake Charles, la
Wow man, great info. You sure know your stuff! I really appreciate it, I'm definitely gonna look at it this evening, report my findings if youre interested. Seems not just electrical I'm having trouble with now lol, got home from ride last night and I got myself a little puddle of oil. Checked underneath with light, CAN'T FIND LEAK! Only thing I see is I have 2 or 3 pan bolts that are wet. I'm guessing oil is leaking thru the bolts? I know this doesn't pertain to current subject, but maybe someone can tell me real quick if I can remove one bolt at a time that's wet, put some sealant or somethin on it, and reinstall without having more leaking problems from gasket. Gasket itself seems good. Its always somethin with these old cars lol just bought it, full rotisserie resto, sat for a few years tho in a heated and cooled garage with only 100 miles on it, and I drive it and stuff starts acting up. I know one thing, I gotta go thru and tighten all that I can cause the vibration and stuff suspension is starting to loosen things!
Thread Starter
Mopar Fan
Joined: Mar 2012
Posts: 50
Likes: 0
From: Lake Charles, la
Hmm, seems that it may be a tranny leak. I use trick shift, and it resembles same color as oil that I use. Still don't know where it's coming from. I have a deep pan, and there was fluid all on the bottom, but no leaks could be found. Now, I did find that an o ring on tranny dipstick was broke. I removed dipstick n saw that there's actually two o rings, one on tube inside a groove and one above it just on the tube itself? I replaced it, guess I'll see soon whenever I get to drive it. Funny thing is the leak is random. Can't really pinpoint when it's gonna do it. Strange. Also, seems to be a slight drip from bolts on rear tranny mount. Do they have capability to leak? Can I pull one at time n use sealant n reinstall? Oh n I did pull dust cover, it's as clean and dry as a whistle. Seems like one oil pan bolt was wet, not bad, could I pull and reinstall with sealant w no problems?
on previous subject, I checked out all the switches, grounds, checked wires, they all seem good. All switches are new, no burns, and right when I went to start ohming things my lead broke on my fluke. I did have a chance tho to check voltages before that at battery. I turned on radio, hi beam, low beam, interior lights, and at idle bat was approx 12.5 12.6 Volts. Lights on low went to 12.8 or so, and when gave just a little gas with everything on, volts went to close to 14 v. Could this be a problem? I start nights tomm so ima tackle ammeter in morning.
on previous subject, I checked out all the switches, grounds, checked wires, they all seem good. All switches are new, no burns, and right when I went to start ohming things my lead broke on my fluke. I did have a chance tho to check voltages before that at battery. I turned on radio, hi beam, low beam, interior lights, and at idle bat was approx 12.5 12.6 Volts. Lights on low went to 12.8 or so, and when gave just a little gas with everything on, volts went to close to 14 v. Could this be a problem? I start nights tomm so ima tackle ammeter in morning.
Thread Starter
Mopar Fan
Joined: Mar 2012
Posts: 50
Likes: 0
From: Lake Charles, la
Oh and 440roadrunner, thanks again for all the input, when I get a new lead, ima check voltages like u said at switches n troubleshoot. One of these days I'll master the Mopar electric system :P
Mopar Lover
Joined: Nov 2007
Posts: 2,424
Likes: 248
I haven't worked on a 67 Fury in about 40 years. Really. But on many of the Mopars it is much easier to drop the steering column, and not all that difficult.
So disconnect the battery ground. Reach up in from below and disconnect the speedo cable. Then remove all cluster screws and see if you can work the cluster out enough to release the electrical connections and disconnect the ammeter nuts. If not, remove several bolts at the column floor plate, and 2 or 3 more nuts up under which clamp the column to the support. There normally is a small trim under the column. You might have to turn the wheel 1/4 turn to get the steering coupler into a position where it "can move" I believe it needs to have one of the more narrow dimensions "up" if you look under the hood
Don't you have a shop manual?
In other words, this could be perfectly normal.


