My under hood detail project.

Old May 18, 2012 | 04:03 PM
  #1  
Mr. Belvedere II's Avatar
Thread Starter
Mopar Fan
 
Joined: Jun 2011
Posts: 28
Likes: 0
From: Riverside California
My under hood detail project.

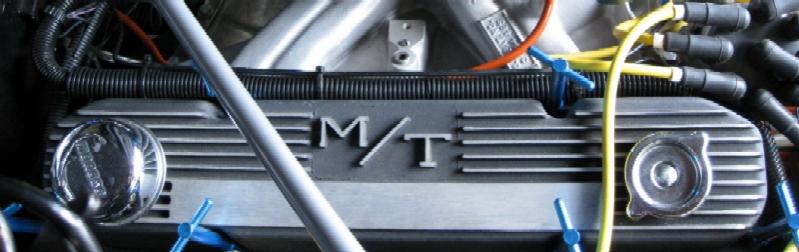
Here are some before during and after shots of my engine compartment detail project. I'ts on to the rear end next, then bodywork/paint and finally interior.Hope you guys dig it. Let me know what you think.
Attached Thumbnails My under hood detail project.-img_0670.jpg   My under hood detail project.-img_0062.jpg   My under hood detail project.-img_0018.jpg   My under hood detail project.-img_0041.jpg   My under hood detail project.-img_0275.jpg  

My under hood detail project.-img_0780.jpg   My under hood detail project.-img_0277.jpg   My under hood detail project.-img_0779.jpg  
Reply
Old May 18, 2012 | 04:10 PM
  #2  
bremereric's Avatar
Super Moderator
 
Joined: Sep 2010
Posts: 3,609
Likes: 181
From: Houston, Texas
Looks 200% better. The only thing I would have done different was to go back to body color in the engine compartment.
Reply
Old May 18, 2012 | 06:16 PM
  #3  
Mr. Belvedere II's Avatar
Thread Starter
Mopar Fan
 
Joined: Jun 2011
Posts: 28
Likes: 0
From: Riverside California
Thanks Eric, The only thing is i'm still not 100% sure on the body color yet; but i had to do something about that hideous engine compartment.
Reply
Old May 18, 2012 | 06:17 PM
  #4  
Archer's Avatar
Mopar Lover
 
Joined: Apr 2010
Posts: 1,889
Likes: 170
From: Long Island, NY
Mr B, -

OK, that looks great, and I really like the valve covers

Might consider sanding the paint off the top of the fins and lettering


Archer
Attached Thumbnails My under hood detail project.-test-009_vc.jpg  
Reply
Old May 18, 2012 | 07:55 PM
  #5  
Mr. Belvedere II's Avatar
Thread Starter
Mopar Fan
 
Joined: Jun 2011
Posts: 28
Likes: 0
From: Riverside California
Thanks Archer. I originally planed to do just that, but I bought my valve covers used and they had a few nicks in the fins on one side. So, I did'nt think they would turn out right if i sanded the fins too.
Reply
Old May 19, 2012 | 06:10 AM
  #6  
Archer's Avatar
Mopar Lover
 
Joined: Apr 2010
Posts: 1,889
Likes: 170
From: Long Island, NY
Mr B -

If you try it, a long sanding block would be best so you don't round the edges. Other option would be a shop that does milling. They can take the top down enough to remove the paint and leave a great finish - and it has to be dead flat.

Again, great looking engine bay!

Archer
Reply
Old May 19, 2012 | 11:55 AM
  #7  
lou3500's Avatar
Mopar Fanatic
 
Joined: Apr 2010
Posts: 283
Likes: 27
From: Palm Harbor Florida
Very nice job 150% improvement, but i too would go for body color engine compartment [jmo]. That was a lot of work but well worth the effort.
Reply
Old May 19, 2012 | 05:23 PM
  #8  
Silverick's Avatar
Mopar Lover
 
Joined: Aug 2010
Posts: 1,171
Likes: 34
From: San Francisco, CA
Quite a difference! The hard work paid off!
Reply
Old May 22, 2012 | 09:07 PM
  #9  
Mr. Belvedere II's Avatar
Thread Starter
Mopar Fan
 
Joined: Jun 2011
Posts: 28
Likes: 0
From: Riverside California
Thanks for all your positive comments guys.Much appreciation.
Reply
Old May 23, 2012 | 05:31 AM
  #10  
62Furious's Avatar
Mopar Lover
 
Joined: Oct 2009
Posts: 722
Likes: 19
From: SOUTH EAST WISCONSIN
Looks great, I never thought of dropping my coil down in the valley, gives room for the air cleaner, very cool
Reply
Related Topics
Thread
Thread Starter
Forum
Replies
Last Post
MOPAR TIM
Engines, Exhaust and Fuel systems
0
Jul 28, 2014 09:18 PM
MOPAR TIM
Do-It-yourself Section
2
Jul 28, 2014 07:22 PM
slpolson
General Discussion
3
Mar 19, 2014 02:29 PM
fury_19
General Discussion
18
Jul 17, 2009 08:40 PM
vitaminc383
Do-It-yourself Section
5
Jul 19, 2008 09:11 PM


Thread Tools
Search this Thread

All times are GMT -7. The time now is 02:05 AM.