
Battery not charging

Thread Starter
Mopar Fanatic
Joined: Nov 2012
Posts: 333
Likes: 3
From: Wyoming
Battery not charging
So I have the Car running good and all and about 3 miles from the house it dies..I jump start it and it runs for about 2 more miles and so on....I took the Alt off and took it in to NAPA and had it checked and its working great...What else can it be?When running I only get about 12.5 Volts on the Battery....

Mopar Lover
Joined: Jan 2013
Posts: 1,281
Likes: 145
From: Cobleskill,N.Y.
Voltage Regulator: It should be charging at 14.2 V no lower then 13.5 V...Does it have an amp gauge? alot of time the wires on the back of the gauge come loose...But it sounds more like the regulator...Keep us posted...Bill


Mopar Lover
Joined: Nov 2007
Posts: 2,424
Likes: 248
Does this still have the original pre--70 charging system?
If so your regulator should look something like this
https://s3.amazonaws.com/gearbox-yea...=450&width=600
and there should only be one "quick connect" wire on your alternator. A very quick check is to disconnect the quick connect at the alternator, and connect a clip lead to the terminal at the alternator. Connect the other end of the clip lead to the big stud at the alternator
If you are in subdued light, you should see a small spark when you connect / disconnect that wire. Start the car and bring up RPM. The ammeter should come up to charge. Monitor battery voltage with your multimeter. It should come up in voltage
Check voltage at the alternator stud as you bring up RPM. That voltage should come up as you bring up RPM, up above 12V. Don't let it climb up above 15 by much. IF it goes very high, much higher than 16, you have a problem between the output of the alternator and the battery that, is, the charging line
Voltage will depend on "how dead" the battery is. A battery that is pretty much charged will run somewhat above 12V, and a "normal" running/ charging battery with a proper operating regulator will run right at 14V.
If your jumper will not bring the voltage up above 12, the alternator is not charging. If the battery comes up some with the jumper is in place, likely a bad regulator. If the output stud goes WAY high, but the battery voltage stays low, then you have a bad connection in the circuit between the alternator output and the battery, that is, the ammeter circuit.
You have a service manual? Download one free here
http://www.forabodiesonly.com/mopar/...p?p=1970088617
or here
http://www.mymopar.com/index.php?pid=31
Last edited by 440roadrunner; Apr 1, 2014 at 07:46 PM.

Thread Starter
Mopar Fanatic
Joined: Nov 2012
Posts: 333
Likes: 3
From: Wyoming
Looks like the Alternator ...I checked it with a meter and put the red (lead) to the big bolt and black (lead) to the ground and I am getting like .65 on it. I checked my wifes car just to make sure I was doing it right and I am getting 14+ on it..The deal is I took it off and had NAPA check it and they said it was fine...I guess I will put on another one and find out.
Mopar Lover
Joined: Nov 2007
Posts: 2,424
Likes: 248
Uh.................no.................
That does not sound right to me..........let's go over this again..........what did you do?
The car is just sitting there? Follow these destructions EXACTLY
Set your meter up to measure the battery. Measure the battery, make sure you get good connections, stab the probes into the battery post AND THE ENGINE BLOCK, with the engine OFF and measure about 12.6 or so with the battery charged.
Now go 'round and stab your probes into the engine block and the alternator stud
You should measure exactly the same voltage. If not you have a bad connection in the charging line between the alternator and the battery
Thread Starter
Mopar Fanatic
Joined: Nov 2012
Posts: 333
Likes: 3
From: Wyoming
Uh.................no.................
That does not sound right to me..........let's go over this again..........what did you do?
The car is just sitting there? Follow these destructions EXACTLY
Set your meter up to measure the battery. Measure the battery, make sure you get good connections, stab the probes into the battery post AND THE ENGINE BLOCK, with the engine OFF and measure about 12.6 or so with the battery charged.
Now go 'round and stab your probes into the engine block and the alternator stud
You should measure exactly the same voltage. If not you have a bad connection in the charging line between the alternator and the battery
That does not sound right to me..........let's go over this again..........what did you do?
The car is just sitting there? Follow these destructions EXACTLY
Set your meter up to measure the battery. Measure the battery, make sure you get good connections, stab the probes into the battery post AND THE ENGINE BLOCK, with the engine OFF and measure about 12.6 or so with the battery charged.
Now go 'round and stab your probes into the engine block and the alternator stud
You should measure exactly the same voltage. If not you have a bad connection in the charging line between the alternator and the battery
Mopar Lover
Joined: Jan 2010
Posts: 1,296
Likes: 118
I’m gonna say alternator. if you did the same thing on another car and got 14+, you obviously did it right on yours.
The reason the car dies is it’s running 100% on your battery. Once the battery has no more to give, kaput——engine dies.
Now let’s just hope you haven’t damaged the battery because those are anything but cheap today.
Of course, the old school way to check is to take the positive post off when the car is running. If the engine dies, you have zero alternator.
Thread Starter
Mopar Fanatic
Joined: Nov 2012
Posts: 333
Likes: 3
From: Wyoming
I�m gonna say alternator. if you did the same thing on another car and got 14+, you obviously did it right on yours.
The reason the car dies is it�s running 100% on your battery. Once the battery has no more to give, kaput��engine dies.
Now let�s just hope you haven�t damaged the battery because those are anything but cheap today.
Of course, the old school way to check is to take the positive post off when the car is running. If the engine dies, you have zero alternator.
Mopar Lover
Joined: Nov 2007
Posts: 2,424
Likes: 248
You haven't really done anything, all your test did was to establish the alternator might be hooked to the battery. Got back to my original post and follow instructions exactly
You must divide the problem into SECTIONS
1......is it a WIRING problem?
A..........is it field wiring?
B..........is it the charging line wiring?
2..........is it the alternator?
3..........is it the regulator?
So we do some testing................
The most very basic testing was my very first post, which is to eliminate the field wiring and the regulator. You remove the field wire from the regulator, and you hook a clip lead to the regulator field terminal. You hook that field terminal to a battery source, and you find out if it will charge. If it DOES charge, this eliminates two sections of the problem..........the alternator and the charge wiring, and leaves two sections..........the field wiring and the regulator.
The other approach is to take the alternator off the car and down to some parts store to have it tested. This is a POOR approach for several reasons. First, many of these testers are unreliable. Second, many of the test "operators" don't know what they are doing, and last, many of the test operators are interested in selling alternators, go figure!!!!
Please go back and read what I posted earler. I don't post this **** just to hear the keyboard rattle around
Last edited by 440roadrunner; Apr 4, 2014 at 10:19 AM.
Thread Starter
Mopar Fanatic
Joined: Nov 2012
Posts: 333
Likes: 3
From: Wyoming
You haven't really done anything, all your test did was to establish the alternator might be hooked to the battery. Got back to my original post and follow instructions exactly
You must divide the problem into SECTIONS
1......is it a WIRING problem?
A..........is it field wiring?
B..........is it the charging line wiring?
2..........is it the alternator?
3..........is it the regulator?
So we do some testing................
The most very basic testing was my very first post, which is to eliminate the field wiring and the regulator. You remove the field wire from the regulator, and you hook a clip lead to the regulator field terminal. You hook that field terminal to a battery source, and you find out if it will charge. If it DOES charge, this eliminates two sections of the problem..........the alternator and the charge wiring, and leaves two sections..........the field wiring and the regulator.
The other approach is to take the alternator off the car and down to some parts store to have it tested. This is a POOR approach for several reasons. First, many of these testers are unreliable. Second, many of the test "operators" don't know what they are doing, and last, many of the test operators are interested in selling alternators, go figure!!!!
Please go back and read what I posted earler. I don't post this **** just to hear the keyboard rattle around
You must divide the problem into SECTIONS
1......is it a WIRING problem?
A..........is it field wiring?
B..........is it the charging line wiring?
2..........is it the alternator?
3..........is it the regulator?
So we do some testing................
The most very basic testing was my very first post, which is to eliminate the field wiring and the regulator. You remove the field wire from the regulator, and you hook a clip lead to the regulator field terminal. You hook that field terminal to a battery source, and you find out if it will charge. If it DOES charge, this eliminates two sections of the problem..........the alternator and the charge wiring, and leaves two sections..........the field wiring and the regulator.
The other approach is to take the alternator off the car and down to some parts store to have it tested. This is a POOR approach for several reasons. First, many of these testers are unreliable. Second, many of the test "operators" don't know what they are doing, and last, many of the test operators are interested in selling alternators, go figure!!!!
Please go back and read what I posted earler. I don't post this **** just to hear the keyboard rattle around
Mopar Lover
Joined: Nov 2007
Posts: 2,424
Likes: 248
Somehow I misread, I owe you an apology.......
Read this MAD article, but the crux is their simplified diagram here:
http://www.madelectrical.com/electri...p-gauges.shtml
Their simplified diagram is an excellent representation of the power distribution, follow along. From the battery, to the starter relay, the fuse link, and through the fuse link, through the bulkhead connector, through the ammeter, to the "welded splice, notice that you take off from the welded splice and branch off to several places, and feed off to the ignition switch, the headlights
BUT YOU ALSO branch off and COME BACK THROUGH the bulkhead on the black wire back to the alternator
This means there are ONLY THREE places that you are losing this connection
They are.........
most probable is the connector through the bulkhead
the welded splice itself, which is rare
the wire ring connector on the end of the wire at the alternator which could happen but rare
Also, if you don't have one, download the free shop manual link I posted above
And last, these wiring diagrams at MyMopar are not always complete, but are sometimes easier to follow:
http://www.mymopar.com/index.php?pid=31
These two diagrams
http://www.mymopar.com/downloads/1968/68CoronetA.JPG
http://www.mymopar.com/downloads/1968/68CoronetB.JPG
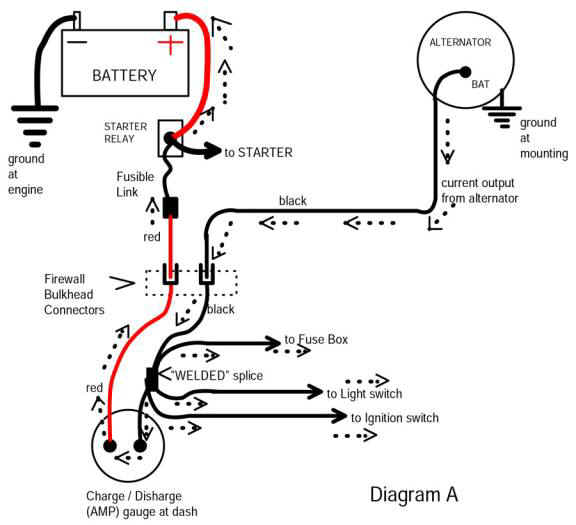
Last edited by 440roadrunner; Apr 4, 2014 at 02:23 PM.
Thread Starter
Mopar Fanatic
Joined: Nov 2012
Posts: 333
Likes: 3
From: Wyoming
Somehow I misread, I owe you an apology.......
Read this MAD article, but the crux is their simplified diagram here:
http://www.madelectrical.com/electri...p-gauges.shtml
Their simplified diagram is an excellent representation of the power distribution, follow along. From the battery, to the starter relay, the fuse link, and through the fuse link, through the bulkhead connector, through the ammeter, to the "welded splice, notice that you take off from the welded splice and branch off to several places, and feed off to the ignition switch, the headlights
BUT YOU ALSO branch off and COME BACK THROUGH the bulkhead on the black wire back to the alternator
This means there are ONLY THREE places that you are losing this connection
They are.........
most probable is the connector through the bulkhead
the welded splice itself, which is rare
the wire ring connector on the end of the wire at the alternator which could happen but rare
Also, if you don't have one, download the free shop manual link I posted above
And last, these wiring diagrams at MyMopar are not always complete, but are sometimes easier to follow:
http://www.mymopar.com/index.php?pid=31
These two diagrams
http://www.mymopar.com/downloads/1968/68CoronetA.JPG
http://www.mymopar.com/downloads/1968/68CoronetB.JPG

Thread
Thread Starter
Forum
Replies
Last Post


