
Checking Points and Condenser

Thread Starter
Mopar Fanatic
Joined: Aug 2012
Posts: 276
Likes: 2
From: Twin Cities, Minnesota
Checking Points and Condenser
Im thinking i have a problem with my points and/or condenser. I am not familiar with points and condensers at all but my friend said i should check those. What am i looking for?
I have a 318 with what i think is a stock distributor. Has been running rough. It runs similar to what it ran like when i had 2 spark plug wires switched around. I checked my timing and vacuum and they are alright. Ive replaced the plugs, wires, cap and rotor.
Anyways i was told that points and condenser is pretty cheap and worth a try just to replace them.
How about the ignition coil? What are signs of a bad coil?


Mopar Lover
Joined: Nov 2007
Posts: 2,424
Likes: 248
What is the year/ model you are working on? A 74 (your user name) would have originally BEEN electronic
I "would" consider saving up and upgrading to some sort of electronic ignition, which doesn't HAVE to be all that expensive.
On the other hand, (I'm 65) I remember when "we" drove thousands of miles with breaker point systems, and other than occasionally resetting, checking or replacing points, they worked just fine.
If you don't have a test tach/ dwell meter, GET one. I see them on ebay or Craigslist for paltry sums. A good test tach/ dwell, and by the way, you can even get one with a digital display, performs the following functions, "usually."
1--voltage function. Useful, to limits of the meter's accuracy, for checking charging voltage, and troubleshooting ignition problems
2--Points resistance. This is important, different meters use different procedures, but this checks how much resistance IE "how dirty" the points contacts are
3--Dwell. The main function. This is how you should adjust breaker gap, NOT with a feeler gauge.
4--Tach. Useful for adjusting idle mixture and speed.
SO a quick review of "how stuff works."
The coil receives power "in series" -- from the ignition switch -- through the ballast resistor -- through the coil -- to the points -- closed to ground.
Current flows, and builds up a magnetic field in the coil core
The distributor rotates, the points open --- and current stops flowing. NOW the magnetic field in the coil's core COLLAPSES and INDUCES voltage in the secondary windings of the coil, sending a huge jolt up through the coil tower connection. AT the same time, this collapsing field CHARGES UP the condenser, and at some point, just like a ball rolling down one side of a canyon and back up the other, STOPS. At this point the condenser is CHARGED, and the voltage in the condenser "wants' to get out, so this charge FLOWS through the coil primary in the opposite direction, AGAIN building up a magnetic field in the coil, and DIScharging the condenser. All this instant in time, the points are still OPEN.
This charge/ discharge is known as RINGING and is ESSENTIAL for a good hot spark IF YOU REMOVE the condenser, most engines will not start or run. A bad condenser, obviously, can cause the same problem. The condenser might be "weak," or completely bad
So:
1--Important that the distributor is not worn, so that the points open and close properly, wear can do bad things like change timing from 1/2 revolution, etc, or even be bad enough to NOT open and close the points at all for some cylinder(s)
2--Important the condenser is "good." A NEW condenser does NOT guarantee "functionally good."
3--Important the points are decent quality, something, I agree, might be tough to get nowadays.
SETTING points
Once you "get good" at setting points, you never touch a feeler. You can toss them in, adjust them "by eye," and hook up the dwell meter and run the dwell "on the starter." I used to be able to hold the remote starter in one hand with one screwdriver, and the second screwdriver in the other hand, and adjust "on the starter" to get them close.
You can start by first using a CLEAN DRY feeler to "rough" them, then check dwell and adjust from there. You must be sure to LUBE the rubbing block a TINY amount of grease on the APPROACH side of the cam. Be very delicate with the feeler, as it's easy to effectively become a "pry" bar with the feeler and get a false reading.
Then install the cap, start engine, and check the dwell. Adjust by trial and error. You want DWELL to be (single points) on the "28 side" of 28--32, because this is the WIDER gap, and they will WEAR closed, which RETARDS timing.
REcheck dwell (and timing)after 500 miles or so!!!!!
Set timing AFTER DWEL, because points gap affects timing. More gap, lower dwell numbers ADVANCE timing. Larger dwell numbers, less gap, RETARDS timing.
AFTER you have set 1--dwell, 2--timing, then 3-- warm engine up to full temp and set idle speed and idle mixture, "tweeking" speed LAST
Last edited by 440roadrunner; Jun 11, 2013 at 10:37 AM.
Mopar Lover
Joined: Nov 2007
Posts: 2,424
Likes: 248
"Running rough"
I would run a compression check, engine warm. Ground the coil wire, block the throttle open somewhat, and check each cylinder. Count the compression pulses for a "peak" reading, and give each cylinder the same amount.
Run a "home made" test:
Work the dist. boots up off each plug tower, and loosen each plug wire so you can easily pull them. With the engine warm and idling, use insulated fuse pliers and pull each wire out one at a time, while simultaneously putting a grounded probe into that tower to short the spark.
An alternative way is to pull up the cap boots, and insert tiny brads down beside each wire, then with engine running, just use your grounded probe to short each one out.
Monitor engine speed with your tach, and listen for sound, and look for RPM drop. Each cylinder "in turn" should sound and drop the same RPM as each other.
Mopar Lover
Joined: Nov 2007
Posts: 2,424
Likes: 248
Checking spark. First check the cap and rotor for grease, dirt, moisture, damage, carbon. Use your ohmeter to check the plug wires and the coil wire.
MAKE SURE cranking voltage is OK. Two ways to check
1:---Hook your meter battery positive to ground, crank the engine, and note the reading while cranking, let's say 11V
Next, hook your meter from coil+ to ground, again crank the engine, and note the reading, let's say 10.5 This means you have 1/2 Volt drop from battery to coil
2:---Second method reads the above directly in one test Clip one probe of your meter to coil+, the other probe to battery +. Crank the engine, using the key, and take the reading, let's say----.5V
The above .5 means that in the circuit path from battery -- starter relay -- fuse link -- bulkhead connector -- ignition switch connector -- through the switch -- back out the switch (brown bypass wire) --back out the bulkhead connector -- to coil + side of ballast
--------means you have 1/2 volt drop. This is SUBSTANTIAL and really should be looked into.
In any case, you need MORE than 10V at the coil for starting. If the voltage at the coil is LESS than 10V during "crank" you need to look into this
====================================
"Rig" a test gap from a plug opened up, or you can buy "made" spark testers. Hook to the coil tower using a SOLID CORE wire, NOT a resistor wire
IMPORTANT to check this by cranking the engine USING THE KEY and NOT by jumpering the start relay. That is because the coil resistor (ballast) bypass circuit is in the switch.
You should get a nice, hot, snappy blue spark, at the least 3/8" and typically 1/2"
Once again, poor points resistance or a bad condenser can also cause weak spark AS WELL AS LOW VOLTAGE
Last edited by 440roadrunner; Jun 11, 2013 at 10:36 AM.
Thread Starter
Mopar Fanatic
Joined: Aug 2012
Posts: 276
Likes: 2
From: Twin Cities, Minnesota

Mopar Fanatic
Joined: Jun 2009
Posts: 448
Likes: 12
From: Rensselaer,New York
74runneer, Your distributor is electronic (no points/condenser)with a new cap and rotor and wires it is most likely good. Like 440 said,check your compression on all 8 cylinders. Try giving the carb a good cleaning also. Good Luck! john

Mopar Lover
Joined: Jan 2013
Posts: 1,281
Likes: 145
From: Cobleskill,N.Y.
Check your plug wires and firing order 18436572 in a clockwise rotation. also check for corroided plugwire end very common on the coil wire. The distributor you have is electronic (no points or condenser) as John Van said. Check these things before you go to Auto shop 101 A tach & dwell meter is of know use for this car but .006 brass feeler gauge to set air gap in the distributor is useful
Last edited by pro-tech; Jun 12, 2013 at 06:56 AM.
Mopar Lover
Joined: Jan 2013
Posts: 1,281
Likes: 145
From: Cobleskill,N.Y.
there are so many things that can cause rough running. If you could give more info it would help you in the long run. Did it just all of a sudden start duing this? Is it a lean misfire? The best way to check for that is to put your hand or close the choke a little and see if the engine picks up or smooths out any. What carb does it have? To answer your previous question a coil will usually just quit when hot mostly or just have no spark. You can also spray carb/brake cleaner along intake manifold to check for vacuum leaks.
Mopar Lover
Joined: Nov 2007
Posts: 2,424
Likes: 248
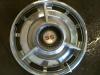
!!!YEE>>>>YYYYEEEE>>>>>>YIKES!!!
Look at the JUNK inside that distributor!!!!
You appear to have the type of ignition that was originally on the car. That is, the "for years" has been Mopar's breakerless distributor triggering an electronic control box. There is one major design change over the years, which, really might not concern you
The earlier systems had a 4 terminal ceramic ballast which in reality is two DIFFERENT ballast resistors inside one ceramic block. One resistor in the block is exactly the same as the older "points" ballast resistor. The other half of the block is a DIFFERENT resistance, used to feed power to the box. This early box is known as a "5 pin box."
Sometime 'er other Ma changed the design of the control box (ECU) so that it did not NEED the second resistor. So later designs used a 2 terminal resistor, just like the old points systems used.
This is commonly called a "4 pin box."
So lets get more or less confused.
Sometimes you can and sometimes you can NOT tell a 5 pin box from a 4 pin box, because many 4 pin boxes HAVE 5 pins. It's simply that the 5th pin is not hooked to anything.
A 5 pin box MUST use a 4 pin resistor
A 4 pin box CAN use either a 2 pin resistor, OR a 4 pin, simply that the second resistor is not hooked up as the box doesn't use it.
Below are simplified diagrams of the early 5, later 4, pin setups
These are actually poor, as they leave out the brown starting circuit, which hooks to the bottom right terminal of the 4 pin ballast, and bottom terminal of the 2 pin
The "run" voltage is coming in from top right labeled "existing wire."
Notice that the 4 pin resistor has a "U" shaped cutout at one end. This is very important as it identifies "one end from the other" and establishes which resistance is hooked where. You can NOT turn the resistor around, because the wrong resistances will be in the circuit. If the car has the proper, original, undamaged connectors, they have a plastic pin which properly engages the slots in the resistor
===================================
Now about that YEE YEYYEYEYYEEE YIKES!!!!!
Look at the JUNK in that distributor!!!!!!!!!!!
That distributor contains a small magnet which is what has attracted all that junk. You need to figure a way to get it out of there. Unfortunately you don't sound very experienced, not sure how to advise you. If I found that, I'd pull the distributor, pull it all apart, and clean it. The rust indicates that the advance mechanism might be sticky or just plain stuck, so a good time to clean and lube that, too.
Which brings me to..............you really really need to get a FACTORY shop manual. You can buy used ones here and there, and on the www you can find reprint paper manuals, as well as "on CD" versions.
So far as specific service to the ignition, this 72 manual is free. The wiring diagrams for the major part of the car is NOT the same, but the specific sections on engine, transmission, front end, etc, are OK, and so is the section on the electronic ignition
http://www.abodyjoe.com/pictures/Mis...Serv%20Man.pdf
In the manual above, the section on electronic ignition starts on page 8-52
So once again, the VERY FIRST order of business is to get all that $hit out of the distributor.
Last edited by 440roadrunner; Jun 12, 2013 at 08:49 AM.
Thread Starter
Mopar Fanatic
Joined: Aug 2012
Posts: 276
Likes: 2
From: Twin Cities, Minnesota
Okay hmmm. Well i can say im not very experienced being only 18 years old. Not gonna lie, that all flew way over my head. Im thinking it would probably be easier to just get a new distributor. I was looking on ebay and there are many newer style distributors for sale in my price range. Id like to spend $50-$80. Are these ones just complete crap are will they suffice for a street engine? They make it sound like i would free up space in my engine bay by no longer needing the ecu control box and ballast resistor. Is this a good option or would it be better just to clean mine? Im mechanically inclined, i just dont know very much.

Mopar Lover
Joined: Nov 2012
Posts: 1,846
Likes: 140
well as allways 440 roadrunner did a fantastic job. but i want to add. when using this system, all ways have 2 ballast in the glove box. upon the first fail just swap out the one under the hood. most fails happen in the cold or hot weather. to check the coil in the distributor. get an analog VOM. set it on the lowest AC setting. unplug the 2 wires to the distributor. put the wires from the distributor in the VOM, order is not important. now spin the distributor. the needle will move a little very little if coil is good. how ever i have not tried testing in a different failed conditions. but it think a failed condition would be clear.
Last edited by moe7404; Jun 12, 2013 at 11:18 AM.
Mopar Lover
Joined: Jan 2013
Posts: 1,281
Likes: 145
From: Cobleskill,N.Y.
Yikes, all that junk can be removed with compressed air / a blow gun and about 125 psi air pressure. the only thing you need to check is the vacuum advance which can be done by putting a peice of new vacuum hose the reason I say new is because, old vacuum hose may leave black on your lps and all your friends will make fun of you.Lol And sucking on it to see if it advances. These distributors are bullit proof and they either work or dont and surely dont cause what you are experiencing unless the air gap is way out and by the pictures it looks very close. Give the kid a break if you guys are Mopar lovers and such you should know this...
Mopar Lover
Joined: Nov 2007
Posts: 2,424
Likes: 248
Yikes, all that junk can be removed with compressed air / a blow gun and about 125 psi air pressure. the only thing you need to check is the vacuum advance which can be done by putting a peice of new vacuum hose the reason I say new is because, old vacuum hose may leave black on your lps and all your friends will make fun of you.Lol And sucking on it to see if it advances. These distributors are bullit proof and they either work or dont and surely dont cause what you are experiencing unless the air gap is way out and by the pictures it looks very close. Give the kid a break if you guys are Mopar lovers and such you should know this...
Judging from the RUST in and around that dist, there is a very good chance of more debri down inside, and a rusty, stuck non working mechanical advance.
These distributors do NOT "either work or they don't" There are several problems that can develop
So far as getting a different one, here's the caveat there.
First, if you get a used/ junkyard one, be sure it has only one pickup unit and also has a vacuum advance. There's a later system (Google it) known as "Lean Burn" which uses these oddball distributors.
Second, ANY factory Mopar breakerless distributor is going to be a "smog" advance curve, meaning a long slow advance curve. For performance, you want a shorter faster curve. Accel does or did make a "look alike" unit, that is, one which looks on the outside just like a Mopar, but INSIDE has an adjustable mechanical advance -- better for performance
Otherwise, you should be able to pick up a working rebuilt unit from O'Really or NAPA for ?? 35--50 bucks. It WILL run OK, just won't have an optimum advance curve, but no worse than what you have now.
Frankly, if I were you, I'd try and find "an old guy like me" locally to help you learn some of this stuff. You MUST get busy and get yourself the proper factory manual. I do not mean Haynes, Chilton, etc, I mean an original Mopar manual. You can find these for sale online and on Ebay
Here's a Mopar Muscle article on tearing these down:
http://www.moparmusclemagazine.com/t...m/viewall.html
another
http://jtsjunkyard.blogspot.com/2011...lectronic.html
This guy here
http://4secondsflat.com/Ignition.html
sells a little kit to put in which limits advance on a factory distributor
Go down the page and look for the J685K kit
Last edited by 440roadrunner; Jun 12, 2013 at 03:06 PM.
Mopar Lover
Joined: Nov 2007
Posts: 2,424
Likes: 248
So since "pro" thinks I oughta keep this simple, the easy answer for now is to go to your local parts supplier and buy a rebuilt factory distributor, then when you get to know a little more, you can diddle things.
The distributor in these (look at the links) is a slot/ tang drive like a screwdriver. This means it only goes in TWO ways .... the right way or the wrong way.
So if you buy one, just pull the cap, disconnect the wire connector, and NOTICE which way the rotor is facing, and WHERE the vacuum can is pointed. Draw a little diagram or take a photo with a camera.
Pull the clamp, clean around the base, yank it out, and with the new one's rotor pointing the same direction, swap it in. You'll need a timing light to set timing, but if you are careful to point "everything the same" it should fire right up
Mopar Lover
Joined: Jan 2013
Posts: 1,281
Likes: 145
From: Cobleskill,N.Y.
440, I dont know why you keep pointing towards the dist. He said it runs rough like 2 wires are switched. The only way it would do that is if the reluctor was worn out on 2 points. The pickup is a hall effect pickup and if it runs it means it is working. from the pictures he posted the dist. doesnt look that bad other than some rust which is normal in most cases. 74Runneer which I think is spelled Runner for Road Runner but anyway PM me your address and I will send you a know good one for free.
Mopar Lover
Joined: Nov 2007
Posts: 2,424
Likes: 248
You better look at those photos again. There's about 5 pounds of steel "hair" in there looks like someone was doing grinding nearby. And in one (magnified) shot I could see down into the mechanical advance area, looks pretty rusty to me
Second, there are several problems with Mopar breakerless distributors which might allow them to run, sometimes, sometimes OK, and sometimes rough,
------or start hard
One might be shaft wear, another might be a pickup "going bad," say, from something like moisture, or reluctor gap.
CERTAINLY rotor damage and or the kind of steel "hairs" massively attracted to the pickup magnet in the photo would deteriorate or stop operation
Thread Starter
Mopar Fanatic
Joined: Aug 2012
Posts: 276
Likes: 2
From: Twin Cities, Minnesota
Okay my initial timing is at 10 degrees so if i wanted my total to be 36 id have to get the conversion to a 12/13 degree distributor? That kit costs $40, so would it be more worth my time and money if i just bought a new distributor with adjustable mechanical advance advance?

Thread
Thread Starter
Forum
Replies
Last Post
Dominic Torreto
General Discussion
2
Jul 31, 2012 10:24 AM


