Vacuum leak through carburetor secondaries?
 11-30-2014, 10:00 AM
#1
Mopar Fanatic
Thread Starter

Vacuum leak through carburetor secondaries?
I'm trying to find a vacuum leak on my Carter AFB 9636S but I'm failed everything that I've tried using carburetor cleaner. I'm pretty sure that I'm dealing with a vacuum leak because the car has rough idle, hesitates on acceleration and if i put my hand over the air horn the engine revs.
So I think: Is possible to have a vacuum leak through the secondaries?
So I think: Is possible to have a vacuum leak through the secondaries?
 11-30-2014, 10:47 AM
#2

some times the base gets warped. if you have to get the base machined be sure and tie the plates closed. in 1968 the new AVS had a lean idle circuit that cause a bog off idle. this is fixed by drilling the idle jet. this is NOT for every one to do.. I think it is Carter AFB Competition Series Carburetor . it might be stock with a lean idle circuit. but first reset the float level to 5/16. O.E.M. is 7/32.
 11-30-2014, 11:24 AM
#4
Mopar Fanatic
Thread Starter
some times the base gets warped. if you have to get the base machined be sure and tie the plates closed. in 1968 the new AVS had a lean idle circuit that cause a bog off idle. this is fixed by drilling the idle jet. this is NOT for every one to do.. I think it is Carter AFB Competition Series Carburetor . it might be stock with a lean idle circuit. but first reset the float level to 5/16. O.E.M. is 7/32.
If the carb base is warped, when I spray carb cleaner around it, should not affect the idle? because when I did that nothing happened
That is an aftermarket Mopar specific carb.. Should work great... I would check the timing, try a little more advance. Make sure the accelerator pump is working
11-30-2014, 06:00 PM
#5
your test for a leak in base is the right way to test. i guess the idle jet needs drilled. from your hand over the lid test says it is lean. get a #61-#80 drill set. on mine the brand name is covered with sticker. but the pt no is HAWTJ6180. you will all so need a pin vice to hold the drill bits. this possess is done very slowly. ONLY by hand, NOT power. take the primary clusters out. the small brass tube is the idle jet. use the drill set to find the dia of the small hole at the bottom. the small dia only goes 1/16 into the tube. to drill the hole chose the drill bit only one step bigger than the stock size. hold the cluster with the tube facing down. drill going up so the the chips fall away from the tube. then test by driving.
11-30-2014, 10:32 PM
#6
Mopar Fanatic
Thread Starter
I spent all the sunday afternoon trying to figure out what was happening with the carb. I cleaned everything, changed the intake gasket and sand the carburetor base just to discard a bad seal between the carburetor and gasket but the test result was the same. Here's a video that I made to try to explain what is happening:
http://vid1067.photobucket.com/album...psvxiynbab.mp4
Then I remember TVLynn post about the ignition timing so I give a bit more advance to the distributor (I don't know how much more exactly because my timing light is broken) and the change was awesome, the idle is a lot smoother, the engine vibration almost stopped but when I put my hand over the air horn the engine still revs so the lean condition continues
This video is after the advance change
http://vid1067.photobucket.com/album...psyw4hpvhy.mp4
12-01-2014, 05:51 AM
#8
Mopar Fanatic
Thread Starter
your test for a leak in base is the right way to test. i guess the idle jet needs drilled. from your hand over the lid test says it is lean. get a #61-#80 drill set. on mine the brand name is covered with sticker. but the pt no is HAWTJ6180. you will all so need a pin vice to hold the drill bits. this possess is done very slowly. ONLY by hand, NOT power. take the primary clusters out. the small brass tube is the idle jet. use the drill set to find the dia of the small hole at the bottom. the small dia only goes 1/16 into the tube. to drill the hole chose the drill bit only one step bigger than the stock size. hold the cluster with the tube facing down. drill going up so the the chips fall away from the tube. then test by driving.
Last edited by josehf34; 12-01-2014 at 05:53 AM.
12-01-2014, 11:58 AM
#9
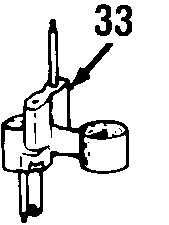
no the small tube pointing down. is the idle jet. the bigger tube pointing down is the emulsion tube. it mixes fuel with air to go to the high speed discharge nozzle. the small tube pointing up is an air bleed that lets air into high speed discharge air fuel mix. so the fuel will drop out of high speed discharge nozzle when the engine goes to idle.
12-03-2014, 08:01 AM
#12
Mopar Fanatic
Thread Starter
On the 9636 YOU should not need any adapter
no the small tube pointing down. is the idle jet. the bigger tube pointing down is the emulsion tube. it mixes fuel with air to go to the high speed discharge nozzle. the small tube pointing up is an air bleed that lets air into high speed discharge air fuel mix. so the fuel will drop out of high speed discharge nozzle when the engine goes to idle.
12-03-2014, 09:01 AM
#13
Mopar Lover

Ok...So you only get Idle mixture screw response from all the way in.. And Out only 1.5 turns...
Common rule of thumb:: it takes 18" of vacuum to run for the average street engine..... Read the gauge... It can help you.... Pull the timing until it's in the GREEN AREA... If that don't work... You got problems elsewhere... But that's the only way I know of to get there with out a timing light...
When you throttle it... To me it even sounds like the timing is late....
Common rule of thumb:: it takes 18" of vacuum to run for the average street engine..... Read the gauge... It can help you.... Pull the timing until it's in the GREEN AREA...
If that don't work... You got problems elsewhere... But that's the only way I know of to get there with out a timing light...When you throttle it... To me it even sounds like the timing is late....
12-03-2014, 02:40 PM
#14
get a spacer for the air cleaner ! http://www.carburetion.com/sitesearc...ner%20Adaptors
Also get a correct throttle cable brackets The metal part of the cable should be healed by the clamp on bracket..
Also get a correct throttle cable brackets The metal part of the cable should be healed by the clamp on bracket..
Last edited by TVLynn; 12-03-2014 at 02:42 PM.
12-03-2014, 03:16 PM
#15
Went and dug mine out Going from memory The large fitting on the front side should go to the PVC valve
the rear large hole should be plugged the large side vent goes to the air cleaner Power brakes should hook up to intake manifold
I don't believe you have a 9636 carb ??? Has a Chevy ? throttle shaft
the rear large hole should be plugged the large side vent goes to the air cleaner Power brakes should hook up to intake manifold
I don't believe you have a 9636 carb ??? Has a Chevy ? throttle shaft
12-08-2014, 12:51 PM
#16
Mopar Fanatic
Thread Starter
get a spacer for the air cleaner ! http://www.carburetion.com/sitesearc...ner%20Adaptors
Also get a correct throttle cable brackets The metal part of the cable should be healed by the clamp on bracket..
Also get a correct throttle cable brackets The metal part of the cable should be healed by the clamp on bracket..
Went and dug mine out Going from memory The large fitting on the front side should go to the PVC valve
the rear large hole should be plugged the large side vent goes to the air cleaner Power brakes should hook up to intake manifold
I don't believe you have a 9636 carb ??? Has a Chevy ? throttle shaft
the rear large hole should be plugged the large side vent goes to the air cleaner Power brakes should hook up to intake manifold
I don't believe you have a 9636 carb ??? Has a Chevy ? throttle shaft
I tried one more time to clean all the carburetor before drill the idle jets, this time I used other liquid carburetor cleaner. Back on the engine the results were noticeable. Now I've more vacuum, easier start, the idle mixture screws are a little more sensitive in the first 2 turns and now if I cover the air horn with my hand the engine doesn't revs.
Here's a video of the results (on this video the distributor advance was already adjusted).
http://vid1067.photobucket.com/album...pspgpv9k7e.mp4
The unique problem is that the idle came rough and sometimes I see black smoke on the exhaust when the engine is idling below 800 RPM.
Maybe I've a spark plug that needs to be changed?
12-08-2014, 02:08 PM
#17
at idle any adjusting of 1/4 / 1/2 turn on the idle mix screws should make a change in the idle speed. other wise something is wrong. are you sure you dont have a square bore carb on a spread bore intake manafold with out the the right steel plate?
12-08-2014, 03:07 PM
#18
Mopar Fanatic
Thread Starter
This is my intake: http://m.ebay.com/itm/330869715498?nav=SEARCH
And is a square bore intake
Maybe is time for a carb replacement?
12-08-2014, 08:43 PM
#20
Mopar Fanatic
Thread Starter
If I give more advance at the dist (no matters if the vacuum advance is plugged or not), the engine starts loosing vacuum, shaking and sometimes stops. I didn't try to give more advance at this point, should I even with the engine shaking?
Last edited by josehf34; 12-08-2014 at 08:49 PM.
12-09-2014, 10:50 AM
#22
Mopar Fanatic
Thread Starter
Dry:
Cyl #, PSI
1: 105
2: 110
3: 100
4: 105
5: 105
6: 102
7: 95
8: 108
Wet:
Cyl #, PSI
1: 125
2: 115
3: 105
4: 110
5: 105
6: 105
7: 95
8: 105
12-09-2014, 02:45 PM
#25
Mopar Fanatic
Thread Starter
Why do you think is not jetted for the 360 (too lean or too rich?)? Right now i have 0.098 on the primary jet and 0.095 on the secondaries
Yep.... 125 PSI Across the board is wear it should be... In my Opinion
IS the ticking clanking... Coming from that # 7 Cylinder?
IS the ticking clanking... Coming from that # 7 Cylinder?
I need to ask: can the vacuum reading or the compression test be affected due to the altitude? Because If I'm right 125 PSI equals to a CR of 8.5:1 at the sea level but I don't live at that altitude...
The engine was rebuilt on the second semester of the last year and right now it has less than 300 miles since rebuilt. But I've always suspected that the machine shop didn't made a good work with the heads because they returned them to me very quickly. Is there a way to check if the valves, valve springs or event the valve seats are worn without removing the heads?
Last edited by josehf34; 12-09-2014 at 04:19 PM.
12-09-2014, 04:10 PM
#26
Mopar Lover
Might be a bad lifter???? Could be a bent push rod? Over worn Rocker maybe? Broken Valve spring? Just a few things to check and a little work too take a peek.
IF it pulled 125PSI as a high... That's what it pulled.... the rest should be within +/- 10-20% as a rule of thumb... But to answer the question, Yes Altitude can make a difference.
Well That just sucks !!!!! So we really are not sure how well the internals are..
Just listing to it labor to run. Makes me think the Cam to Crank alignment is not set properly. This where I was going, but now I'm unsure about the whole Rebuild stability....
12-09-2014, 04:18 PM
#27
Mopar Fanatic
Thread Starter
Might be a bad lifter???? Could be a bent push rod? Over worn Rocker maybe? Broken Valve spring? Just a few things to check and a little work too take a peek.
IF it pulled 125PSI as a high... That's what it pulled.... the rest should be within +/- 10-20% as a rule of thumb... But to answer the question, Yes Altitude can make a difference.
Well That just sucks !!!!! So we really are not sure how well the internals are..
Just listing to it labor to run. Makes me think the Cam to Crank alignment is not set properly. This where I was going, but now I'm unsure about the whole Rebuild stability....
IF it pulled 125PSI as a high... That's what it pulled.... the rest should be within +/- 10-20% as a rule of thumb... But to answer the question, Yes Altitude can make a difference.
Well That just sucks !!!!! So we really are not sure how well the internals are..
Just listing to it labor to run. Makes me think the Cam to Crank alignment is not set properly. This where I was going, but now I'm unsure about the whole Rebuild stability....
Which checks can I do after pull the heads out and check the internals?
A video with the engine running without valve covers can be useful on this situation?
Now I'm nervous because it seems that my fears are becoming reality and maybe the engine will need to be pulled out the car
12-09-2014, 04:35 PM
#28
Mopar Lover
I did forget to mention, that yes you will have to remove the heads to check them or have them checked properly... Spring Tension, installed height, valve stems, valve margins, seat in the head, installed height, and so on. But if your going in that far you might as well look at the Rings and Bore and so on....
I just am leery of the basic foundation at this point. No scents in throwing good money into something that really need attention elsewhere... If you know what I mean.
I just am leery of the basic foundation at this point. No scents in throwing good money into something that really need attention elsewhere... If you know what I mean.
12-13-2014, 07:23 PM
#29
Mopar Fanatic
Thread Starter
I did forget to mention, that yes you will have to remove the heads to check them or have them checked properly... Spring Tension, installed height, valve stems, valve margins, seat in the head, installed height, and so on. But if your going in that far you might as well look at the Rings and Bore and so on....
I just am leery of the basic foundation at this point. No scents in throwing good money into something that really need attention elsewhere... If you know what I mean.
I just am leery of the basic foundation at this point. No scents in throwing good money into something that really need attention elsewhere... If you know what I mean.
Here's the video:
http://vid1067.photobucket.com/album...psxeutart8.mp4
Also I noticed that without the PCV valve the left head smokes and the right smokes too a bit, I don't know if that's normal, but I made a video too:
http://vid1067.photobucket.com/album...psn5mav1rm.mp4
Must I prepare everything to remove both heads, right?
Last edited by josehf34; 12-13-2014 at 07:27 PM.
12-13-2014, 08:25 PM
#30
Mopar Lover
Those are self adjusting rockers and shafts..... You just torq them to spec and thats that.... Not like chevy's... No 0 lash and then give it 1 turn... Not on this type....
The BlowBy might be because the rings are not seated yet.... Lack of mileage?
Just a thought....
Oiling looks good..On the top end....
Still would like to know why that #7 Cylinder has such low compression?
Must be rings or Valve Leaking..... Cam lift looks ok.....
The BlowBy might be because the rings are not seated yet.... Lack of mileage?
Just a thought....
Oiling looks good..On the top end....
Still would like to know why that #7 Cylinder has such low compression?
Must be rings or Valve Leaking..... Cam lift looks ok.....
Last edited by RacerHog; 12-13-2014 at 08:27 PM.


