
74 "E" 5.9 and twins


Thread Starter
Mopar Fan
Joined: Nov 2009
Posts: 29
Likes: 1
From: SoCal
74 "E" 5.9 and twins
Hello all,
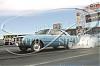
There is my car of choice. Had it for many years and current iteration is for it to be twin turbocharged.
Setup has been in process for more than a year and I expect several more for completion. So bear with my slowness.
It is being built almost entirely by me. It is a home project that will probably only see street miles. If it ever makes it to a track would be a bonus.
Car began life as basic 318 3spd on the floor with power nothing. I have added through the years P/S, P/B, 4 speed w/pistol grip, 360 4v, and the rallye dash.
Many of the items I will be listing are in various stages of completion.
Motor will eventually be converted to a later version 5.9 Magnum. I currently have a lower mileage one in the garage I am using for all the mock ups. Initial start up will be on the current motor.

The start

Then the battery relocation.

Lots of room now on this side...

Wiring is not pretty but functional. I will be Improving on it in the future when car is converted to EFI. most of the cars original wiring will be negated.
More to follow.
Danke,
Mike.
 opcorn:
Thread Starter
Mopar Fan
Joined: Nov 2009
Posts: 29
Likes: 1
From: SoCal
Thanks, BTW Monrovia wasn't my friend with the law way back when.
One thing to note with the premise of this build is that I will not be doing any major surgery on the car. Only a few mounting holes where needed. The most will be the addition of frame connectors.
Not sure If they will be the Hotchkis style or the ones that follow the floors contour and weld in along their length and also possibly some boxing plates.
I will try to update this as much as possible (have new job and long hours) to get listing items up to current.
Here are some of the header shots. 1/2" SS flanges were water jetted. 5/8 SS piping for the primaries and 2-1/2 for the collectors. They are currently around 80% completed. All are being TIG welded.


Please know that some of these pictures are out of specific progress order...
Also made the motor stand and bolted it onto an old conveyor base. The old "T" style stand was getting wobbly.
The intended throttle body just sitting there is from a Lincoln mod motor. Going to also make my own plenum for it to mount on. Intake is an M1 that has the 4150 style opening. Will temporarily plug the injector holes and initial start up will be carburetor.
Currently the car is back to stock. All the turbo additions are being added and tested as mock up and then removed to keep it drive-able.
Mike.

Mopar Lover
Joined: Jun 2013
Posts: 11,117
Likes: 957
From: Monrovia SO-CAL (USA)
WE had to go to Pasadena or Alhambra (Valley Blvd)....lol
So you are from the good old hey days.....lol...
So You knew the Blaire's, Rule's, Engine Magic, Pauls' Automotive, Gale Banks eng., Maloof's Performance, John's Speed Shop, Service Center, Cruised Van Nuys Blvd and so on?
Good Luck with the new Job...
So you are from the good old hey days.....lol...
So You knew the Blaire's, Rule's, Engine Magic, Pauls' Automotive, Gale Banks eng., Maloof's Performance, John's Speed Shop, Service Center, Cruised Van Nuys Blvd and so on?
Good Luck with the new Job...
Thread Starter
Mopar Fan
Joined: Nov 2009
Posts: 29
Likes: 1
From: SoCal
I know of Maloof's Performance, John's Speed Shop,Service Center.
Only a couple of times Cruised Van Nuys Blvd and so on?
mostly Pico Whittier Alhambra.
Thanks so far so good.
Intercoolers, yes dual. I am making all custom tanks. Same theme no hacking to make them and piping fit. Look at previous engine bay pics. You can partially see that the radiator is moved off the core support towards the engine. This becomes a pass thru. Pain in the a$$ but I got them in. Will post up later. Want to show the progress as it happened.
Mike
Only a couple of times Cruised Van Nuys Blvd and so on?
mostly Pico Whittier Alhambra.
WE had to go to Pasadena or Alhambra (Valley Blvd)....lol
So you are from the good old hey days.....lol...
So You knew the Blaire's, Rule's, Engine Magic, Pauls' Automotive, Gale Banks eng., Maloof's Performance, John's Speed Shop, Service Center, Cruised Van Nuys Blvd and so on?
Good Luck with the new Job...
So you are from the good old hey days.....lol...
So You knew the Blaire's, Rule's, Engine Magic, Pauls' Automotive, Gale Banks eng., Maloof's Performance, John's Speed Shop, Service Center, Cruised Van Nuys Blvd and so on?
Good Luck with the new Job...
Intercoolers, yes dual. I am making all custom tanks. Same theme no hacking to make them and piping fit. Look at previous engine bay pics. You can partially see that the radiator is moved off the core support towards the engine. This becomes a pass thru. Pain in the a$$ but I got them in. Will post up later. Want to show the progress as it happened.
Mike
Mopar Lover
Joined: Jun 2013
Posts: 11,117
Likes: 957
From: Monrovia SO-CAL (USA)
We got to bang heads with the (Scotty's) Guy's.. He had a lot of neat stuff at that car lot...
Then we would head over to That street Leo Hoffman Chevy was on and...Well You know.... LOL
Cough, Cough...(GET WITH IT)

Then we would head over to That street Leo Hoffman Chevy was on and...Well You know.... LOL
Cough, Cough...(GET WITH IT)
Thread Starter
Mopar Fan
Joined: Nov 2009
Posts: 29
Likes: 1
From: SoCal
Our favorite "quarter" ended up being behind the Nabisco plant in Buena Park. Long gone now. Building was demolished with explosives and was filmed for what I believe was a McGuivor episode.
Thread Starter
Mopar Fan
Joined: Nov 2009
Posts: 29
Likes: 1
From: SoCal
Next transition was to eliminate the vacuum brake booster. I converted it to hydroboost. The unit is from a late 90s model mustang. I went to several salvage yards and reviewed many different versions from heavy trucks of different makes, suburbans and even astro vans. All the booster units ended up being basically the same sizes and even brand. I ended up by chance seeing a Mustang with one. Even was basically the same as all the others but it was rotated 90deg. There is a pressure canister on them and with the rotation this canister is out of the way better giving me more clearance where the down pipe will go. Had 2 custom hoses made for the pressure side. 1 goes from the pump to the hydroboost and another one from it to the P/S gear box. the low pressure drain is just T's into the original hose that goes to the P/S pump return. New master cylinder uses a bubble type brake line connection. bought new lines with that fitting on them already. Bent them where they needed to go, cut them off and bent my own double inverted flare to tie into the original proportional valve. Bonus is that I also remembered to put the thread fittings on BEFORE they were flared. Not saying I have ever done that before... LOL.
Made a basic 5/8 thick aluminum plate for the fore/aft positioning. Three of the systems mounting holes aligned with the cars existing bolt holes. I ovaled the forth one on the unit so it would also match the car. I also had to cut and re-weld the units push shaft shorter and made a "C" shape bracket to attach to the brake pedal mechanism. There are actually 6 mounting holes in the firewall. My setup used the upper locations (for more exhaust pipe clearance) to which I had to use the "half" shaft setup from the original power unit setup. I believe if the unit was used in the lower mounting position same as with original non power brakes, it would work without having to cut the pusher shaft shorter and be even more simple of a transition.
Overall, setup either way was really much simpler than I expected.
Brake feel is very much the same. In short, I would do it again.
Enjoy the pics.


Original JY setup with old master cylinder for mock up. Put new cylinder on prior to start up.

Danke,
Mike.
Thread Starter
Mopar Fan
Joined: Nov 2009
Posts: 29
Likes: 1
From: SoCal
Thread Starter
Mopar Fan
Joined: Nov 2009
Posts: 29
Likes: 1
From: SoCal
Next installment:
Preparation for eventual EFI conversion. I will will be setting it up for sequential injection.
Crank trigger and using distributor for cam signal along with the Ls coils.
Started from a scrap piece of stock that I had wet ground flat at previous employer and went old school rotary table with it.


Making a round from a square

Many, many, many cranks later

Because I don't know where the sensor will end up mounting the 3 mounting slots will accommodate for a full 360 deg adjustment.
ID is only rough dropped out.

Only set into place for visual.


Cut and welded some tabs on the pully's back side.

Turned up to a diameter, flat and true.

Mounting holes


Setup and turned the ID to match pully.

Mounted


and mounted

Close but clears WP.

Mike.
Thread Starter
Mopar Fan
Joined: Nov 2009
Posts: 29
Likes: 1
From: SoCal
Along with the trigger wheel above, I also have made a bracket to relocate the P/S pump.
I had it relocated awhile ago but recently altered the setup so it will work on both the Magnum and the LA currently in the car. Relocation places it down low similar to the current setup.
Original setup used a hacked up factory plate and bolted to the engine for stability. Glad it is gone now...
New setup mounts using 2 W/P bolts and 2 T/C cover bolts.

Cardboard mockup


Rough layout

Some hacking

Bottom plate in picture is from first setup. It was modified but still used.

P/S pulley is a mock up piece. I bored out the mounting ID slightly so it could slip on and off during all the trial fitting.


Money shot.
The tensioner pulley mechanism was also rotated down slightly so it is closer to the motor.
Next I will make an idler pulley to temporarily omit the A/C pump.
Now the entire Magnum setup will bolt onto the LA360 So transformation can be done in stages.

Mike.
Thread Starter
Mopar Fan
Joined: Nov 2009
Posts: 29
Likes: 1
From: SoCal
Along the way (20+) years ago before you could just buy what you wanted, I started my own widening project. Then there it sat forever. Finished them recently just for spite. That and the fact I am tired of having them in my way.
I cut out the center hubs from 14" rallye rims. Removed the center hub from some 15" Oldsmobile ones and split the rings in half. Keeping as much as I could from each of the front and rear rings. They have the same hub mounting ID as the 14". I ended up with the rims being 8.5 inches wide. measured from the tire mounting/ sealing surface. Overall rim width is around 9". Most of the offset is to the inside so the stock beauty ring still looks correct.

Mounted a cr@p tire to confirm the weld is sealed. All that and only one pinhole leak that was easy to re-tig and seal off.
Inner hidden by tire are is left as welded but ID where hub is pressed in was ground smooth.

Made a clamp fixture to draw the hub into ring.


Used a hardened and flat ground ring to establish a measuring surface and establish the correct offset and also adjust so so it is running true.

Mounted 275/60/15


Bonus, more floor room...
A bit of a "bling" update.
Several years ago at previous employment I also 3D cad modeled up and cut some hood emblems to announce the cars transformation. Due to leaving the facility abruptly I was not able to get them "penciled" in entirely with small cutters for the fine detailing. But turns out they still look good. They were modeled to mimic the original lettering style.
In short, I machined 2 of them on a single plate and then cut and removed the rear of it to leave the mounting posts and reveal the lettering.
Enjoy the progress.


Danke,
Last edited by YellowThumper; Dec 10, 2013 at 08:22 PM.
Thread Starter
Mopar Fan
Joined: Nov 2009
Posts: 29
Likes: 1
From: SoCal
A lot if these items started awhile ago. Earlier this year I quit a shop I had worked at for 27 years. 7 month of not working allowed for the majority of the updates being shown. Working again so things are slowing down accordingly again. Motivation seed is still planted though. All these updates are from only the past couple of months.

Thread Starter
Mopar Fan
Joined: Nov 2009
Posts: 29
Likes: 1
From: SoCal
Family shop. Would have worked for the old man for the rest of my career but now the offspring are taking over. And of course there is always "the one" arrogant $ob.
They are up from around 10 employees when I started to around 150 now. Problem is there are also now 4 executive paychecks sucking it dry. Way too much put on the shoulders of who got them there without anything in return.
I ran the tool shop and was also the engineering project manager for all their offshore tooling projects. 12-15 hours a day on salary compensation based on 8 with no end in sight.
Leaving the company turned out to be easy. Leaving my customers and suppliers was the difficult part. Some of the Chinese suppliers I had used for over 15 years.
Now since you got me back typing how about another update to get this back on track:
Bought some intercoolers and promptly cut the tanks off.

Found a suitable work bench. lol

Cut up and bent up some 1/8 inch plate.


And started welding.


This view is showing the bottom opening. Obviously not completed.

View into their tops

Where visible, I am sanding down and smoothing out the weld.


Ok, the mounting of these are designed to fit through the core support radiator opening. They will fit in from the engine side. I have also left enough room for a Classic Air condenser to mount. As noted previously the radiator will be moved off the core support around 2 1/2 inches towards the motor. This allows room for the piping to pass.
This view shows the o-ring groove in the upper tank.
This mating flange will be connected to a pipe that will route over the radiator to the throttle body. 2 will merge into a single in the center.

Mounting brackets that actually bolt to car using existing holes.

They are all now probably 90% welded. So of course true to form with me I have moved onto another part of this project...
Mike.
Thread Starter
Mopar Fan
Joined: Nov 2009
Posts: 29
Likes: 1
From: SoCal
Working on fuel system. Slow going as expected now that I am working again.
Made a bracket using scrap pieces.
It mounts to the cross member above the differential. The box tube is a spacer. The mounting surface is small hole side and large hole side is for access.


Bent strap is the horizontal bar pump and filter mounts on. It will hang down in between the gas tank and differential. Bend provides clearance for pumpkin.


Going to mount like this

Using some straps and dense foam as an insulator to hopfully keep the noise down.

In true hot rod style, I bought a new sending unit and promptly started cutting it up.
Had to remove its wire contact and relocate it to make for room for the bulkhead.


Looks like a cluster fu~~ with all the fittings required to get to the pipe end but should work. I also removed the "sock" because I am using a pre-filter.


Shot from rear on left (drivers) side. Wanted to use all black fittings but supplier was out at the time. Completing the purchases trumped sticking with all black.

Pass side

Straight up from ground

What is visible looking from behind without crawling under.

Eventually it will be trimmed and cleaned up better and painted. Just aiming for functional now.
All flex lines are SS braided and Teflon lined ID so they should last and not permeate the fuel smell throughout my garage.
Ran some 14 and 16 gauge wire for the relays.

 .
.
Mike.
Made a bracket using scrap pieces.
It mounts to the cross member above the differential. The box tube is a spacer. The mounting surface is small hole side and large hole side is for access.


Bent strap is the horizontal bar pump and filter mounts on. It will hang down in between the gas tank and differential. Bend provides clearance for pumpkin.


Going to mount like this

Using some straps and dense foam as an insulator to hopfully keep the noise down.

In true hot rod style, I bought a new sending unit and promptly started cutting it up.
Had to remove its wire contact and relocate it to make for room for the bulkhead.


Looks like a cluster fu~~ with all the fittings required to get to the pipe end but should work. I also removed the "sock" because I am using a pre-filter.


Shot from rear on left (drivers) side. Wanted to use all black fittings but supplier was out at the time. Completing the purchases trumped sticking with all black.

Pass side

Straight up from ground

What is visible looking from behind without crawling under.

Eventually it will be trimmed and cleaned up better and painted. Just aiming for functional now.
All flex lines are SS braided and Teflon lined ID so they should last and not permeate the fuel smell throughout my garage.
Ran some 14 and 16 gauge wire for the relays.

 .
.Mike.
Thread Starter
Mopar Fan
Joined: Nov 2009
Posts: 29
Likes: 1
From: SoCal
I purchased a coil of 3/8 SS tube and bent up my own setup that mostly follows the original 5/16. Initially the 5/16 will be my feed line and the 3/8 is the return. I want a less restrictive return so there are no issues with unwanted pressure build while I am using the carburetor. I have an Aeromotive bypass regulator that comes with 2 different springs. One for lower (carb) pressure and one for higher (FI) pressures when I convert. After converting to FI (and turning up the wick  ) will then swap the lines so the 3/8 becomes the feed line.
Coil start

now bent
 .
.
As with most items, nothing goes as expected...
My tube benders were not up to snuff for the SS and purchase of the quality bender required would have cost more than just plumbing another full line of flex. So...
Dug in the scrap pile again and made my own bender. It worked ok. I couldn't make a full 90 deg with it without "walking" it around a bit. It came out only ok, but there are no kinks.


Next on the bucket list is to button up the new fuel line connections and drill out new mounting holes in my Magnum M1 intake so it will bolt up to the old 360 in the car. I will then convert the front accessories to Magnum. Start up will initially be carburetor to make sure all changeovers function properly. Same time as manifold and front swap I will attempt to remove oil pan and add the turbo oil return bungs.
I am being very conscious of the remaining months leading up to this summer and not overstepping what steps can be completed. I WILL be driving it then and attending a few local shows.
Mike.
) will then swap the lines so the 3/8 becomes the feed line.Coil start

now bent
 .
.As with most items, nothing goes as expected...
My tube benders were not up to snuff for the SS and purchase of the quality bender required would have cost more than just plumbing another full line of flex. So...
Dug in the scrap pile again and made my own bender. It worked ok. I couldn't make a full 90 deg with it without "walking" it around a bit. It came out only ok, but there are no kinks.


Next on the bucket list is to button up the new fuel line connections and drill out new mounting holes in my Magnum M1 intake so it will bolt up to the old 360 in the car. I will then convert the front accessories to Magnum. Start up will initially be carburetor to make sure all changeovers function properly. Same time as manifold and front swap I will attempt to remove oil pan and add the turbo oil return bungs.
I am being very conscious of the remaining months leading up to this summer and not overstepping what steps can be completed. I WILL be driving it then and attending a few local shows.
Mike.

Thread
Thread Starter
Forum
Replies
Last Post
70DartMike
Part(s) Wanted
0
Nov 17, 2012 02:58 PM
mystarcollectorcar.com
Off Topic
15
Apr 16, 2010 03:42 AM


