When you click on links to various merchants on this site and make a purchase, this can result in this site earning a commission. Affiliate programs and affiliations include, but are not limited to, the eBay Partner Network.
The frame part that you cut.... Just run the mig welder over it and grind off any high spot that might interfere with setting in the new panel, and " Let-R-Rip Tater Chip".It will be just fine...
Those corner spots to me are the hardest to deal with in my opinion....
But your doing a fine job.... At least I think....
Do any of you guys know if the floor piece that sits to the side of where the seat mounts is available? Talking about the section that is between the door and where the seat riser piece begins. Circled black area here:
The green section above has several holes where it will need to be replaced. If I can find something that shape it will make life a lot easier than trying to bend a piece with the various angles and such to go along the seat. I can find them for the crew cab all day long, such as this one - https://www.summitracing.com/parts/g...BoCAlsQAvD_BwE
But, that definitely does not fit the regular cab. I know this, because I bought one and after a long time head scratching trying to figure out how it fits, I looked a little closer at the description and noticed it said crew cab.
LMC only had the crew cab section (that's the one I incorrectly ordered) took a good bit of searching but finally found it at the link above. The price was a little hard to take ($98 + $57 shipping) especially when the main front pans, crew cab side piece are around the $45 mark, but it was either pay for this one or try to fabricate the piece. Hopefully, it is good quality and will fit nicely.
Made some progress yesterday, but a little slower than hoped. First step, made the hole even bigger:
Started test fitting the front pan, which unsurprisingly was a terrible fitment. Ended up having to cut about 2" out of the middle of it to get it to fit at all.
In addition to that, we had to beat the heck out of the side of the pan that goes up against the transmission tunnel. If you look at the picture below you can see the tunnel has a curve to it, the floor pan did not. So the back piece of it would butt up against the tunnel and the front was nowhere near, a lot of hammering later and we got it to fit nicely.
Welded up that cross beam that some idiot cut into, then welded in the larger of the pieces. We were going to weld in the outer section but I had sprayed that Easton corrosion inhibitor all into the rocker and after reading "Extremely flammable" and it being after 5pm decided to call it a day.
The other piece that caused a slow down, was this:
Trying to remove the seat belt to get some more room to work and also repair a couple tiny holes back there (I also still want to install new belts, so figured removing it now while the seats are out makes sense), the bolt was not cooperating. I think at one point it was a 3/4" bolt (the green lines) however the red lines for example are more of a 5/8 or 11/16 size. Added to that the bolt head is real shallow and already pretty mangled up. Tried by hand a few times, open end wrench does not want to stay on there, socket slips off, added liquid wrench, air tools, nope, still not budging. Left that for another day.
Thanks, it's getting there. Albeit slowly!! I am not sure the next day I have free that I can work on it and he is only available on week days. At least I can, sort of, see the finish line... the front part is cut and ready to be welded into place, the piece extending towards the rear is mostly prepped. Once the 2 pieces are welded into place, I should at that point be able to reinstall the seat and get the truck back to my place where I can use seam sealer / POR 15 to get everything finished up.
Had an annoying update yesterday, my friend calls me and says the truck will only run when is turning the key, as soon as he lets go of the key, it cuts out. I am hoping it is just something silly like a loose connection on the HEI upgrade module, but it's frustrating because I don't like him being unable to move the truck at his house if he needs to do so and I unfortunately have no idea when I will be able to get out there and look at it. Going to check the connections on the HEI module, then maybe a jumper from battery to the coil. Fingers crossed not a huge problem, but I feel pretty bad that it is stuck at his place.
Had the truck just over a year now, while truthfully I have not been able to drive it as much as I would like, it is also a good bit more reliable and improved than the day I bought it!
Check or replace the ballast resistor. The ballast will do just that when bad. Fire right up but shut down when ignition goes to run. If that doesn't do it, I had the ignition module do the same thing on some vehicles.
Check or replace the ballast resistor. The ballast will do just that when bad. Fire right up but shut down when ignition goes to run. If that doesn't do it, I had the ignition module do the same thing on some vehicles.
No ballast resistor on the truck anymore, I bypassed it when installing the HEI module. When I can get out there, I plan to check all the connections on the HEI upgrade, maybe one worked it's way loose, going to also try jumping a wire from the battery to the coil and see if it stays running. Really hoping it is something simple though, it was running so nicely!!
It sounds like the module/coil is losing power when the ignition switch is in the Run position. When you install hei or another aftermarket ignition system on a mopar the "Ignition Run" wire and "Ignition cranking" wire must be joined together. The stock system uses a separate wire/circuit to temporary bypass the ballast resistor during cranking for a hotter spark. However, HEI expects full voltage while both cranking and running.
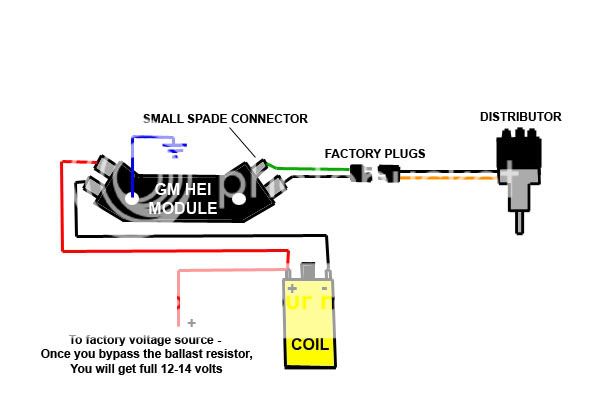
That's what I plan to check first...trying to remember off hand how everything is wired. The only wires I remember joining together were each end of the ballast resistor and nothing else, essentially I used this wiring diagram:
Assuming (and hoping) it is that, once I get it running, the floors complete, and the truck back home, I'll pull out the soldering iron and dump any crimped connectors for soldered ones. While I did use heat shrink and a good crimp, in the engine bay with all the vibration, a solid connection will be better IMO.
I am hoping the rain eases off that I can go take a quick look at this later today, I have a few supplies that I think cover everything I need, just trying to get a plan in my head. Thinking this as a sort of plan:
1. Manually verify connections on the HEI module, coil etc.
2. With the key in the run position, verify 12v where it originally connected to the ballast resistor
3. Verify 12v to coil
4. Verify 12v to HEI
Hopefully at that point I will have discovered the issue, failing that I can try a jumper from battery to coil and see if it runs.
This reminds me that I need to put a cut off switch on the fuel pump, the electric pump runs constantly with the key on, so the entire time I am checking all of this, the pump will be pumping gas up to the carb, which likely will flood the carb.
Last edited by Abcdefghii; 09-18-2024 at 10:07 AM.
Well, thankfully this was an simple fix and appears to just have been a loose connection. Got there, popped the hood, cursed at all the rain water then dumping right over all the connections I was about to look at, checked at the HEI module, nothing loose there, then checked at where I jumped the ballast resistor, had to unwrap the tape covering this connection, wiggled the wire there and decided to try starting it.
Fired right up. Let it run a few minutes, shut if off and restarted another 3 times. Wrapped the connection back up in tape and started it again. Happy with that, especially as it was raining. Here is the offending part:
So the black connectors were either side of the ballast resistor, with the HEI module, you make that little pig tail and just put that there, the wire with the green line is for the headlight relay. I am tempted to cut those 2 black connectors off and solder the connection, but just need to then determine a good spot for the headlight relay wire.
One other thing I noticed, water getting in up here:
That's up behind the high beam foot switch, I think there is a seam there that when I opened the hood and all the water dumped down it ended up in there. Now, in normal driving, with the hood closed, it's unlikely to get water coming in there, but going to see if I can seal it up anyway because it would suck to have water come in there.
Make sure your hei swap is utilizing an older genuine GM module. I ran that hei setup on one of my trucks for a time but, it was build from auto part store components. Modules would usually last about a year for me. I was able to get about two years when I had the module drive the stock coil. Ultimately I ended up switching back to the stock ignition box and haven't had any issues since.
Regardless of which you choose, make sure you have back up ignition parts onboard for peace of mind.

 08-21-2024, 06:40 AM